

To set up a VPN on your iPhone, you can either download a VPN app or manually add a VPN configuration in your settings.
The app method is usually easier and more reliable, but manual setup can give advanced users greater control.
If you’re worried about all the technical stuff, don’t be — we’ve got you covered. In this guide, we’ll explain how to install a VPN app on iOS and how to manually configure secure protocols.
Why use a VPN on an iPhone?
Your iPhone puts the world at your fingertips, as you can use it for streaming, shopping, banking, or just checking emails.
But just because iOS devices are trusted doesn’t mean you’re fully protected online. In fact, your sensitive data could still be exposed in many everyday situations.
Using a VPN on your iPhone is essential because it helps you with the following:
Protect your data on public Wi-Fi
Hotel, airport, and coffee shop Wi-Fi networks can be easy targets for cybercriminals. Hackers can set up fake networks in evil twin attacks or exploit weak security on your device to steal sensitive information, such as login credentials or credit card numbers.
Shield your online activity from snoops
Your ISP (Internet Service Provider) and advertisers can see what you do online. And while incognito mode might give you some privacy, it’s not enough to fully protect you — private browsing can still be tracked.
A VPN on your iPhone keeps your browsing private, making it harder for others to track your searches, shopping, or streaming habits.
Keep you safer from online threats
Cybercriminals can use unsecured networks to access data from your mobile devices. With a VPN encrypting your connection, it’s much harder for bad actors to intercept your details.
Access content securely when traveling
When you’re abroad, a VPN lets you change your virtual location to connect to your favorite news, websites, and streaming services from back home — with all your internet data protected.
Disclaimer: Please note that using Surfshark services for any illegal activities is strictly forbidden and violates our Terms of Service. Make sure that any use of Surfshark services for your particular activities conforms to all relevant laws and regulations, including those of any service providers and websites you access using Surfshark.
How do you choose a VPN provider?
With many options available, picking the best VPN for your iPhone can feel overwhelming. Here are some key factors to keep in mind when choosing a VPN provider:
- Privacy and security: ensure your VPN app offers strong AES-256 encryption and doesn’t store any data about your online activity;
- Speed and performance: a high-quality VPN offers a broad network of servers in various locations and uses advanced VPN protocols to deliver faster, more reliable connections;
- Simultaneous connections: some VPN providers limit how many devices you can connect at once, while others offer unlimited simultaneous connections with a single subscription;
- Multidevice compatibility: choose a VPN that works well on all major platforms, including iOS, Android, macOS, Windows, and Linux. Some VPNs also offer browser extensions and apps dedicated to smart TVs;
- Ease of use: the best VPNs offer easy-to-navigate apps with a one-tap connect feature, user-friendly interfaces, and transparent settings;
- Extra cybersecurity features: find a VPN with bonus privacy features like ad blockers, malware protection, split tunneling, and double VPN connections;
- Customer support: make sure your VPN provider has dedicated customer support, whether it’s live chat, email, or a detailed help center. You have a better chance of getting 24/7 support with a subscription-based VPN;
- Reputation and transparency: check your VPN provider’s independent security audits and no-logs policies to be confident in their privacy and security claims. Choosing a trusted provider with a solid reputation is always a good idea.
Installing a VPN app on your iPhone or iPad
Setting up a VPN on your iPhone or iPad is incredibly easy. The fastest way to get started is by downloading a VPN app directly to your device. Here’s a quick walkthrough:
- Head to the App Store on your iPhone or iPad and search for the VPN of your choice. For security reasons, make sure to select the official app. If you choose Surfshark, you can go directly to our iOS VPN download page instead.
- Once you find the app, tap the download button. The VPN will install on your iOS device just like any other app.
- If you’re new to the VPN service, you’ll need to sign up. This usually involves entering your email and setting a password. If you already have an account, just log in.
- After signing in, the app may ask for permission to set up VPN configurations on your device. Don’t worry — this is normal and necessary for the VPN to work.
- After everything is set up, you can choose a VPN server and tap Connect. In just a few seconds, you’ll be browsing securely!
Personalizing your VPN experience
If you’ve installed Surfshark VPN on your iPhone, there are a few ways to personalize your experience and ensure you get the most out of it. Surfshark offers a variety of features to enhance your security and maximize privacy:
- Auto connect: want to make sure you’re always protected? Turning on the auto connect feature automatically establishes a connection to the VPN whenever you join a network. That way, you never have to worry about connecting manually.
- Choose your protocol: Surfshark lets you pick which VPN protocol to use (like WireGuard, IKEv2, or OpenVPN). Each has its benefits, so you can choose based on your priorities — whether it’s speed, security, or compatibility.
- Multi Hop: for an added layer of privacy, Surfshark’s Multi Hop double VPN feature routes your traffic through two different VPN servers in separate countries. This makes it even harder for anyone to trace your activity.
- Clean Web: no one likes ads — which is why Clean Web blocks them. It also helps you avoid trackers and malware when you browse the web.
- Bypasser: sometimes, you may not want certain apps to go through the VPN (for example, banking apps) but still keep everything else protected. With the Bypasser split tunneling feature, Surfshark lets you hand-pick these apps and websites.
- Kill switch: this is a must-have if you’re serious about staying secure. If your VPN connection drops for any reason, the kill switch will automatically block your internet connection until the VPN reconnects, keeping your data safe at all times.
Learning how to use a VPN effectively can help you get the most from these features, whether you’re focused on privacy, speed, or ease of use.
VPN protocols explained
The VPN connection on your iPhone is managed by a specific protocol, or a set of rules that determines how your data gets encrypted and transmitted. Most VPN apps choose a protocol automatically, but knowing the main types of VPN protocols can be helpful during manual setup.
While iOS supports multiple protocols, here are the most common:
- IKEv2/IPsec: IKEv2 (Internet Key Exchange version 2) encrypts via IPsec (Internet Protocol Security) and is a good choice for mobile devices;
- WireGuard: a modern, streamlined protocol designed for speed, security, and simplicity. WireGuard offers quick reconnects, especially when roaming on mobile networks;
- OpenVPN: a well-established protocol recognized for its reliability and flexibility, especially on mobile devices. OpenVPN supports two modes — UDP and TCP.
How to manually configure VPN protocols on an iPhone
While using a VPN app is the easier, more secure, and more reliable way to get up and running, manual VPN configuration might have its benefits. It can provide advanced users with more control, enhanced compatibility with a custom VPN server, and even improved battery life.
Here’s how to manually set up IKEv2, WireGuard, and OpenVPN protocols on your iPhone:
Note: Remember, iPad VPN settings are identical to iPhone VPN settings.
How to set up IKEv2 on iOS
iPhones and iPads have built-in IKEv2 configurations, meaning you won’t need third-party apps to set up IKEv2. What you will need, though, is an IKEv2 certificate and connection credentials. You can get them from your VPN provider’s website after you get a subscription plan.
To manually set up a VPN on your iPhone or iPad with an IKEv2 connection, follow these steps:
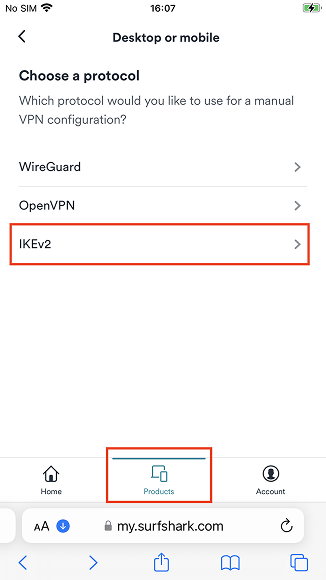
1. Download the IKEv2 certificate to your device and follow your VPN provider’s guide. For Surfshark, log in to your profile on our website, and then select Products > VPN > Manual Setup > Desktop or mobile > IKEv2 to generate your credentials.
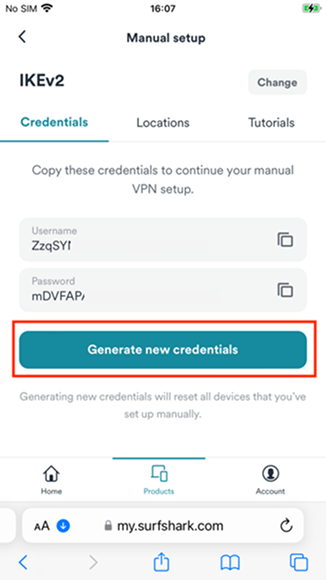
2. Find your manual connection credentials in the Credentials tab and select Generate new credentials (you’ll need these for later).
Note: These login details are different from those used for your account.
3. Go to the Locations tab to find all available hostnames. Tap on the location of your choice to see the server address.
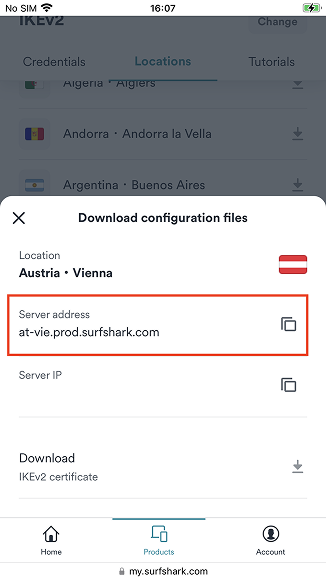
4. Scroll to the bottom of the Locations tab. Tap on the IKEv2 certificate to start your download.

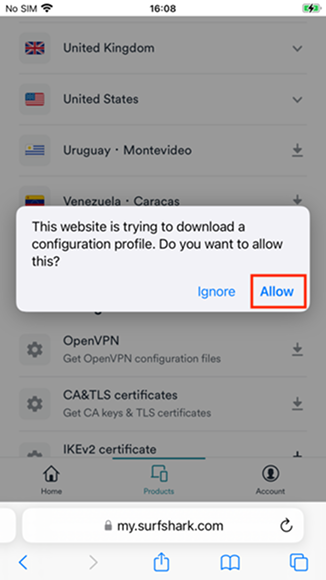
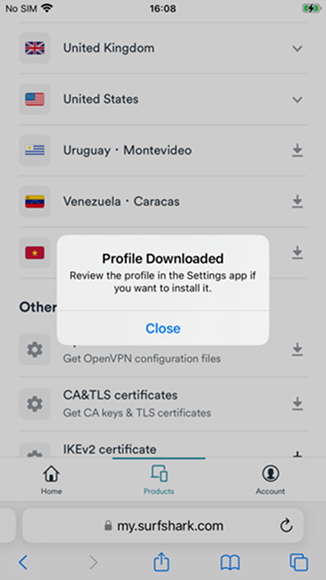
5. When you press the download icon, you may get a pop-up. Select Allow.
6. When the download finishes, you’ll get a Profile Downloaded notification. Select Close.
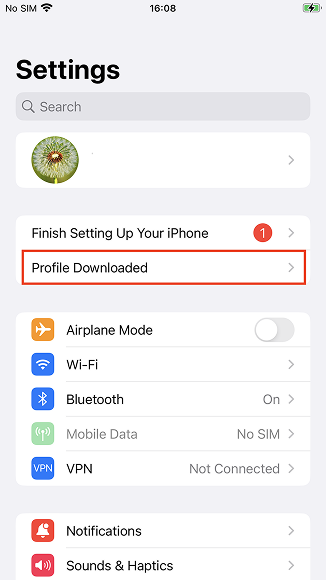
7. Open the Settings app and tap on the Profile Downloaded tab.
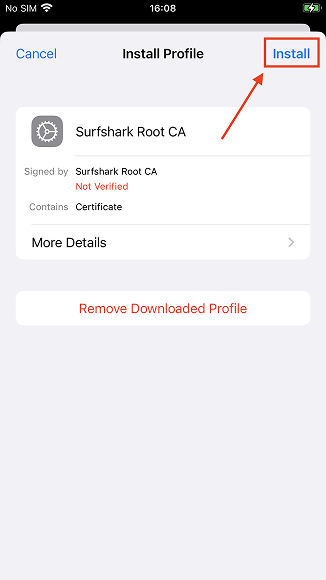
8. Tap Install after opening the profile.
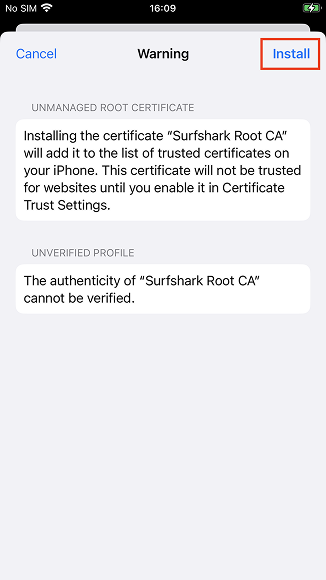
9. Tap Install again to confirm installation.
10. Tap Done once installation is complete to move on to the next step.

11. Go back to the Settings app, go to General, and tap on the VPN & Device Management tab.
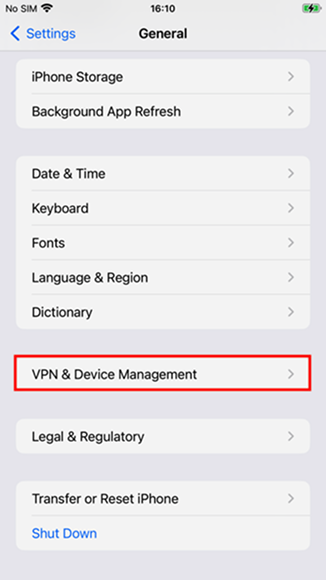
12. Select Add VPN Configuration…
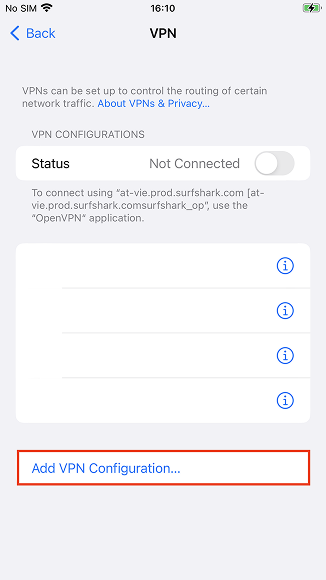
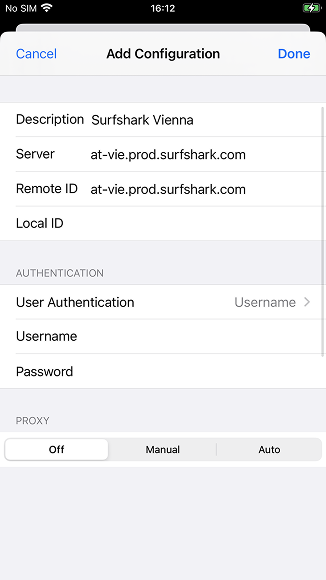
13. Fill in all the required fields:
Type: IKEv2;
Description: your preferred name of the connection;
Server: the hostname of the server, as mentioned in step 3;
Remote ID: copy the hostname you put in the Server line;
Local ID: leave this one empty;
User Authentication: the username you use to log into your VPN service;
Username and Password: your Surfshark service credentials;
Proxy: switch off.
Press Done after entering all the details.
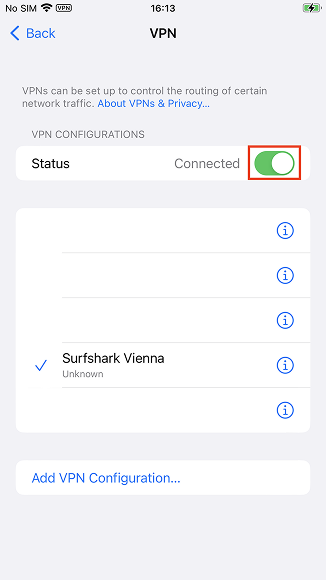
14. You’ll not find the configured VPN profile in the VPN tab under Settings > General. Move the slider to connect or disconnect from the VPN.
How to set up WireGuard on iOS
To manually set up WireGuard, you will need the WireGuard app and a VPN service subscription. Once that’s done, you’ll need to generate a key pair — here’s how to do it with Surfshark:
- Open Safari, type in surfshark.com, and log in. Then select the VPN tab, enter Manual setup, then choose Desktop or Mobile, and WireGuard.
- Select I don’t have a key pair followed by Generate a new key pair.
- After the key pair has been generated, save it and select Choose a Location.
- Select and download configuration files for the chosen location (tap on the arrow to the right of the server name).
If you already have a key pair:
- Go to surfshark.com, log in, and select the VPN tab. Select Manual setup, tap Desktop or Mobile, and choose WireGuard.
- Tap I have a key pair and enter a custom name for it.
- Enter your public key and hit Save.
- Select Choose a Location and pick a server of your choosing.
With your key pair ready, connect to the VPN:
- Open the WireGuard app and select Add a tunnel.
- Find the configuration file you downloaded earlier and import it.
- You’ll see a pop-up saying WireGuard would like to add VPN configurations. Tap Allow.
- To connect to (or disconnect from) the VPN, toggle the button next to the location.
How to set up OpenVPN on iOS
Since the OpenVPN connection isn’t built into Apple mobile devices, you’ll need to download a third-party app from the App Store.
To manually set up a Surfshark OpenVPN connection on your iOS device, follow these steps:
- Log in to Surfshark, go to the VPN tab, select Manual setup, then choose Desktop or Mobile, and OpenVPN.
- At the bottom of the page, you’ll see your service credentials.
Note: These login details are different from those used for your account.
- On your iPhone, open the App Store, search for the OpenVPN Connect app, and download it.
- After you install the app, download one or several OpenVPN configuration files from the manual connection page. Choose Recommended server for the best performance and speed.
- Download the file by selecting the gray arrow icon.

- Unzip the downloaded configuration files.
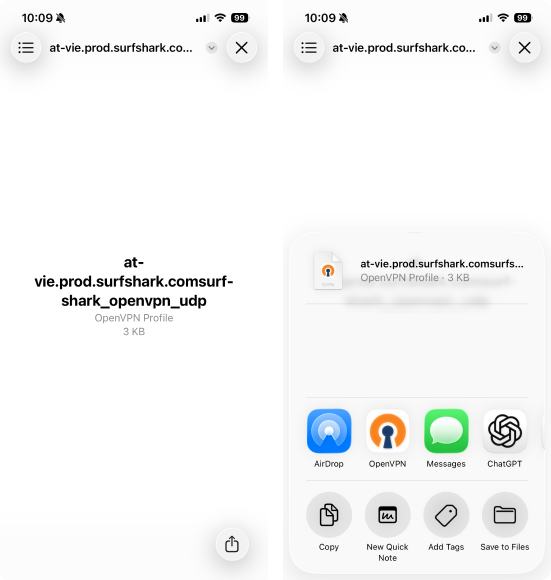
- Open the OpenVPN Connect app.
- Tap OVPN Profile.

- Tap Add to import the .ovpn file.
- Enter the service credentials mentioned in Step 2 and hit Connect.
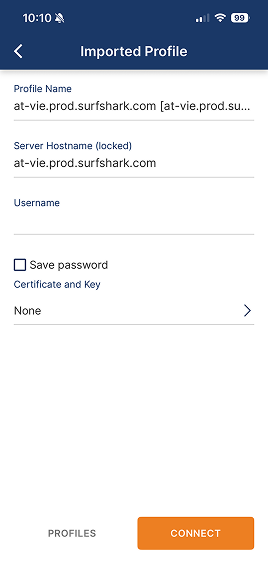
- Once you’ve added the profile, toggle the connection switch on.

Key takeaway: choose a simple, secure VPN app
By now, you’ve seen how easy it is to set up a VPN on your iPhone or iPad. Manual configuration may be worth it for more control, but a VPN app is your best bet for greater simplicity and security.
Choose a VPN provider like Surfshark to level up your online protection with no extra steps required.

FAQ
Should I turn on the VPN on my iPhone?
Yes, turning on a VPN is a great way to help protect your privacy, especially when using public Wi-Fi or if you want to keep your browsing activity private. It encrypts your connection, making it much harder for anyone to intercept your data.
Does the iPhone have a built-in VPN?
No, iPhones do not come with a built-in VPN service. However, iOS does support manual VPN configurations, and you can easily use third-party VPN apps like Surfshark for quick setup and reliable protection.
Is a VPN free on iPhones?
While some free VPN options are available on the App Store, they often have limitations like slower speeds or data caps. Paid VPN services, like Surfshark, provide better performance, top-notch security, and unlimited data caps.
When should I use a VPN on my phone?
You should use a VPN whenever you’re connected to public Wi-Fi or want to secure your online activities, such as browsing, banking, or streaming. A VPN on your phone is also useful for securely accessing content from home when traveling abroad.
Disclaimer: Please note that using Surfshark services for any illegal activities is strictly forbidden and violates our Terms of Service. Make sure that any use of Surfshark services for your particular activities conforms to all relevant laws and regulations, including those of any service providers and websites you access using Surfshark.
Can I set up a VPN myself?
Yes, you can manually configure a VPN on your iPhone through the device settings by choosing a protocol like WireGuard or IKEv2, or you can use a VPN app for a quicker and easier setup. Both options give you strong privacy protection.
How do I know if my phone is connected to a VPN?
When your iPhone is connected to a VPN, you’ll see a small “VPN” icon in the top right corner of your screen.
How do I know if my iPhone has a VPN?
To check if your iPhone has a VPN configured, go to Settings, followed by General and VPN & Device Management. If a VPN is set up, it will be listed there. You can manage your connection from that menu.


