A pfSense VPN lets you protect every device on your home network with a single setup. Instead of installing VPN apps on each laptop, phone, and smart TV, you configure a single VPN connection on your pfSense router, automatically securing everything connected to it.
This pfSense VPN setup guide covers all your steps from start to finish using Surfshark as an example.
pfSense VPN basics: supported VPN protocols
pfSense software supports several VPN protocols out of the box. Before configuring, it helps to understand your options and which one best fits your situation.
pfSense supports the following protocols:
OpenVPN
OpenVPN is the most stable and widely supported option. Nearly every leading VPN service provides OpenVPN configuration files, and it works across all pfSense versions. If you’re setting up a pfSense VPN client for the first time, OpenVPN is the safest bet.
WireGuard
WireGuard is a newer, faster protocol that’s lighter on your hardware. However, it requires pfSense 2.5 or higher. If your pfSense box can run it, WireGuard generally delivers better speeds than OpenVPN.
IPSec
While compatible with pfSense, IPSec is primarily designed for site-to-site VPN connections between two networks, like linking your home office to a company network. In addition, many top VPN services don’t support IPSec. In general, it’s not the right choice for routing personal internet traffic through a VPN provider.
For most users seeking remote access to a VPN service, OpenVPN or WireGuard is the preferred choice.
What you need before setting up
Before setting up a VPN on your pfSense router, make sure you already have the following:
pfSense admin access
To get administrator access to your pfSense dashboard, open a browser on any device connected to your home network. Next, type 192.168.1.1 (the default LAN IP address) into the address bar and log in with your admin username and password. The default credentials are:
Username: admin
Password: pfsense
If you haven’t changed these defaults, you can do so under System > General Setup. Leaving factory credentials unchanged on your firewall can be a major network security risk.
Surfshark VPN credentials
Once you have an active Surfshark VPN subscription, you’ll need your manual setup credentials. Note that these aren’t the same as your regular account login. Here’s how to find them:
- Log in to the Surfshark web app at www.surfshark.com.
- Navigate to VPN > Manual setup and choose your protocol (either OpenVPN or WireGuard).
- Download the configuration files and copy your username and password. Keep them somewhere easily accessible.
Updated firmware and internet access
Confirm your router is running the latest firmware. An outdated version may be missing protocol support or critical security patches. As of 2026, pfSense 2.8.1 is recommended, especially if you’re relying on support for the WireGuard protocol.
Moreover, make sure your WAN interface has a stable internet connection. A spotty connection will make each troubleshooting step harder than it needs to be.
How to configure a VPN on pfSense (OpenVPN method)
Follow these steps to set up a working OpenVPN tunnel that routes all your network traffic through Surfshark’s encrypted servers.
1. Choose a Surfshark OpenVPN server
In the Surfshark web app, go to VPN > Manual setup > Router > OpenVPN.
Then, select the Locations tab and choose an OpenVPN server you want to connect to. Click the download icon next to the server name and select Download UDP.
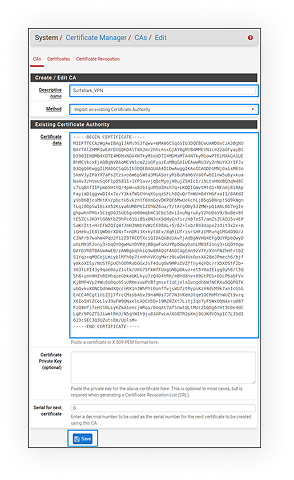
2. Import your CA (Certificate Authority) file
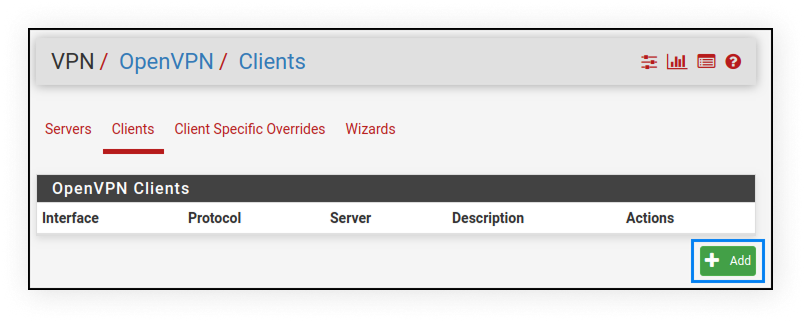
Before you add the VPN client, pfSense needs the CA from your Surfshark configuration file. To import it, go to System > Certificate Manager > CAs. Select Add and then Save at the bottom of the page.
Next, go to VPN > OpenVPN > Clients and select Add.
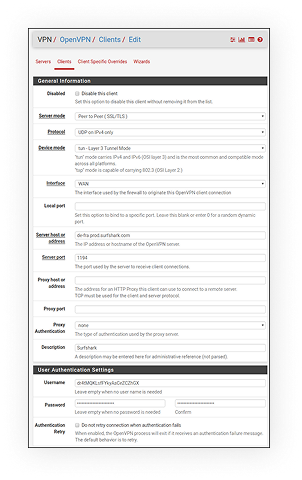
3. Configure VPN client settings
Create the OpenVPN client that connects to Surfshark by filling in the following fields:
General Information
Disable this client: leave unchecked
Server mode: Peer to Peer (SSL/TLS)
Protocol: UDP on IPV4 only (you can also use TCP)
Device mode: tun – Layer 3 Tunnel Mode
Interface: WAN
Local port: leave blank
Server host or address: the hostname of the OpenVPN server you want to connect to
Server port: 1194 (or 1443 if using TCP)
Proxy host or address: leave blank
Proxy port: leave blank
Proxy Authentication: none
Description: leave blank or add any information you find helpful
User Authentication Settings
Username and Password: the login details for Surfshark VPN that you created earlier
Authentication Retry: leave unmarked
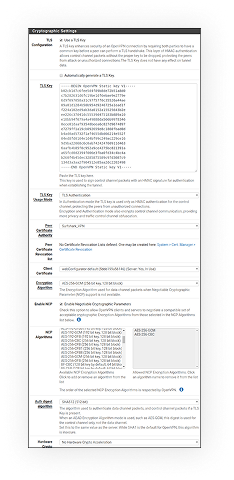
Cryptographic Settings
TLS Configuration: check Use a TLS Key, and leave Automatically generate a TLS Key unchecked (since you’re importing an existing key)
TLS Key:
—–BEGIN OpenVPN Static key V1—–
b02cb1d7c6fee5d4f89b8de72b51a8d0
c7b282631d6fc19be1df6ebae9e2779e
6d9f097058a31c97f57f0c35526a44ae
09a01d1284b50b954d9246725a1ead1f
f224a102ed9ab3da0152a15525643b2e
ee226c37041dc55539d475183b889a10
e18bb94f079a4a49888da566b9978346
0ece01daaf93548beea6c827d9674897
e7279ff1a19cb092659e8c1860fbad0d
b4ad0ad5732f1af4655dbd66214e552f
04ed8fd0104e1d4bf99c249ac229ce16
9d9ba22068c6c0ab742424760911d463
6aafb4b85f0c952a9ce4275bc821391a
a65fcd0d2394f006e3fba0fd34c4bc4a
b260f4b45dec3285875589c97d3087c9
134d3a3aa2f904512e85aa2dc2202498
—–END OpenVPN Static key V1—–
TLS Key Usage Mode: TLS Authentication
Peer Certificate Authority: Surfshark_VPN
Peer Certificate Revocation list: leave undefined
Client Certificate: webConfigurator default (59f92214095d8) (Server: Yes, In Use). Note that the specific numbers may be different
Encryption Algorithm: AES-256-GCM
Enable NCP: check this field
NCP Algorithms: AES-256-GCM and AES-256-CBC
Auth digest algorithm: SHA512 (512-bit)
Hardware Crypto: No hardware crypto acceleration
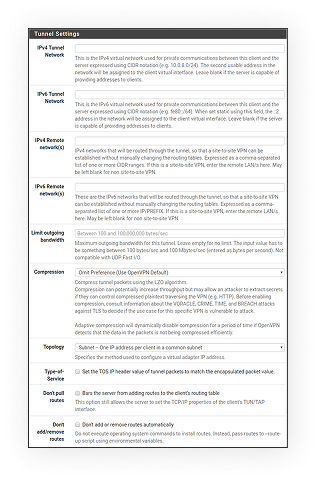
Tunnel Settings
IPv4 tunnel network: leave blank
IPv6 tunnel network: leave blank
IPv4 remote network(s): leave blank
IPv6 remote network(s): leave blank
Limit outgoing bandwidth: leave blank
Compression: Omit Preference (Use OpenVPN Default)
Topology: Subnet – One IP address per client in a common subnet
Type-of-service: leave unchecked
Don’t pull rates: leave unchecked
Don’t add/remove routes: leave unchecked
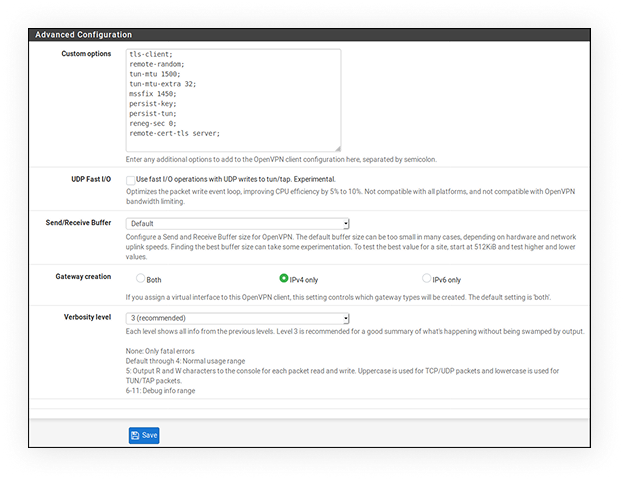
Advanced Configuration
Custom options:
tls-client;
remote-random;
tun-mtu 1500;
tun-mtu-extra 32;
mssfix 1450;
persist key;
persist-tun;
reneg-sec 0;
remote-cert-tls server;
UDP FAST I/O: leave unchecked
Send/Receive Buffer: Default
Gateway creation: IPv4 only
Verbosity level: 3 (recommended)
Select Save at the bottom of the page and then Apply changes at the top.
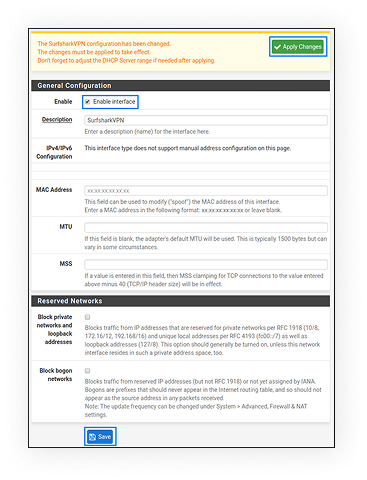
4. Add Surfshark VPN interface
Go to Interfaces > Interface Assignments and add the Surfshark VPN interface.
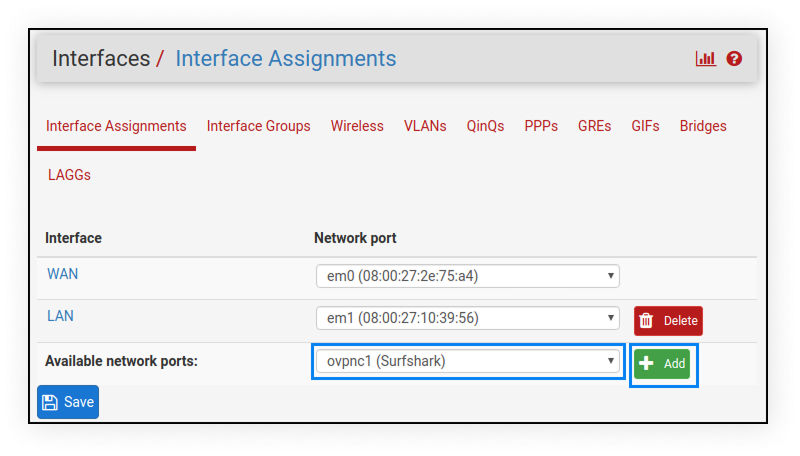
Select OPT1 on the left side of your assigned interface and enter the following information:
Enable: check this field
Description: Surfshark VPN
MAC Address: leave blank
MTU: leave blank
MSS: leave blank
Don’t change anything else. Scroll down and click Save and Apply Changes.
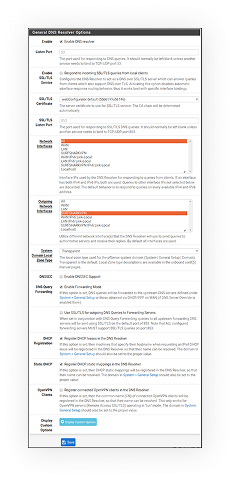
Next, go to Services > DNS Resolver > General Settings and fill in the following:
Enable: check this field
Listen port: leave unchanged
Enable SSL/TLS Service: leave unchecked
SSL/TLS Certificate: webConfigurator default (59f92214095d8) (Server: Yes, In Use). Note that your numbers may be different
SSL/TLS Listen Port: leave unchanged
Network Interfaces: All
Outgoing Network Interfaces: Surfshark VPN
System Domains Local Zone Type: Transparent
DNSSEC: leave unchecked
DNS Query Forwarding: check this field
DHCP Registration: check this field
Static DHCP: check this field
Click on Save and Apply Changes.
Now, in DNS Resolver, select Advanced Settings and fill in the following:
Advanced Privacy Options
Hide Identity: check this field
Hide Version: check this field
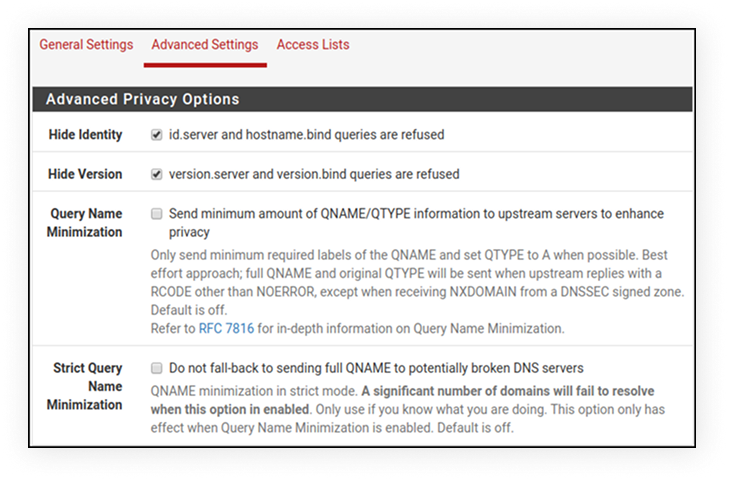
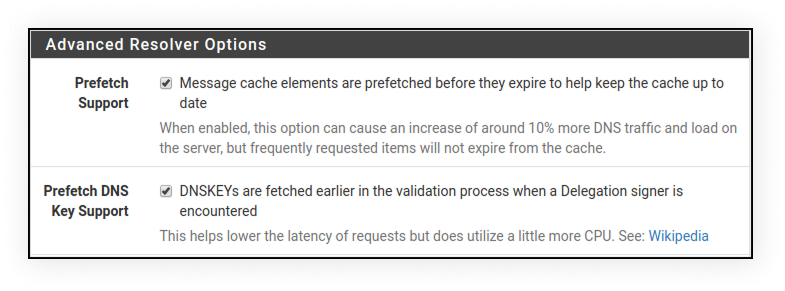
Advanced Resolver Options
Prefetch Support: check this field
Prefetch DNS Key Support: check this field
Click Save and Apply Changes.
5. Create NAT and firewall rules
The OpenVPN client is now running, but pfSense isn’t sending any traffic through it yet. You need to create rules that tell your pfSense router to route traffic through the VPN gateway instead of the regular WAN connection.
To allow traffic to flow through the VPN tunnel, follow these steps:
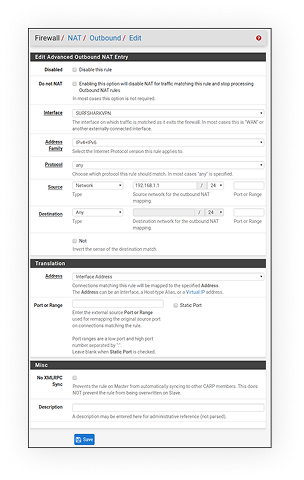
- Go to Firewall > NAT > Outbound and select Manual Outbound NAT rule generation. Click Save and Apply Changes.
- Four rules will appear. Leave them untouched and add a new rule with this information:
Interface: Surfshark VPN
Source: your subnet - Select Save.
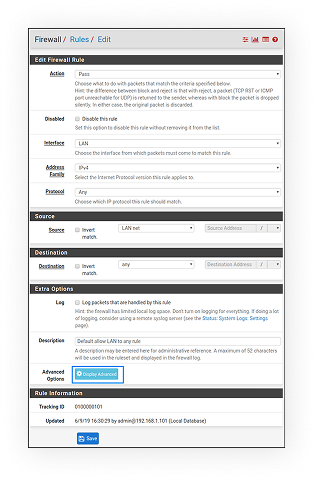
Next, route traffic through the VPN gateway by adding a LAN firewall rule:
- Go to Firewall > Rules > LAN and delete the IPv6.
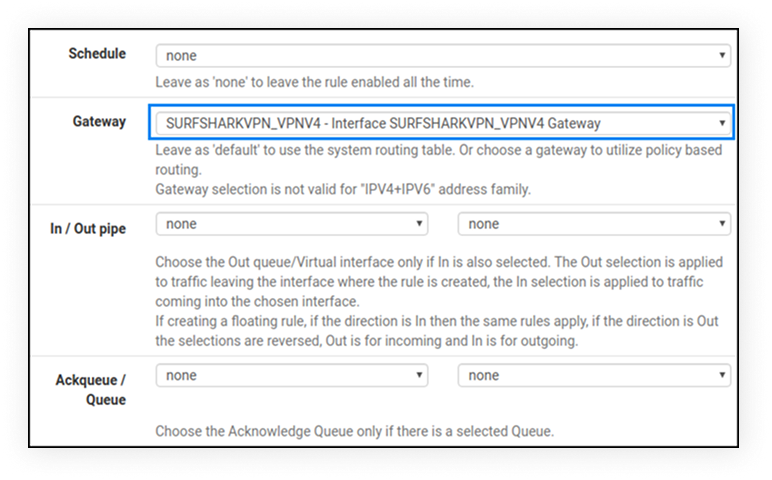
- Edit the IPv4 rule by clicking Display Advanced and changing Gateway to Surfshark VPN.
- Click Save and Apply Changes.
This step makes pfSense route traffic through the VPN. If you skip it, your internet connection will stay unprotected.
6. Apply and test connection
Go to System > General Setup > DNS Server Settings and enter the following:
DNS Server 1: 162.252.172.57; Gateway: SURFSHARKVPN_VPNV4
DNS server 2: 149.154.159.92; Gateway: SURFSHARKVPN_VPNV4
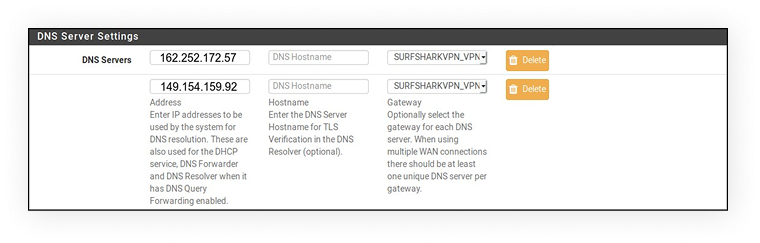
After this, click Save and go to Status > OpenVPN. The status should be “up.”
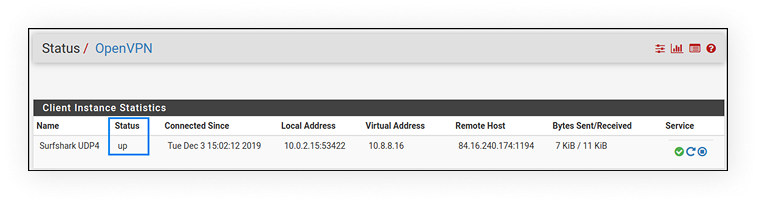
Once the status reads “up,” your pfSense VPN client is live. Every device on your home network is now sending traffic through the Surfshark OpenVPN tunnel.
How to configure a VPN on pfSense (WireGuard method)
The steps for setting up a WireGuard tunnel on pfSense with Surfshark can vary slightly depending on the pfSense version you’re using. The following steps work for pfSense 2.6.0.
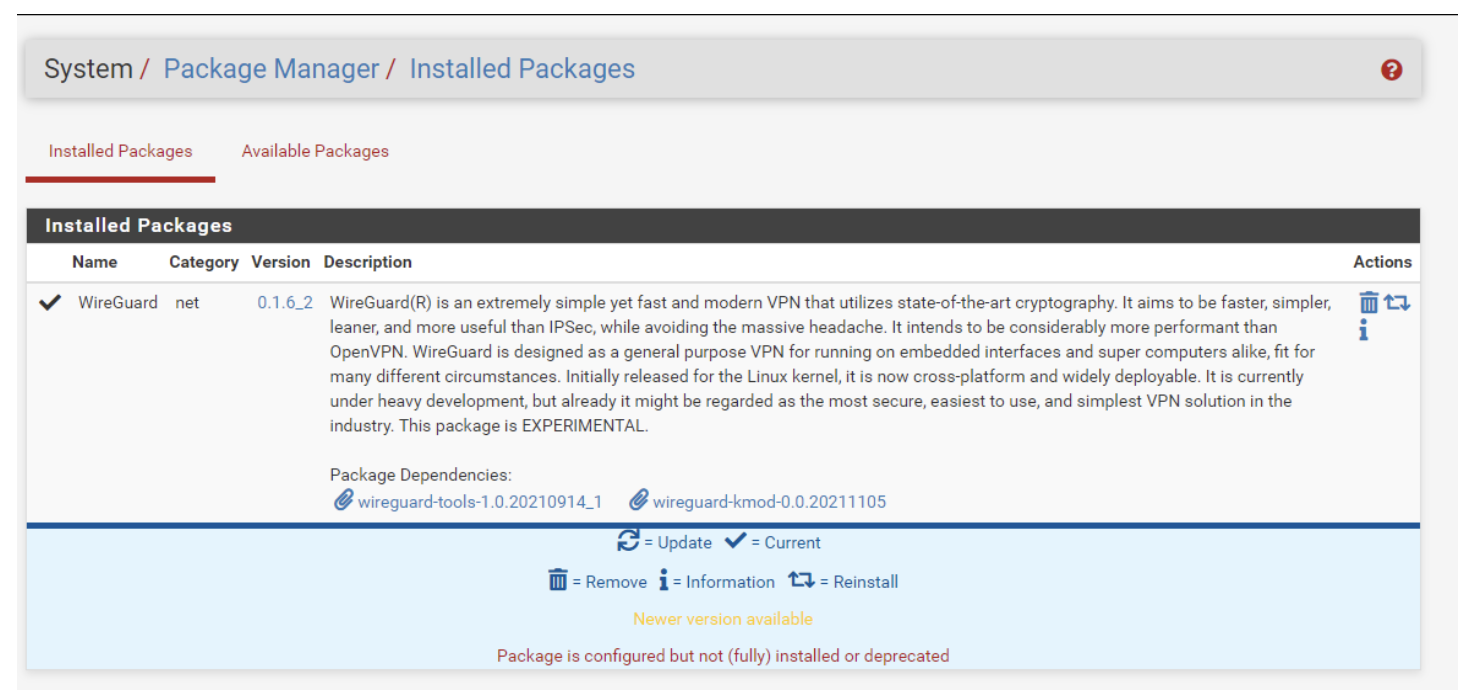
1. Install WireGuard package
Go to System > Package Manager > Available Packages. Then search for WireGuard and install the WireGuard package.
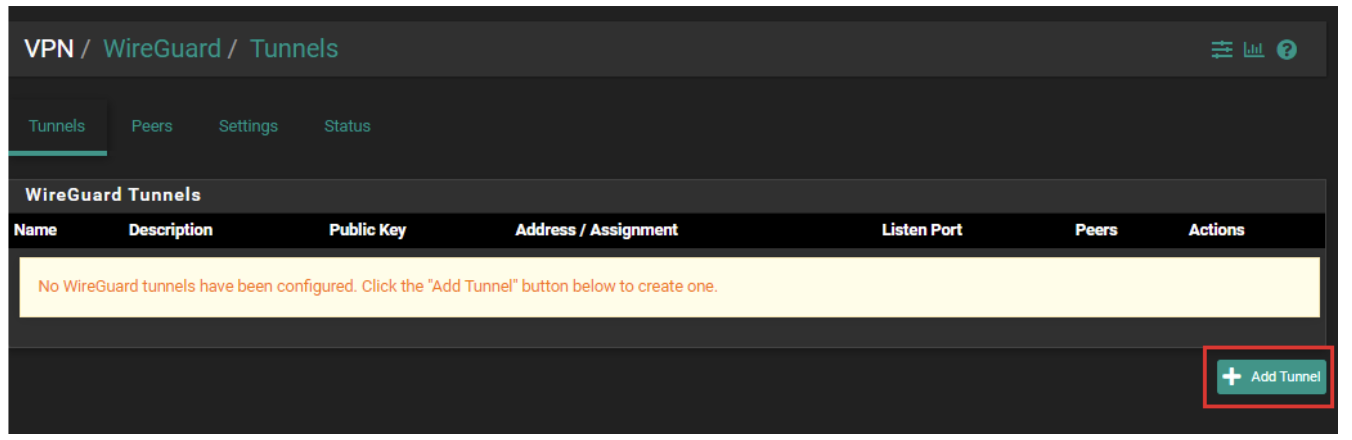
2. Set up WireGuard VPN tunnel
WireGuard supports multiple tunnels, but here’s how you set up a single one:
- Navigate to VPN > WireGuard > Add Tunnel.
- Check Enabled and enter whatever Description you like. The Listen Port should be 51820 by default.
- Enter your Public key and Private key from the Credentials tab found in the WireGuard setup section of Surfshark’s web app.

3. Set up Peer Configuration
You can configure a peer by entering the Peers tab or pressing Add Peer at the bottom of the window. Enter the following:
Description: describe the VPN server name
Dynamic Endpoint: leave unchecked
Endpoint: enter the server hostname, and make sure to configure the port to 51820
Keep Alive: set to 25
Public Key: enter the server’s public key address. You can find it in the server’s configuration file or in the Surfshark web app’s WireGuard setup section after selecting a server.
Pre-shared Key: leave blank
Allowed IPs: enter 0.0.0.0/0
Click Save Peer and Apply Changes.

4. Configure Interfaces
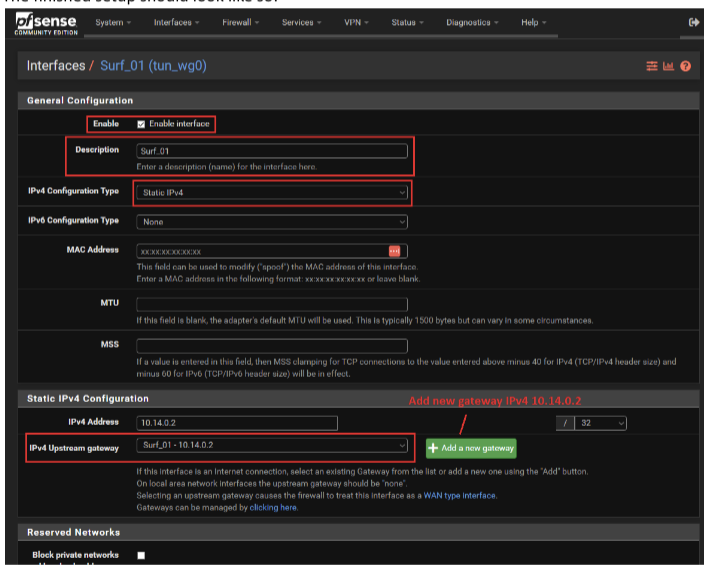
Assign the new WireGuard tunnel as a network interface with these steps:
- Go to Interfaces > Assignments and click Add and Save.
- Click on the OPT1 interface name link and check Enable.
- Change the description name from OPT1 to whatever you like.
- Change the IPv4 Configuration Type to Static IPv4. On IPv6 Configuration Type, select None.
- Enter 1420 in the MTU field. Leave MAC Address and MSS blank.
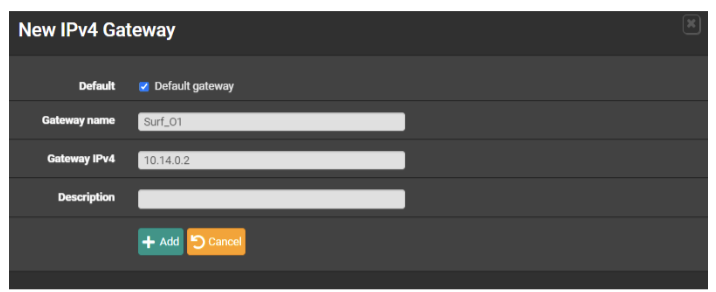
- In the IPv4 Address field, enter 10.14.0.2. By IPv4 Upstream gateway, click Add a new gateway.
- In Gateway name, enter whatever you like. In Gateway IPv4, enter 10.14.0.2.
- Click Save and Apply Changes.
5. Configure Firewall
Set up a LAN firewall rule with these steps:
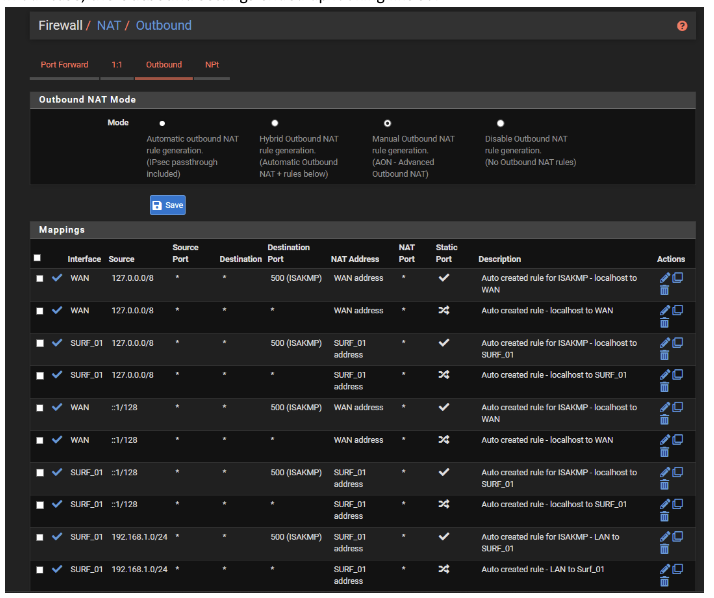
- Navigate to Firewall > NAT > Outbound and change the mode to Manual.
- Click Save and Apply Changes.
- Look for the entry that contains your local network subnet. It should look something like 192.168.1.0/24 and not contain any entries for port 500 or IP address 127.0.0.0.
- Click the Pen icon to edit mapping.
- Change Interface to fit the description you chose earlier. Change Description to mention the VPN for easier navigation.
- Click Save and Apply Changes.
6. Configure Rules
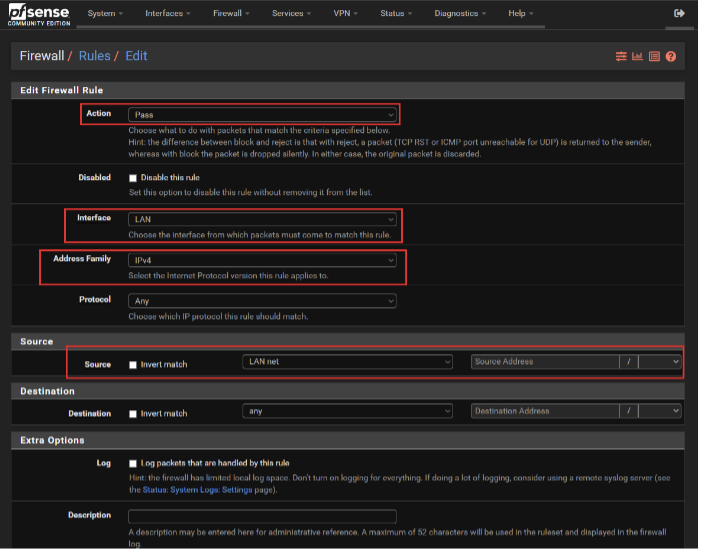
Navigate to Firewall > Rules > LAN and click Add at the top. Set the following:
Action: Pass
Interface: LAN
Address Family: IPv4
Protocol: An
Source: LAN net
Description: whatever you want
Click Save and Apply Changes.
Next, disable the default WAN access firewall rules on the Firewall > Rules > LAN page by clicking the green check marks by the Default allow rules for IPv4.
Click Apply Changes again.
7. Configure Static routing
To set up static routing, follow these steps:
- Go to System > Routing > Static routes.
- Click Add and configure the routes as follows:
Destination network: the IP address of the WireGuard server (10.14.0.2)
Gateway: your router’s WAN gateway
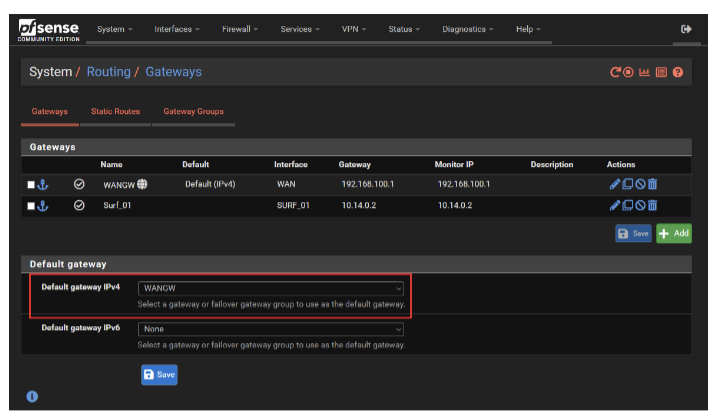
Description: whatever you want - Go to System > Routing > Gateways and set Default gateway IPv4 to what you configured previously (you should be able to see it in the dropdown menu).
- Click Save and Apply changes.
8. Configure DNS
Set up the DNS on your pfSense device with the following:
- Go to System > General Setup > DNS and set DNS Servers > Address to Surfshark’s DNS addresses (162.252.172.57 and 149.154.159.92). You can also use Google DNS (8.8.8.8 and 8.8.4.4).
- Uncheck the DNS Server Override option and click Save.
- Set the Gateway to the WireGuard gateway you named earlier.

- Go to Service > DHCP Server and set DNS Servers > DNS Server 1 to the one chosen above.
- Click Save.
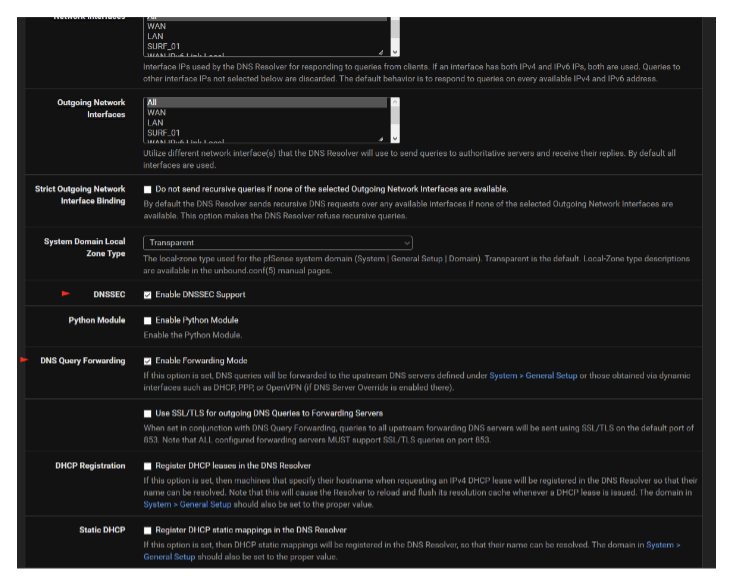
To configure the DNS Resolver:
- Go to Services > DNS Resolver and check Enable DNSSEC.
- Check Enable Forwarding Mode by DNS Query Forwarding.
- Click Save and Apply Changes.
Check your pfSense VPN connection
You can verify that everything is working with your pfSense VPN with any of these three checks:
- Check the status page: go to Status > OpenVPN (or WireGuard) and confirm the tunnel shows as connected with a valid public IP address assigned.
- Verify your IP address: open a browser on any device connected to your network and visit an IP checker tool. You should see the VPN server’s IP, not your real one. If you see your ISP’s address, traffic isn’t routing through the VPN tunnel.
- Run a DNS leak test: use an online DNS leak test to make sure DNS queries aren’t escaping outside the tunnel. If your ISP’s DNS servers show up, go to Services > DNS Resolver and check if the Outgoing Network Interface is your VPN interface.
Troubleshooting common pfSense VPN issues
Here are simple solutions to the VPN problems pfSense users encounter most often.
VPN not connecting
If your VPN isn’t connecting:
- Double-check your username and password: remember, these are your Surfshark manual setup credentials, not your regular account login data;
- Verify the server host address and port: these fields need to exactly match what’s in your .ovpn or WireGuard config file;
- Try connecting to a different Surfshark server: the server you picked may be experiencing temporary downtime.
No internet access after connecting
If you’ve lost internet access, this is likely connected to your NAT or gateway rules. Follow these steps:
- Confirm your outbound NAT mappings point to the VPN interface, not the WAN interface.
- Check that the LAN firewall rule uses the VPN gateway, not the default gateway.
- Go to System > General Setup and make sure DNS servers are configured. Use Surfshark’s DNS and set the gateway for those DNS servers to the VPN interface.
Configuration errors
Recheck all your pasted fields, from the entire certificate to the TLS key. Missing a single character will cause authentication to fail.
Likewise, check that you selected the correct peer certificate authority in the OpenVPN client settings. Ensure there are no extra spaces or line breaks present.
Slow performance
If your connection is noticeably slower, consider these options:
- Switch to WireGuard: WireGuard is significantly faster than OpenVPN on most hardware;
- Pick a closer server: connecting to a Surfshark server closer to your physical location cuts latency and improves speed;
- Check your hardware: VPN encryption is CPU-intensive. If your pfSense router has a weak processor, speeds can bottleneck regardless of your protocol. Hardware crypto acceleration can help if your system supports it.
Why should you use a VPN on pfSense?
You can install a VPN app on your phone or laptop in just a few minutes, so going through the trouble of manual VPN configuration might not make sense for many users.
Configuring a VPN on your pfSense router can be beneficial if you want to:
- Securely connect your entire network with a single setup: every device on your home network automatically passes through the VPN. This includes tablets, smart TVs, game consoles, IoT sensors, and more;
- Protect devices that can’t run VPN apps: smart home gadgets, streaming sticks, and certain mobile devices don’t support VPN software directly. A pfSense VPN gateway handles them all;
- Prevent ISP monitoring: all your internet traffic is encrypted at the router level. Your ISP sees encrypted data going to a VPN server and nothing else;
- Get always-on connectivity: unlike apps on individual operating systems that can be forgotten, toggled off, or crash in the background, a VPN running on your pfSense router stays active 24/7;
- Enjoy total control: pfSense gives you granular power over firewall rules, NAT, DNS, and gateway routing. You can even exclude specific clients from the VPN if needed.
Key takeaway: protect your pfSense with a VPN
If you’re looking for a reliable service that’s compatible with pfSense and other VPN routers, Surfshark’s an excellent choice that supports both OpenVPN and WireGuard. With a network of 4,500 high-speed servers in 100 countries, Surfshark makes it easy to enjoy more privacy and security online.
It also covers unlimited devices on a single subscription, so you can set up your VPN on other routers if you have more in your network.
FAQ
Can pfSense be used as a VPN?
Yes, pfSense supports the OpenVPN, WireGuard, and IPSec VPN protocols. You can configure it as a VPN client to route traffic through a provider like Surfshark.
Can I use a free VPN on pfSense?
Yes, you can use pfSense with a free VPN if the provider offers OpenVPN or WireGuard config files, but this isn’t recommended. Free VPNs often come with speed limits, data caps, or limited server access, so a paid VPN service like Surfshark is a better choice for stronger network protection.
Is pfSense still free?
Yes, pfSense CE (Community Edition) has free and open-source software. For additional features, pfSense plus is free for home use on Netgate hardware.
For most home users, the CE version has everything you need to run a full-featured pfSense VPN setup.
What is the best VPN for pfSense?
The best VPN for pfSense should offer OpenVPN and WireGuard support, fast global servers, no device limits, and clear setup documentation. Surfshark meets all of these criteria and provides dedicated guides — including step-by-step instructions for setting up OpenVPN on pfSense.