Setting up a VPN on your ASUS router encrypts traffic for every connected device at once — phones, laptops, smart TVs, and IoT gadgets — without installing separate apps on each one. This guide walks you through configuring Surfshark on compatible ASUS routers using OpenVPN or WireGuard, plus explains how to use VPN Fusion for per-device routing.
- Setup time: 10-20 minutes
- Compatible firmware: ASUSWRT and ASUSWRT-Merlin
- Best option for beginners: OpenVPN (widely supported)
- Fastest option: WireGuard
- End result: encrypted traffic across your network
What you’ll need before starting
Router-based VPN (Virtual Private Network) configuration is straightforward, but having the correct firmware, files, and credentials ready beforehand will make the process much smoother.
ASUS routers run either ASUSWRT (official firmware) or ASUSWRT-Merlin (community firmware with enhanced VPN tools). Common VPN-compatible models include the RT-AX86U, RT-AX88U, RT-AC68U, and most newer Wi-Fi 6/7 routers.
Before starting, gather the following:
- A VPN-compatible ASUS router with VPN Client support;
- The latest ASUSWRT or ASUSWRT-Merlin firmware;
- An active Surfshark subscription;
- VPN configuration files (.ovpn for OpenVPN or .conf for WireGuard);
- Your VPN service credentials;
- Access to the router’s admin dashboard.
Update your router firmware
Running the latest firmware ensures access to current security patches, protocol support, and features like VPN Fusion.
- Log in to your ASUS router dashboard.
- Go to Administration in the left menu.
- Select Firmware Upgrade.
- Click Check to search for updates.
- If an update’s available, follow the prompts to install.
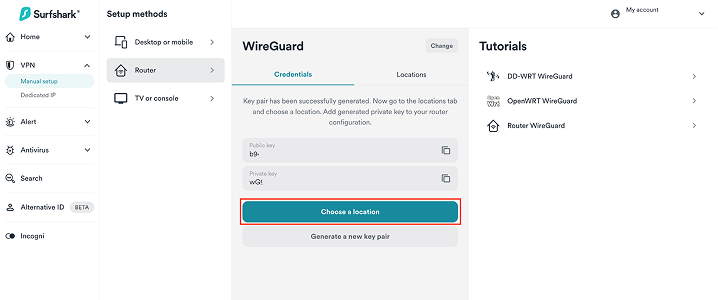
Generate a key pair (WireGuard only)
This step is only required if you plan to use WireGuard. To generate a key pair:
- Log in to your Surfshark account.
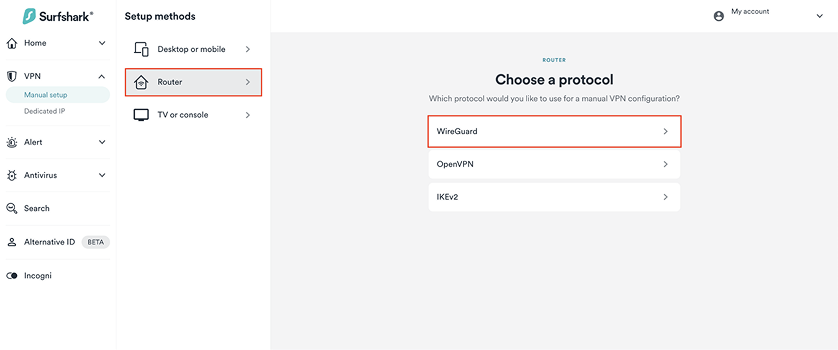
- Go to the Manual Setup section.
- Select Router as the device type and WireGuard as the protocol.
- Click on I don’t have a key pair.
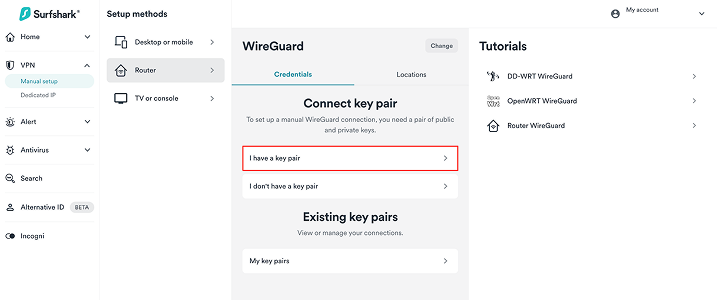
- Enter a name for your key pair.
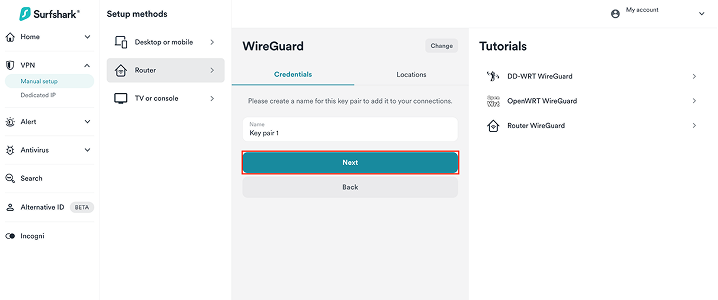
- Select Generate a new key pair.
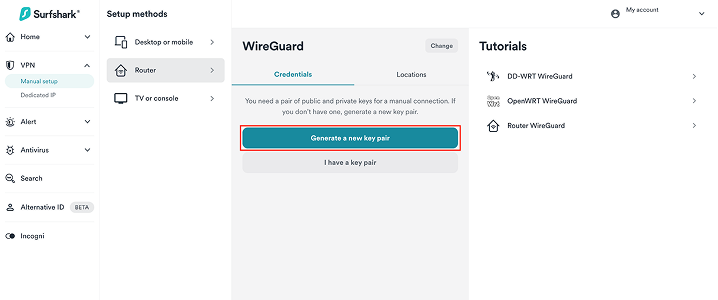
Surfshark will generate a public and private key used to authenticate your VPN router. You don’t need to save these keys separately — they are automatically included in the WireGuard configuration file you’ll download next.
Generate credentials (OpenVPN only)
OpenVPN uses a username and password for authentication instead of cryptographic key pairs. These credentials are separate from your Surfshark account login.
To generate OpenVPN credentials:
- Log in to your Surfshark account.
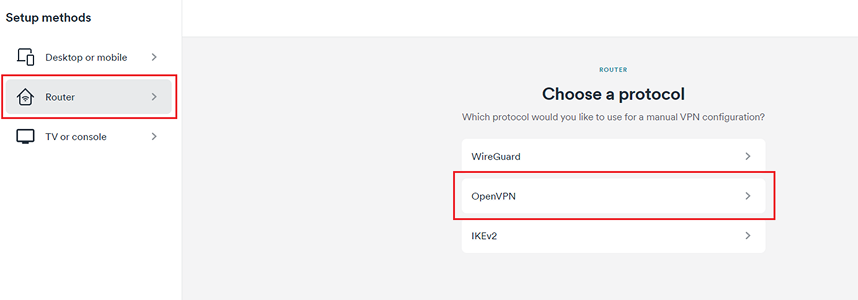
- Go to the Manual Setup section and select OpenVPN as the protocol.
- Generate or copy the provided username and password.
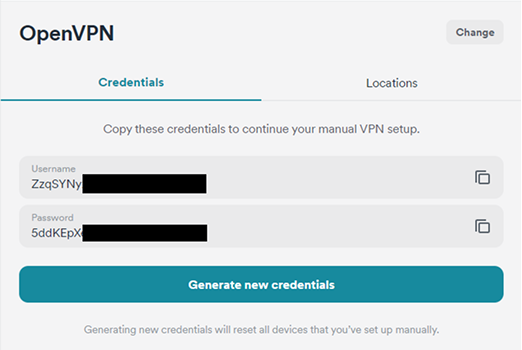
Save these credentials securely. You’ll be prompted to enter them when importing the .ovpn file or when activating the VPN client on your router.
Choose a VPN server location and download the configuration file
From Surfshark’s manual setup page, select the VPN server location and download the configuration file for your router:
- Log in to your Surfshark account and go to the Manual setup section.
- Select Router as the device type and choose the VPN protocol you want to use (OpenVPN or WireGuard).
- Select Choose a location.
- Select a server location from the list and download the configuration file:
- OpenVPN uses .ovpn files;
- WireGuard uses .conf files.
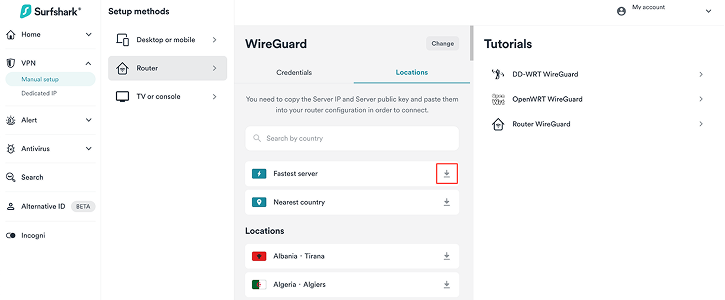
Choose a location close to your physical position to minimize latency and improve performance, or select a specific country if you need an IP (Internet Protocol) address from that region.
The downloaded file contains the connection settings for the chosen server, and you’ll be uploading it to your ASUS router.
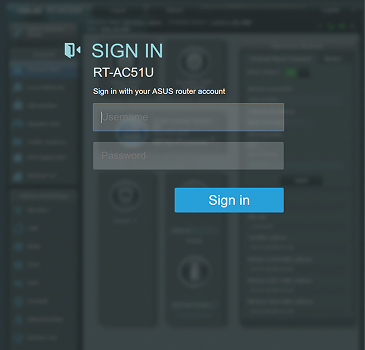
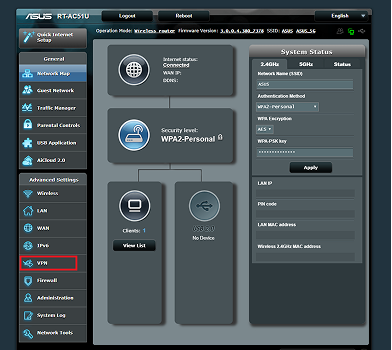
Access your router’s dashboard
In order to change the configuration, you will need access to your router’s admin panel. The required credentials are usually found on a sticker underneath the router.
- Open a browser on a device connected to your router’s network.
- Go to http://192.168.1.1 or http://router.asus.com.
- Enter your router’s admin username and password.
How to set up OpenVPN on your ASUS router
OpenVPN is the most widely supported protocol on ASUS routers — it works on nearly all ASUSWRT and ASUSWRT-Merlin firmware versions. It’s slightly slower than WireGuard due to heavier encryption overhead, but it offers broad compatibility. If you’re unsure about which method to use, start here.
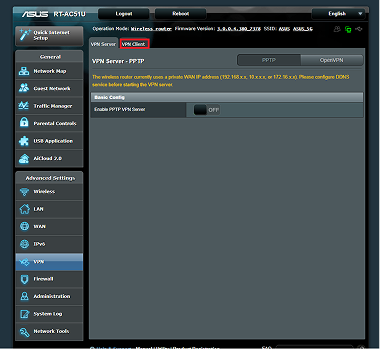
Go to the VPN Client section
The VPN Client section is where you’ll add and manage all VPN profiles on your router:
- Log in to your ASUS router dashboard.
- Click VPN in the left menu.
- Open the VPN Client tab.
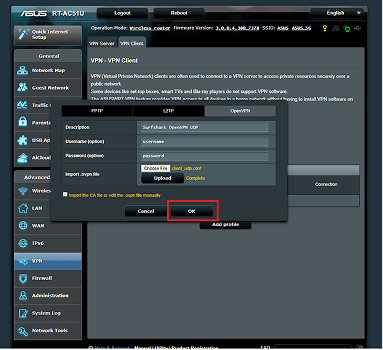
Add a new OpenVPN profile
Once you’re in the VPN Client menu, upload your Surfshark configuration file:
- Click Add Profile.
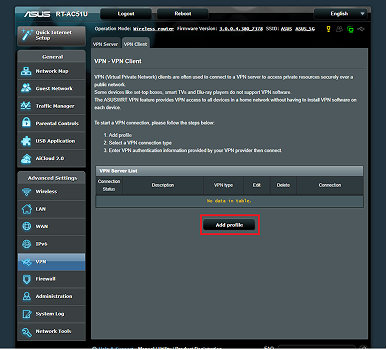
- Select OpenVPN.
- Enter a custom profile name.
- Click Choose File and upload your .ovpn file.
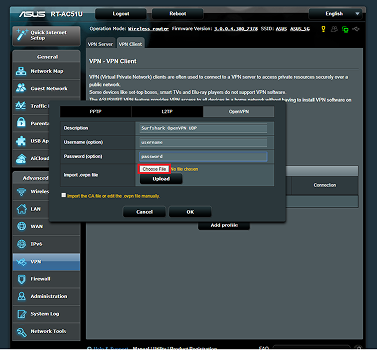
Enter your credentials and connect
After uploading the profile, activate it to start the VPN connection:
- Enter your Surfshark credentials when prompted.
- Click OK or Apply.
- Find the profile in the VPN list.
- Toggle Activate.
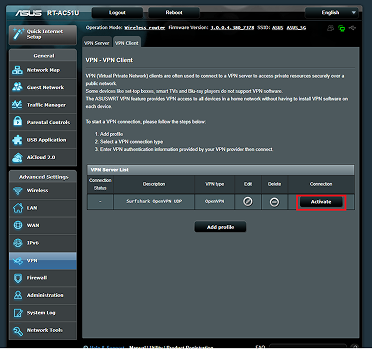
The status should change to Connected. All devices on your network now route traffic through the VPN tunnel (unless you configure VPN Fusion for per-device control — more on that later).
How to set up WireGuard on your ASUS router
WireGuard is a newer protocol designed for speed and efficiency — it typically outperforms OpenVPN, especially on routers with limited processing power. The trade-off is compatibility: WireGuard requires newer firmware and isn’t available on all ASUS models. But, if your router supports it, WireGuard is usually the better choice.
Check if WireGuard is available on your router
First, confirm your router supports WireGuard:
- Log in to the ASUS router dashboard.
- Go to VPN in the left menu.
- Look for a WireGuard tab or option.
If you can’t find WireGuard settings anywhere, you’ll need to update your firmware or stick to OpenVPN instead.
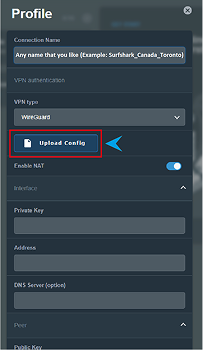
Add a WireGuard profile
If WireGuard is available, set it up using your Surfshark configuration file:
- Open the WireGuard section.
- Click Add Profile or Import Configuration.
- Upload your .conf file.
- Name the profile.
- Save.
Confirm and test your connection
After importing the profile, activate it and verify the connection:
- Enable the WireGuard profile.
- Click Apply.
- Check that the status shows an active connection or handshake.
How to use VPN Fusion for per-device routing
VPN Fusion lets you route traffic on a per-device basis — you choose which devices use the VPN and which connect directly through your ISP (Internet Service Provider). This is useful when you need encrypted browsing on personal devices but want others (like a gaming console or network-attached storage) to connect directly for speed or local network access.
For more details, see our guides: one for setting up OpenVPN on Asus VPN Fusion and one for WireGuard on Asus VPN Fusion.
Enable VPN Fusion
Start by turning on the feature in your router settings:
- Log in to your router dashboard.
- Go to VPN in the left menu and select VPN Fusion.
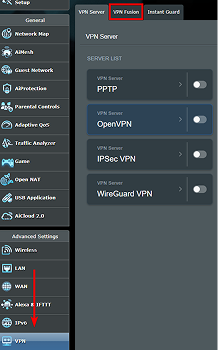
- Toggle to Enable and click Apply.
If VPN Fusion doesn’t appear, your router model or firmware may not support it.
Add VPN profiles to VPN Fusion
VPN Fusion uses the OpenVPN or WireGuard profiles you’ve already created:
- Open the VPN Fusion interface.
- Click Add Profile and upload your VPN configuration.
- Save.
If your router supports concurrent connections, you can upload multiple profiles.
Assign devices to either a VPN or a standard connection
Once VPN Fusion is enabled and profiles are available, decide which devices use each connection.
- In VPN Fusion, find the device assignment section.
- Click on the pencil icon next to a device on the list.
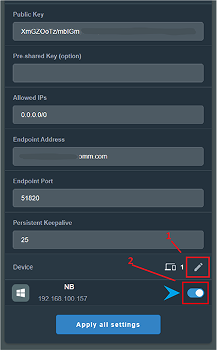
- Assign it to either a VPN profile or the regular connection.
- Click Apply.
How to verify your VPN connection is working
After setup, confirm everything works as expected.
Check the connection status in the router dashboard
Start by verifying the VPN profile is active in your router dashboard:
- Go to VPN, then VPN Client (or the WireGuard section).
- Locate your enabled profile.
- Verify the status shows Connected.
Confirm your IP address has changed
The easiest way to verify VPN routing is to check your external IP address:
- On a connected device, visit an IP-check website.
- Compare the displayed IP with your regular ISP-provided address.
A working VPN shows the VPN server’s IP instead of your ISP’s.
Verify VPN Fusion is routing devices correctly
If you followed the VPN Fusion method, confirm that only assigned devices route through the VPN:
- Devices assigned to the VPN profile should show the VPN server IP;
- Devices on the standard connection should show your regular ISP-issued IP.
Run a DNS leak test for extra assurance
A DNS leak test confirms your DNS (Domain Name Service) requests also route through the VPN. Your ISP’s DNS servers shouldn’t appear in the results.
Troubleshooting common ASUS router VPN issues
Even with a straightforward setup, occasional issues can arise — especially with incorrect credentials, outdated firmware, or unsupported features.
VPN won’t connect
If your VPN profile won’t connect or keeps disconnecting, check the following:
- Verify credentials: VPN service credentials may differ from your main account login.
- Re-download the configuration file: corrupted or outdated files cause connection failures.
- Update firmware: older versions may lack support for certain encryption settings.
- Try a different server: some locations may be temporarily unavailable.
- Confirm the correct protocol: ensure the profile type matches your configuration file.
Slow or unstable VPN speeds
VPN encryption increases CPU load, which can reduce speeds — especially on entry-level routers. To improve performance:
- Switch to WireGuard: it’s faster and less CPU-intensive than OpenVPN.
- Choose a closer server: shorter distance means lower latency.
- Limit VPN-routed devices: use VPN Fusion to limit encryption to devices that need it.
- Check router hardware: entry-level routers struggle with encryption overhead. Mid- to high-end models like the RT-AX86U or RT-AX88U handle VPN traffic more efficiently.
VPN Fusion not available in settings
If VPN Fusion doesn’t appear in your settings, it’s usually due to one of these three reasons:
- Model limitation: VPN Fusion is available only on certain mid- to high-end ASUS routers.
- Outdated firmware: updating may enable the feature for your model.
- Firmware variant: some features differ between standard ASUSWRT and ASUSWRT-Merlin.
If VPN Fusion is not available, the standard VPN Client setup will encrypt your entire network.
Conclusion: should you set up a VPN on your ASUS router?
A router-level VPN encrypts traffic for your entire network through a single configuration. With Surfshark and protocols like OpenVPN or WireGuard, you can route all devices through a secure tunnel — or use VPN Fusion to apply encryption only where you need it. For most users, the 10–20 minute setup is worth the network-wide coverage, especially if you have devices that don’t support VPN apps natively.

Take control of your home internet privacy
Use Surfshark on your router to keep your connection more secure at all times
Get SurfsharkFAQ
Do ASUS routers support VPNs?
Yes, many ASUS routers include built-in VPN client features. Once configured, all connected devices route traffic through the encrypted tunnel without needing individual apps.
How do I activate a VPN on an ASUS router?
Log in to your router dashboard, go to VPN, then VPN Client, upload your configuration file, enter your credentials, and enable the profile.
What is an ASUS VPN server?
This usually refers to a VPN server you connect to through your router, not one hosted by ASUS. Your router acts as the client, sending traffic through your VPN provider’s server.
Can I use WireGuard on an ASUS router?
Yes, if your router model and firmware support it. WireGuard delivers faster speeds than OpenVPN. If it’s not available, try updating your firmware or stick to OpenVPN — it’s still a completely viable option.
Should I keep the VPN running all the time?
For consistent encryption, yes. VPN Fusion offers flexibility if you need certain devices to connect directly — useful for accessing local network services or reducing latency on some devices.