
By setting up a VPN (Virtual Private Network) on your router, you encrypt your entire network. This means all connected phones, laptops, smart TVs, consoles, and even smart home devices are protected automatically.
In this 2025 guide, you’ll learn what a VPN on a router is, how it works, and how to easily install it. Follow these clear instructions to effortlessly enhance your entire home’s online security.

Safeguard your entire home network with VPN encryption
Shield all your devices with a VPN router solution
Get SurfsharkWhat is a VPN router?
A VPN router is a Wi-Fi router configured with VPN software, encrypting internet traffic from all devices connected to the network, ensuring privacy, security, and IP address change.
In other words, it achieves network-wide data encryption with just one device actually having a VPN set up.
How does a VPN router work?
When you set up a VPN on your router and connect to a server, all data from browsers, apps, games, services, and other sources is sent and received through a secure VPN tunnel between your device and the VPN server.

This means you don’t have to install VPN clients on every device you own. Additionally, VPN protection is extended even to devices that don’t natively support VPN apps. So, by setting up a VPN on your router, you inherently protect all devices connected to your Wi-Fi network — smartphones, laptops, TVs, smart home appliances, and more.
Pros and cons of setting up a VPN on a router
| Pros | Cons |
|---|---|
| Covers all devices at once | Setup can be technical |
| Great for smart devices | Harder to switch servers |
| Always-on protection | Can affect internet speed |
| One login for your household | Less flexibility per device |
| Ideal for set-it-and-forget-it users | Troubleshooting can be more complex |
Pros of a VPN-protected router
- Covers all devices at once: any device connected to your home Wi-Fi is protected automatically — no need to install apps on each one.
- Great for smart devices: protects things like smart TVs, game consoles, and IoT devices that don’t support VPN apps.
- Always-on protection: VPN stays connected by default, reducing the chance of accidental exposure.
- One login for your household: you can use one VPN account for everyone on your network, regardless of how many devices they use.
- Ideal for set-it-and-forget-it users: once configured, it runs in the background with no need for regular attention.
Cons of a VPN-protected router
- Setup can be technical: not all routers support VPNs out of the box, and setup may involve manual configuration.
- Harder to switch servers: changing VPN server locations usually requires logging into your router settings (not as quick as using an app).
- Can affect internet speed: all traffic goes through the VPN, which may slow things down depending on your router’s power and the VPN server load.
- Less flexibility per device: all devices share the same VPN location and settings — you can’t easily customize it per person or device.
- Troubleshooting can be more complex: if something goes wrong, diagnosing issues on a router-level VPN can be trickier than on a single app.
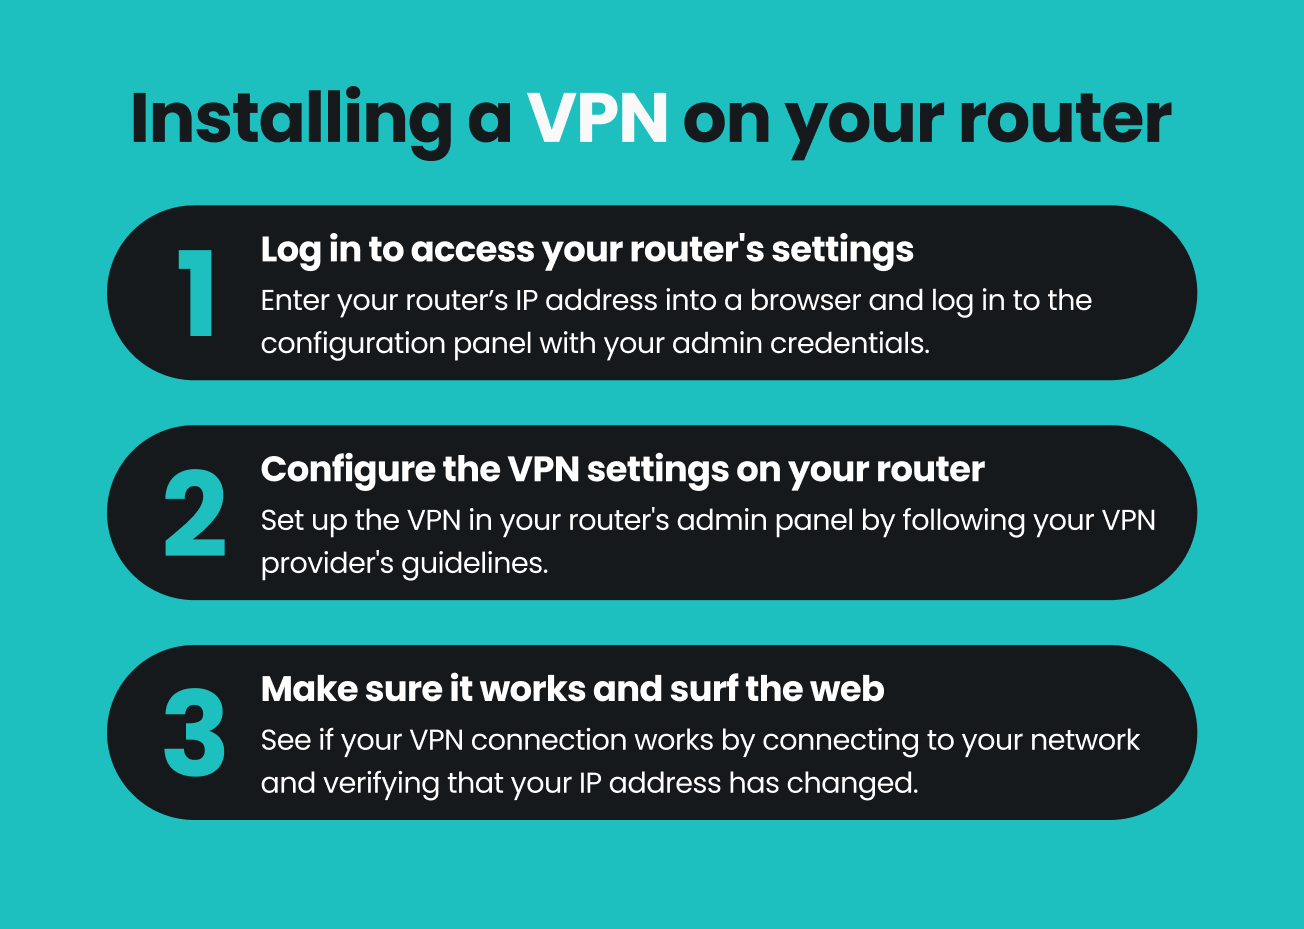
How to set up a VPN on a router (easy steps)
VPN installation begins with the VPN itself. If you don’t have one, consider purchasing a Surfshark VPN subscription.
This is a guide for VPN-compatible routers. See below for non-compatible routers.
- Log into your router’s admin panel: type your router’s IP (Internet Protocol) address into your browser (commonly found as Default Gateway in your device’s network settings)
- Navigate to VPN settings: find the VPN or Advanced tab within the router’s interface.
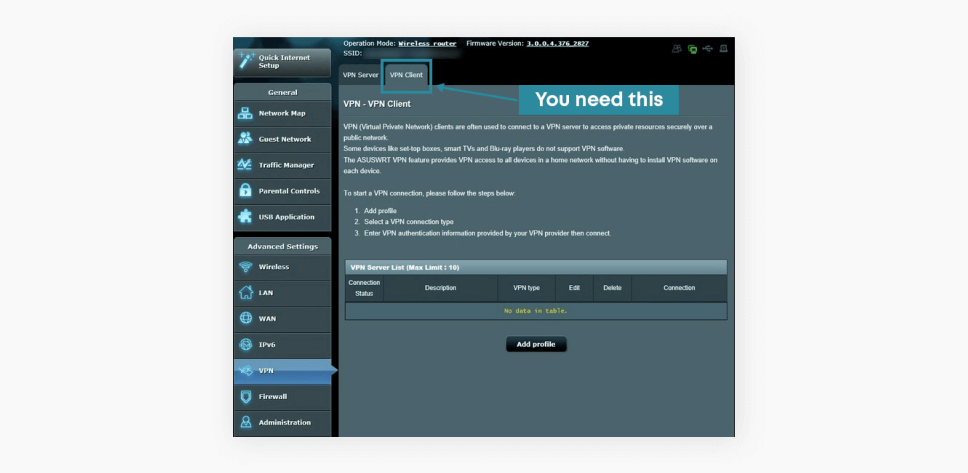
- Configure your VPN Client: follow specific setup instructions provided by your VPN service. Popular providers like Surfshark offer easy-to-follow guides for different router brands (e.g., Asus, DD-WRT, Tomato).
- Verify your VPN connection: visit a site like What is my IP? to confirm your VPN is active and your IP address has changed.
Router type vs. VPN compatibility
Not all routers are VPN-compatible. To check whether your router model supports VPN setup:
- Read the manual: this information should be in a printed manual that came with the router, or you can find one online;
- Google it: entering [router model] VPN compatibility in a search engine should give you all the information you need.
Find specific instructions for your router’s firmware
Surfshark’s help center has detailed VPN installation instructions for the following routers:
- TP-Link Deco (WireGuard®)
- GL.iNet (WireGuard®, OpenVPN)
- Keenetic (WireGuard®, OpenVPN)
- FRITZ!Box (WireGuard®)
- Asus VPN Fusion (WireGuard®, OpenVPN)
- OpenWRT (WireGuard®, OpenVPN)
- DD-WRT (WireGuard®, OpenVPN)
- OPNsense (OpenVPN)
- AsusWRT (OpenVPN)
- Portal (OpenVPN)
- Tomato (OpenVPN)
- Asus Merlin (OpenVPN)
- Sabai (OpenVPN)
- Freebox (OpenVPN)
- pfSense (OpenVPN)
- Synology NAS (OpenVPN)
- QNAP (OpenVPN)
- Netduma R1 (OpenVPN)
- MikroTik (IKEv2)
- Linksys (requires flashing firmware)
You can also learn how to set up a VPN on Starlink, and how to set up a VPN on TP-Link routers (Archer and Deco models).
Having trouble installing a VPN on your router?
If installing a VPN on your router proves to be a tougher nut than you can crack, don’t worry. Surfshark’s support team is here to help you 24/7. You can submit a request or start a live chat at our help center, and our experts will help you install Surfshark VPN on your router. So don’t hesitate to contact us.
If your router does not support VPN connections, it probably falls into one of the following types:
| Router type | VPN support |
|---|---|
| ISP-issued routers | Usually not compatible. Locked settings, no VPN options |
| Consumer routers (store-bought, e.g., Netgear, TP-Link. | Potentially compatible, but often need manual setup |
| Custom firmware routers (flashed with DD-WRT, Tomato, etc.) | Fully compatible. Requires technical setup and know-how |
| Preconfigured VPN routers (preloaded with VPN-ready firmware) | Ready to use with VPNs out of the box. Simple but more expensive |
| VPN router boxes (plug-and-play devices built specifically for VPN use) | Designed for VPNs. Easy setup, built-in VPN features |
| Mesh routers (systems like Eero, Google Nest WiFi, or ASUS AiMesh) | Mixed compatibility. Some support VPNs, others don’t |
| Enterprise routers (advanced models used in business networks, like Ubiquiti or Cisco) | Strong VPN support, but the setup is complex and not beginner-friendly |
So, should you set up a VPN on your router?
If you’re comfortable doing a bit of technical setup — or don’t mind following a solid step-by-step guide — setting up a VPN on your router is worth it.
Here’s a simple breakdown:
Yes, you should set up a VPN on your router if:
- You want every device in your home protected automatically — including your guests’;
- You have smart devices (TVs, game consoles, etc.) that can’t run VPN apps;
- You prefer a “set it and forget it” solution with always-on security;
- You don’t need to switch server locations often.
Maybe skip it (or stick to device-level VPN apps) if:
- You need to be able to switch countries per device;
- You travel often and rely on portable setups;
- Your router isn’t VPN-compatible or is underpowered;
- You’re not comfortable tweaking network settings.
How to get the most out of your VPN router
- Connect to the nearest VPN server. If you want speed, connect to a VPN server closest to your location. The more servers a VPN provider offers, the greater your options.
- Don’t double up unnecessarily. Don’t have a VPN running on both your router and your device — your VPN-protected router has got you covered! Doubling up on the VPN connections will decrease your internet speed.
- Look for the latest encryption standards. Newer encryption standards are faster and more secure. WireGuard, IKEv2, and OpenVPN are the best, most secure protocols on the market. However, not all VPN routers support them. Make sure your VPN client isn’t going to waste on a VPN router that can’t fully support it.
- Be cautious of free VPN services. Free VPN service providers may not have the security standards of paid ones. You may find yourself dealing with slower performance, intrusive ads, and possibly even having your online activity logged and sold to third parties.
- Bookmark your router settings. That’s the router’s IP address we talked about before. Have it bookmarked on your browser so you can easily access the VPN router settings whenever you need.
In conclusion: take your VPN router out for a spin
Setting up a VPN router may seem daunting, but it’s relatively easy when well-informed. The benefits — such as saving time on VPN installation and securing all connected devices in one go — speak for themselves. Having read this article, you’re now armed with the knowledge of how to set up your home VPN router.
May we suggest Surfshark? Our VPN has excellent setup guides for various routers and an optimized server network that offers great speeds. If anything goes amiss, you can rely on the 24/7 support service to help you get back on track. Even better: you can choose from a variety of pre-flashed (read: preconfigured) VPN routers — with Surfshark already installed.
Disclaimer: Please note that using Surfshark services for any illegal activities is strictly forbidden and violates our Terms of Service. Make sure that any use of Surfshark services for your particular activities conforms to all relevant laws and regulations, including those of any service providers and websites you access using Surfshark.

FAQ
How do I set up a VPN on a router?
- Access your router’s control panel by typing your IP in the browser’s address bar.
- Install the VPN firmware on your router by downloading it from the DD-WRT website.
- Install a VPN app.
- Go to the VPN tab in the router’s control panel.
- Enable the OpenVPN Client and enter your server info.
- Hit Save and Apply Settings.
Can I use a VPN on a Wi-Fi router?
Yes, you can install and use a VPN on your router, but first, check the router model and whether it’s VPN-compatible. A VPN on a router encrypts ALL of your network’s data, enhancing your online safety on any device using Wi-Fi.
Can you set up a VPN on any router?
You can install a VPN on most consumer routers. ISP-issued routers that don’t support VPN setups can typically be flashed with compatible firmware like DD-WRT or Tomato, but doing so might breach terms of service or agreements.
Should I put a VPN on my router?
Generally speaking, it’s more convenient and solves the problem of your device not supporting a VPN app. A router with a VPN setup encrypts all network traffic, eliminating the need to install and activate VPN apps on individual devices.
Does using a VPN router slow down my internet?
Yes, slightly, due to encryption overhead. Using servers close to your location or a high-performance VPN minimizes this impact.
Is it legal to use a VPN router?
Yes, VPN routers are legal in most countries. Always comply with local regulations and terms of use of services accessed through VPNs.
Should I use a free VPN with my router?
Free VPNs can compromise speed, security, and privacy. It’s advisable to use reputable, subscription-based VPN services like Surfshark.
How do I check if my router is VPN-compatible?
Check your router’s manual or search online for [router model] VPN compatibility to confirm compatibility quickly.