TV? Check. Warm drink in your hands? Check. Chromecast? Check. You’re all set for the perfect evening of relaxation! There’s just one hitch: the classic Chromecast doesn’t run VPN apps on its own, so you’re stuck with the privacy and local access your home network provides. Good news: there are four solid ways to add a VPN, plus one shortcut worth knowing.
Surfshark does not encourage using a VPN in any way that would potentially violate the Terms of Service of other service providers.
Why use a VPN with Chromecast?
Chromecast can’t run a VPN app itself, so anything you cast is only as private as your home network and only fast if your ISP doesn’t throttle you. Pairing Chromecast with a VPN on your router, a virtual hotspot, or Google TV fixes both problems and more:
- Access more of your favorite streaming apps and platforms: the Netflix app, BBC iPlayer, Amazon Prime Video, HBO Max, and more, including geo-restricted content, accessed safely as if you were somewhere it’s available;
- Improve privacy with a secure, encrypted connection for all your internet traffic: with a VPN on, your ISP can’t record your browsing data, so your streaming stays private;
- Reduce ISP throttling of streaming traffic: ISPs often slow down video streaming, and a VPN keeps that traffic private so they can’t target it. However, it won’t help with throttling from data caps or network congestion during peak hours.
Disclaimer: Please note that using Surfshark services for any illegal activities is strictly forbidden and violates our Terms of Service. Make sure that any use of Surfshark services for your particular activities conforms to all relevant laws and regulations, including those of any service providers and websites you access using Surfshark.
How Chromecast and VPNs work together (and where the limits are)
Not every Chromecast device works the same. Classic Chromecast dongles run a stripped-down OS that can’t install any apps, including VPNs, so there’s nowhere on the device to install one.
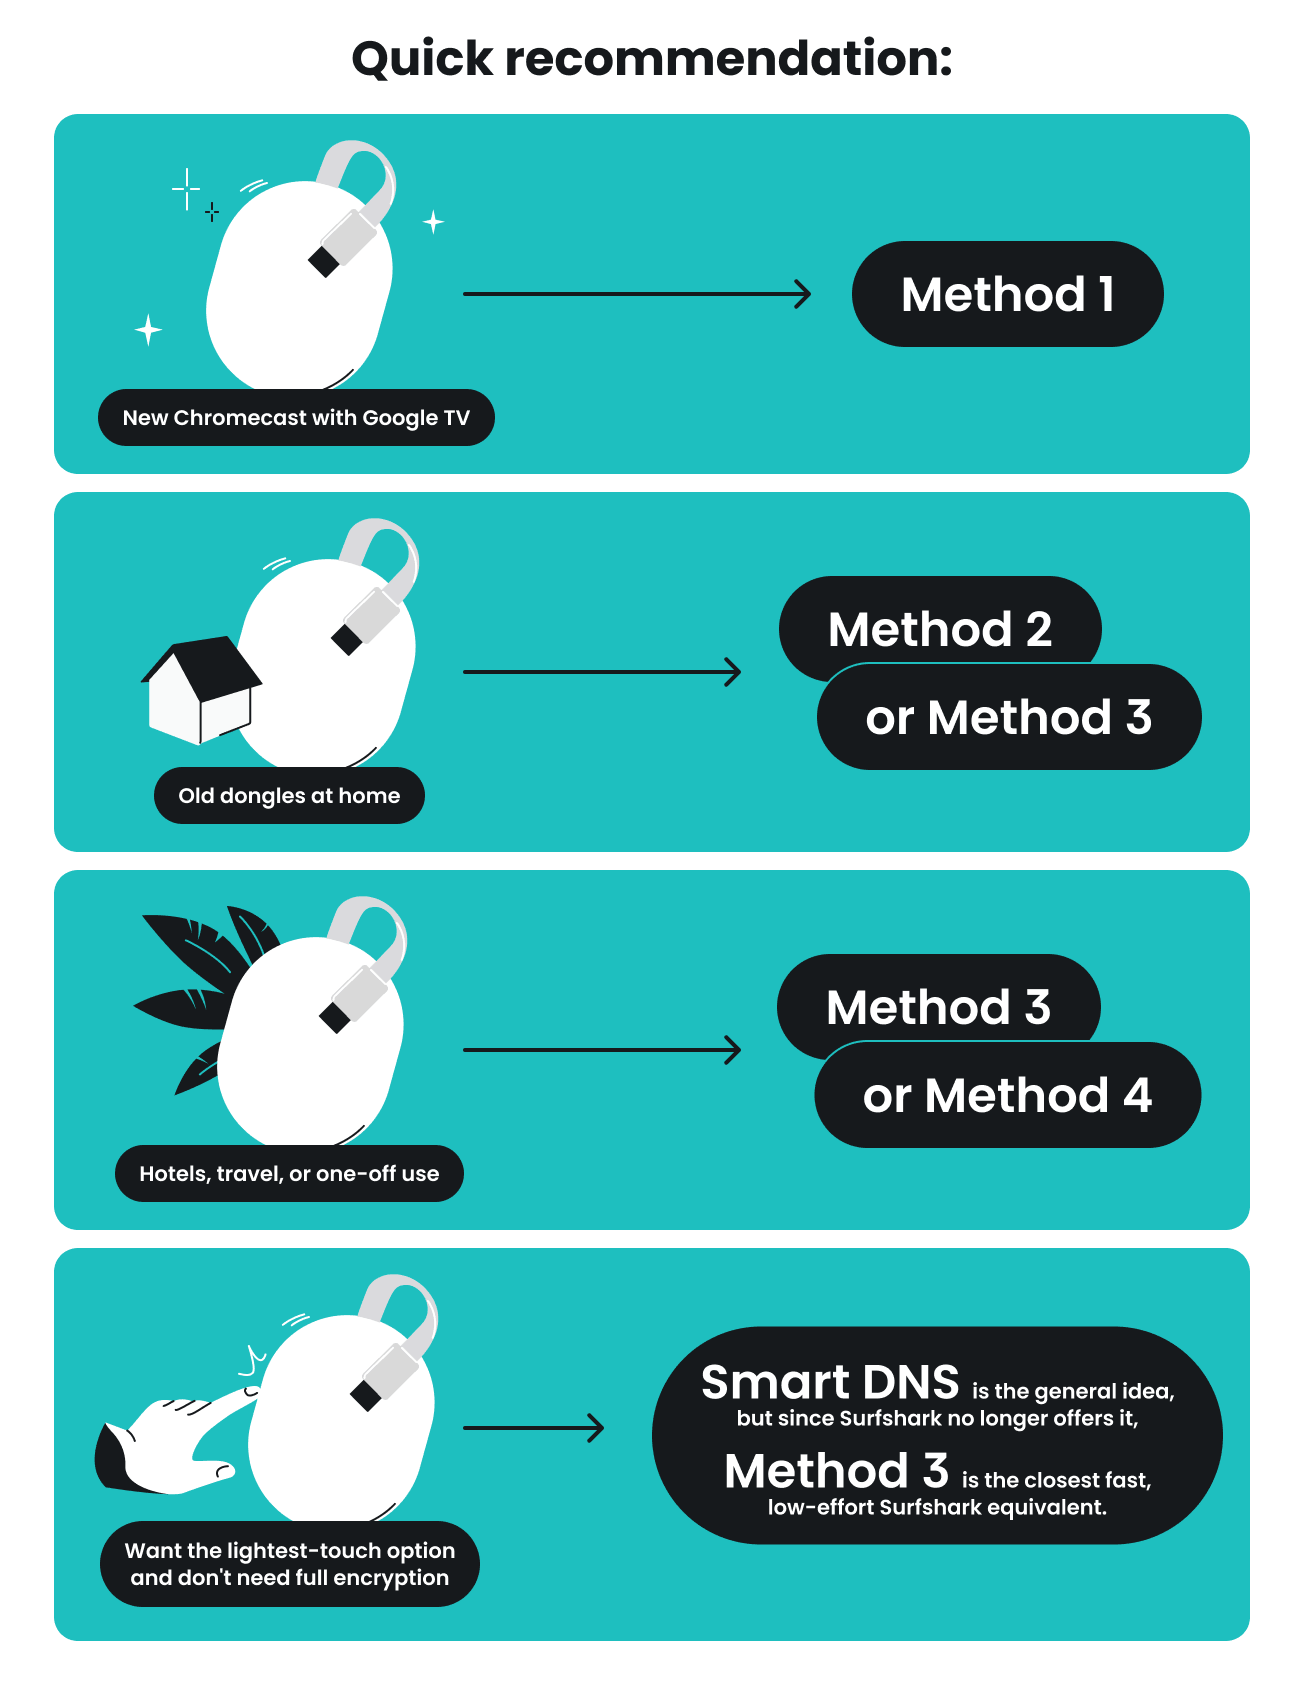
Chromecast with Google TV works differently. It runs on Android TV, so you can install the Surfshark app from the Google Play Store and encrypt the device’s traffic directly (Method 1 below). Every other Chromecast needs the VPN on a physical or virtual router, so it’s protected even though the device never runs a VPN app.
One mix-up worth clearing up: Chromecast ships with Google’s DNS servers (8.8.8.8 and 8.8.4.4) hardcoded, and some assume this alone keeps your ISP out of the loop. It doesn’t. This only changes how DNS lookups resolve. The video still travels over your ISP’s network in full view, which is the gap a VPN closes.
One more thing before you pick a method: if you haven’t set up your Chromecast yet, do that first. Google’s official setup guide walks you through it. The VPN just rides on top of whatever network the Chromecast connects to.
Method 1 – Install VPN directly on Chromecast with Google TV
For this method, you’ll need a Chromecast with Google TV and a Surfshark subscription — no router access or extra hardware required.
Step-by-step
- On your Chromecast with Google TV remote, open the Google Play Store app.
- Search for Surfshark and install the official Surfshark app.
- Open the app and sign in with your Surfshark account.
- Pick a VPN server location and connect.
- Once you see the connected confirmation, stream as usual — everything from this device now runs through the VPN.
Pros and cons
|
Pros
|
Cons
|
|
Simplest setup of the four.
|
Only works on Chromecast with Google TV.
|
|
Great for both privacy and accessing geo-restricted content safely, as if you were at home.
|
Older dongles can’t install anything, this method included.
|
Method 2 – Use a VPN on your router
For this method, you’ll need a router that supports VPN connections directly. Not all do, so check your manual or search your model plus “VPN” first. The option is usually under advanced network settings, sometimes labeled “VPN client” or “VPN passthrough.”
If yours doesn’t support it, you have two options:
- Follow our guide on how to install a VPN on a router;
- Or skip the DIY route and get a new router that is compatible with Surfshark.
Heads-up: most mesh Wi-Fi systems like Amazon eero or Google Nest Wi-Fi don’t support installing a VPN directly. So this method mainly suits traditional physical routers. If your router supports it, follow these straightforward steps:
Step-by-step
- Open the router configuration panel. To do it, enter your router’s IP address in your browser, just like a URL. Finding the IP is different for every operating system.
- For Windows 10 users, this means opening the “Start” menu, typing in “Command Prompt,” and opening this program. There, you have to type in “ipconfig” and press “Enter.” You should see your router’s IP address on the “Default Gateway” line.
- Mac users should start by going to “System Preferences.” There, you should find and click the “Network” icon, select your network connection (Wi-Fi, wired, whatever), and click the “Advanced” button at the bottom. Then, go to the “Network” window, select the “TCP/IP” tab, and see your router’s IP address listed as “Router.”
- Follow your VPN app’s guidelines. Every VPN service will have different instructions for setting up on different router firmware types. For example, you can take a look at Surfshark’s instructions for setting up a VPN on Asus, DD-WRT, and Tomato routers. More can be found in the support section.
- Check if you’re connected to the internet. If not, check whether you followed the instructions correctly. If you’re a Surfshark user, contact Surfshark customer support.
Once that’s done, connect your Chromecast to the same VPN-protected network, and you’re set.
Pros and cons
|
Pros
|
Cons
|
|
Covers every Chromecast model, old dongles included.
|
More technical to set up than the other methods.
|
|
Protects multiple devices connected to your network at once, with nothing extra to install on the streaming device itself.
|
Not all routers — mesh systems especially — support it.
|
Method 3 – Create a VPN hotspot / virtual router on your computer
If your router doesn’t support a VPN and a preconfigured router isn’t an option, you can turn a Windows laptop or Mac into a temporary VPN-protected Wi-Fi hotspot using Surfshark’s desktop app. This is a good fallback for hotels, travel, or one-off streaming sessions.
Windows laptop as a hotspot
On Windows 10:
- Go to “Settings,” then “Network and Internet,” and then “Mobile Hotspot.”
- Switch the “Mobile Hotspot” ON.
- On the right, under “Related settings,” click “Change adapter options” (where Windows lists your network adapters).
- In the new window, right-click on your VPN app’s connection and choose “Properties.”
- Navigate to the “Sharing Tab,” tick the “Allow other network users to connect through this computer’s internet connection” box, and choose your newly-created hotspot in the drop-down menu. Click “OK.”
- Your virtual router is good to go!
On an older version of Windows:
- Press the Windows + S keys at the same time.
- Type in “cmd.”
- Right-click “Command Prompt” and select “Run as Administrator”
- Type in “netsh wlan set hostednetwork mode=allow ssid=[NETWORKNAME] key=[PASSWORD]” and do not press “Enter.”
- Replace [NETWORKNAME] with the name of your new network.
- Replace [PASSWORD] with the password for your new network.
- Press “Enter.”
- Press the Windows + R keys at the same time.
- Type in “ncpa.cpl” and click “OK.”
- Find the connection with the name you chose in Step #5 above.
- Remember the title (the first line) of this connection.
- Find your VPN connection. In this example, it’s the Surfshark one.
- Right-click on it and select “Properties” in the drop-down menu.
- Go to the “Sharing Tab,” check the “Allow other network users to connect through this computer’s internet connection” box, and choose the hotspot with the title you noted above in the drop-down menu. Click “OK.”
- Your virtual router is ready!
Mac as a hotspot
Setting up a virtual router on a Mac, usually via macOS’s Internet Sharing feature, is complicated, limited, and often doesn’t work well with a VPN app’s virtual network adapter. You can try it, but we recommend other methods. If you want, contact our support team to test it and see if it works for you.
Pros and cons
|
Pros
|
Cons
|
|
No new hardware needed.
|
Your computer has to stay on and connected the whole time, which can mean battery drain or heat on a laptop.
|
|
Works with any Chromecast, old dongles included.
|
Not the most reliable choice for a long 4K session.
|
Method 4 – Cast or mirror from a VPN-protected device
Instead of putting the VPN on your network, you can run it directly on the phone or laptop you’re casting from — the Chromecast just displays what that device sends it.
Step-by-step
- Connect to a Surfshark server on your phone, tablet, or laptop.
- Make sure that the device and your Chromecast are on the same Wi-Fi network — this part still matters, VPN or not.
- Open the Google Home app (or Chrome, for casting a browser tab) and select your Chromecast as the target.
- Start mirroring your screen, or cast the tab or app you want to stream.
If Chromecast doesn’t show as a cast option once the VPN is on, the VPN app is usually the cause. It blocks local network discovery, not the Chromecast. Look for a “local network” or LAN access toggle (sometimes called split tunneling) in your VPN app’s settings and turn it on. This fix appears more often in support forums than any Chromecast troubleshooting.
Pros and cons
|
Pros
|
Cons
|
|
No router or hotspot setup needed.
|
Only protects what you’re actively casting or mirroring.
|
|
Works with any Chromecast, wherever you are.
|
Depends on your VPN app allowing local network access (see tip below).
|
Optional alternative – using smart DNS with Chromecast
Smart DNS is a lightweight technique some VPN providers offer to access geo-restricted streaming sites and platforms. It reroutes only your DNS requests, making your traffic appear from elsewhere without encrypting it.
It’s worth knowing the concept exists, but as of February 2, 2026, Surfshark discontinued its SmartDNS feature due to limited demand (see Surfshark’s support article). If you want a Surfshark option today, Methods 1–4 above are best: router-level VPN, a virtual hotspot, the Google TV app, or casting from a protected device. All add full encryption.
Which method should you choose? Quick comparison
Every method above gets a VPN between you and your streaming services — here’s a quick side-by-side to help you pick the right one for your setup:
|
Method
|
Best for
|
Difficulty
|
Need extra hardware?
|
Privacy level
|
|
Google TV app
|
Chromecast with Google TV owners
|
Easy
|
No
|
Full (device-level encryption)
|
|
Router VPN
|
Older dongles, protecting every device at once
|
Medium–hard
|
No (uses your existing router, if compatible)
|
Full (network-level encryption)
|
|
Virtual hotspot
|
Hotels, travel, one-off use
|
Medium
|
No
|
Full, while the hotspot is running
|
|
Cast/mirror from a protected device
|
Quick, one-off sessions
|
Easy
|
No
|
Full, while mirroring
|
|
Smart DNS
|
Streaming only, no privacy needed
|
Easy
|
No
|
None
|
Why use Surfshark for Chromecast?
Looking for the best VPN for Chromecast? Here’s why Surfshark is a solid choice:
- Unlimited devices — Surfshark offers unlimited simultaneous connections, covering every TV, phone, and laptop in the house, Chromecast included, on one subscription;
- WireGuard support — a fast, modern VPN protocol fast enough for HD and 4K streaming without a noticeable slowdown;
- Step-by-step setup guides and intuitive apps for routers and Chromecast with Google TV, so you’re never guessing at firmware menus;
- A strict, independently audited no-logs policy, plus a 30-day money-back guarantee if Surfshark isn’t the right fit.
Bottom line: don’t Chromecast unprotected
All you need to stream with Chromecast and a VPN is to pick a method you prefer. Virtual routers, physical routers, Windows, Mac – the world’s your oyster. And setting up a VPN to work with Chromecast is well worth the effort.
If your Chromecast turns any TV into a smart TV, then a VPN allows you to use your Cast-friendly service without streaming your data to ISPs, advertisers, and other snoopers.
FAQ
Does Chromecast work with a VPN?
Yes, but only indirectly unless you have Chromecast with Google TV. For every other Chromecast, the VPN has to run on your router, a virtual hotspot, or the device you’re casting from.
Can I install a VPN directly on Chromecast?
Only on Chromecast with Google TV, which runs Android TV and supports the Surfshark app from the Google Play Store. Older Chromecast dongles can’t install any apps at all, so the VPN needs to run on your network instead.
Will a VPN slow down my Chromecast streaming?
Not noticeably, if you’re using a fast protocol like WireGuard and a nearby server. If your ISP is specifically throttling streaming traffic, a VPN can even make your stream steadier — though it won’t fix slowdowns caused by a data cap or general network congestion during peak hours.
Can I use a free VPN with Chromecast?
You can, but a free Chromecast VPN comes with real trade-offs compared to other VPN services — slower speeds, data caps, and far fewer server locations. For daily HD or 4K streaming, a paid, reliable VPN with unlimited devices and unlimited bandwidth is a better fit.