
To change your IP (Internet Protocol) address, you can manually configure a static IP on your device, utilize a proxy server, or just a VPN (Virtual Private Network). You can also contact your ISP (Internet Service Provider) and request a new IP address the old-fashioned way.
Let’s dive into each method to help you change your IP address easily and boost your online privacy.
What is an IP address?
An IP address is a digital identifier that allows devices to send and receive data online. Every device connected to the internet — whether it’s your smartphone, laptop, or smart fridge — has a unique IP address that helps it communicate with websites, services, and other devices.
Just as a mailing address ensures your letters reach the right destination, an IP address ensures that internet traffic is routed correctly. These addresses can change depending on factors like your ISP (Internet Service Provider), network settings, or location, influencing how your device connects to the web.
Devices often have both a public and private IP address. A public IP address is assigned by your ISP, while a private one is used within your local network.
Types of IP addresses: static vs. dynamic IP addresses
There are two main types of IPs — static and dynamic. The kind of IP address you use can impact your online experience. Let me explain how:
Static IP Address
A static IP address is assigned by your ISP and remains the same every time you connect to the internet, making it useful for businesses hosting websites or servers. It provides reliable access for remote connections but also makes it easier for advertisers and trackers to monitor your online activity.
Dynamic IP Address
A dynamic IP address changes periodically and is typically assigned by your ISP through something called a DHCP (Dynamic Host Configuration Protocol) server. It offers more privacy by making it harder to track your browsing over time. However, it can occasionally cause minor disruptions if the address changes during an online session.
Fun fact: You can use our free IP lookup tool to get more info — like city, country, and ISP — on your static or dynamic IP address.
Why change your IP address?
In 2024, cybercrime costs in the United States surged past $450 billion, with many attacks starting from something as simple as a leaked IP address falling into the wrong hands.
Changing your IP address can help protect you from hackers — but that’s just the beginning. Here are other key reasons to consider switching your IP:
- Avoid advertisers and trackers: changing your IP address makes it harder for websites and advertisers to use IP tracking to monitor your online activity and build targeted profiles;
- Browse safely: a new IP helps reduce exposure to risks linked to your old one. If your previous IP address was targeted by cybercriminals, tracked by advertisers, or flagged for suspicious activity, switching to a fresh IP can bring you safer, more private browsing online;
- Fix network issues: switching your IP can resolve connection problems, such as IP conflicts or slow speeds caused by network congestion;
- Bypass IP blocks: certain websites or services may restrict access to your current IP address. If you’re blocked, changing your IP might restore access;
- Prevent DDoS attacks: gamers and streamers often change their IPs to reduce the risk of DDoS (Distributed Denial of Service) attacks or doxxing attempts that reveal personal information.
Disclaimer: Please note that using Surfshark services for any illegal activities is strictly forbidden and violates our Terms of Service. Make sure that any use of Surfshark services for your particular activities conforms to all relevant laws and regulations, including those of any service providers and websites you access using Surfshark.
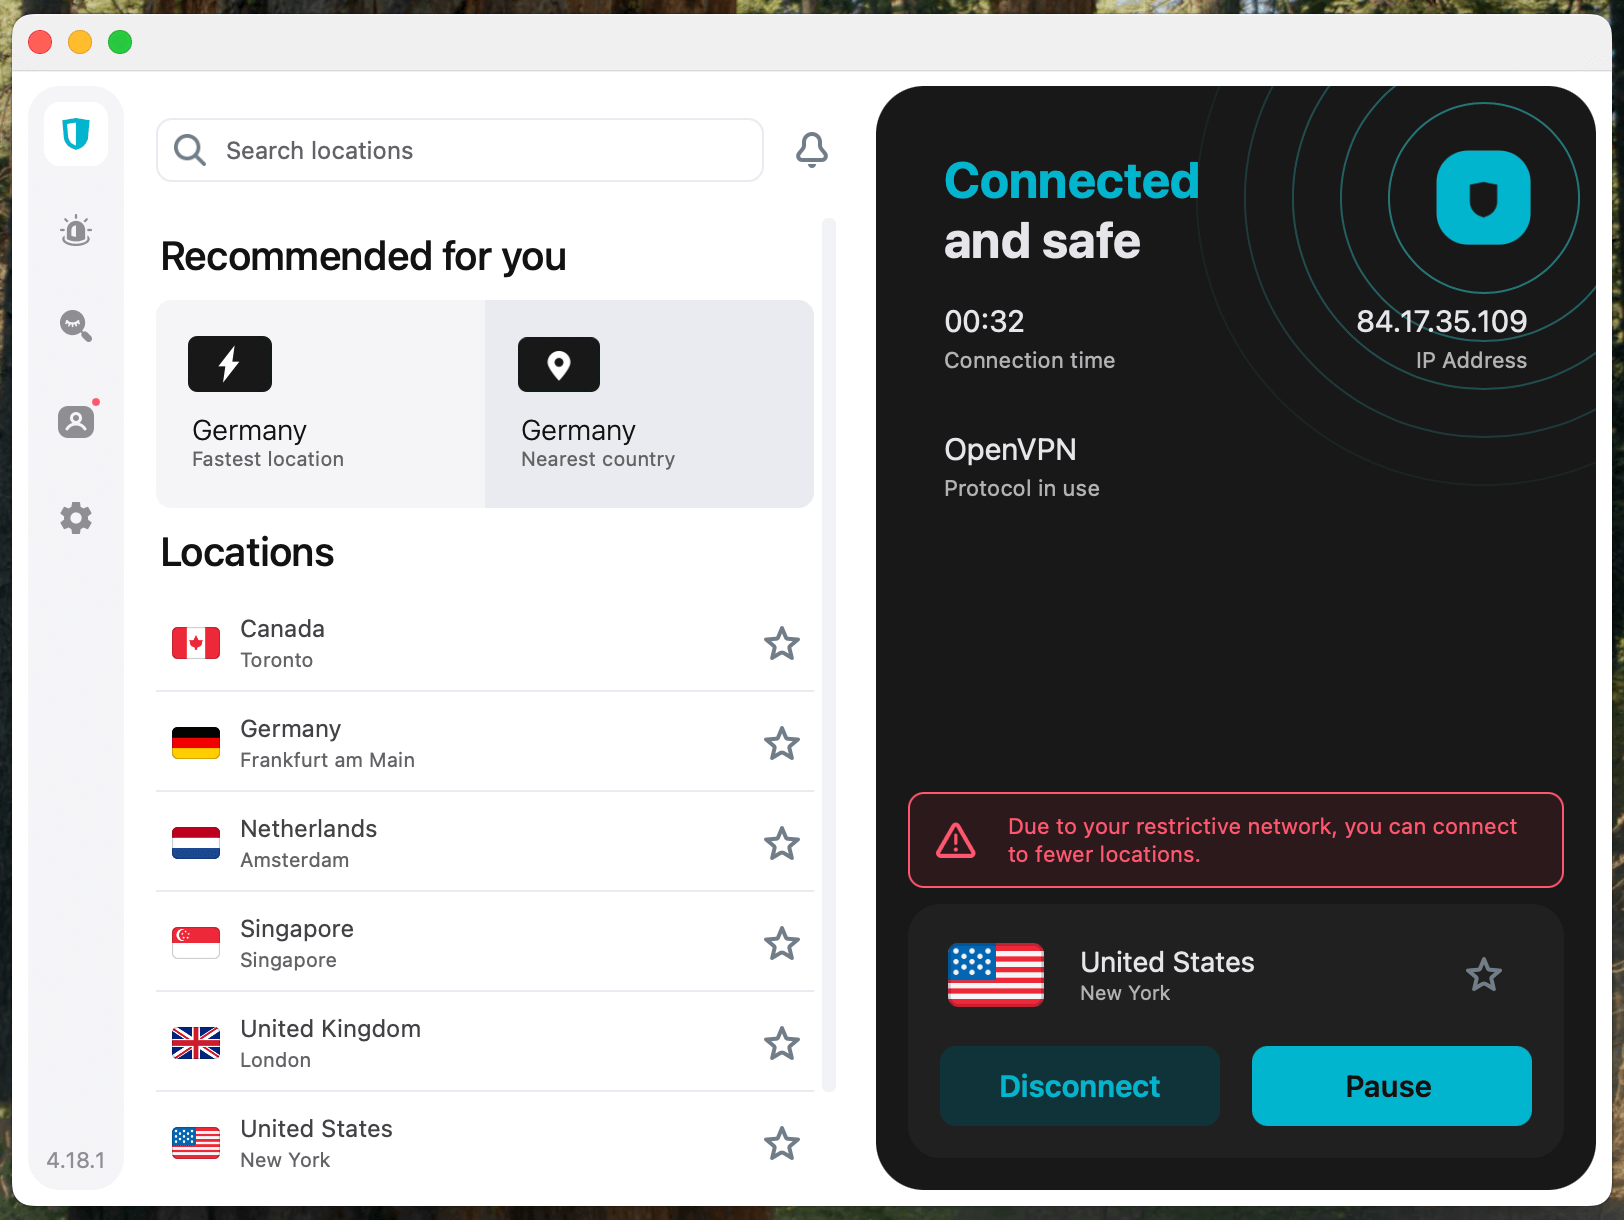
How to change your IP address with a VPN
If manually switching your IP seems overwhelming, you can change your IP address automatically with a VPN. A VPN doesn’t just make getting a different IP address easy, but it also provides encryption that other options lack.
Follow these steps on how to change your IP address using a VPN to better secure your online activity:
- Subscribe to a reliable VPN service: select a VPN service — like Surfshark — that offers a wide range of server locations worldwide to ensure better privacy and high-speed connections.
- Download the VPN app: go to your VPN provider’s website or the appropriate app store (for mobile devices) to install the VPN app on your device.
- Log in: open the app and log in with your credentials.
- Select a server location: choose a server location that suits your needs. For a faster internet connection, choose a nearby server so your web traffic won’t be routed too far away.
- Launch the VPN: click on your selected server location to activate your VPN. You’ll be automatically assigned the VPN server’s IP, masking your real IP address.

How to change your IP address without a VPN
Protecting your online privacy is vital, so you should mask your IP whenever possible. If you’re wondering how to change your IP address, check out these different methods:
Restarting your router
Here’s how to reset your IP address and get a new one just by restarting your router:
- Unplug your router: find and unplug the power cable from your router’s electrical outlet. This will cut off the router’s connection to your ISP.
- Wait a few minutes: wait at least 5–10 minutes to let your ISP’s DHCP server reassign your old IP address to another device on the network.
- Plug the power cable back in: reconnect the power cable to the electrical outlet and wait for the router to power up completely. This can take a few minutes because the router needs to re-establish its connection with your ISP.
- Verify the change: once your router is powered on and connected to the internet, you can use a tool like What is my IP? to check if your IP address has changed.
Manually changing your IP address
If restarting your router doesn’t work, you can also change your IP address manually on different platforms. Here’s how:
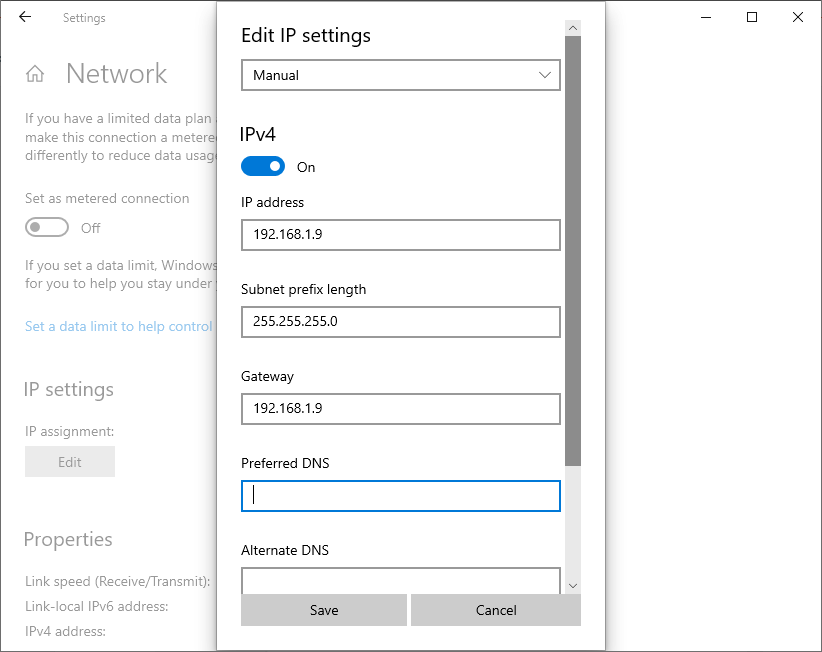
How to change your IP address on Windows 10 manually
- Click the Start menu and select Settings.
- Click Network & Internet and choose Wi-Fi or Ethernet, depending on your connection.
- Go to your network connection, then click Edit under your IP settings.
- Choose Manual from the dropdown menu, then toggle on the IPv4 switch.
- Enter your new IP address, subnet prefix length, default gateway, and DNS server addresses. These will usually come from your router’s settings or network administrator.
- Click Save.
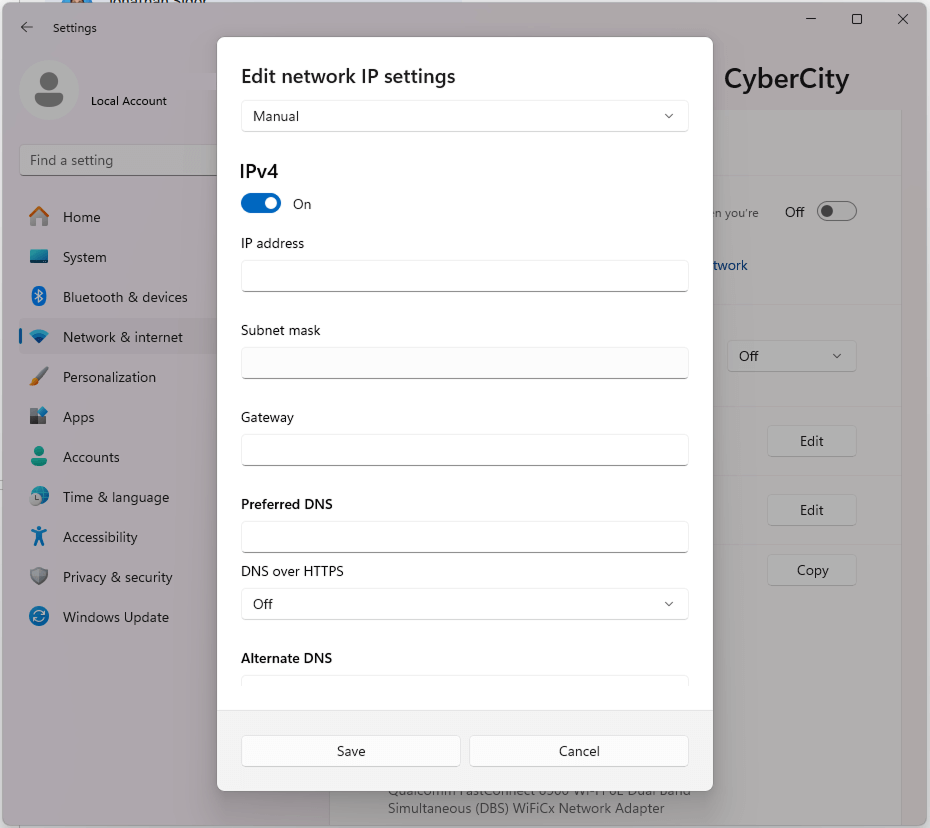
How to change your IP address on Windows 11 manually
- Go to your computer Settings.
- Find and click the Network & internet option, then go to Advanced network settings.
- Find and select the Hardware and Connection Properties option.
- Return to Network & internet and click on Wi-Fi.
- Find and click on the <name of connection> properties option, then go to Edit IP assignment.
- Select Manual from the dropdown menu and enter your new IP and all required data (fill in the Subnet mask, DNS, and Gateway boxes).
- Enter all required data and click Save.
How to change your IP address on Android manually
- Go to your Android Settings.
- Tap Connections or Network & Internet.
- Tap Wi-Fi.
- Tap and hold your connected Wi-Fi network.
- Select Modify network or Manage network settings.
- Change your IP settings from DHCP to Static.
- Enter your new IP address, gateway, and DNS addresses.
- Tap Save.

Note: The exact steps for changing your IP address on Android may differ slightly depending on your device.
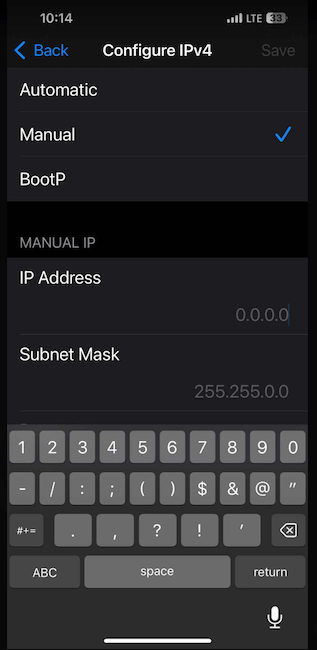
How to change your IP address on iOS devices manually
- Open your device’s Settings page.
- Go to Wi-Fi, then click the information icon next to the Wi-Fi network you’re connected to.
- Under IPV4 Address, tap Configure IP.
- Select Manual and enter your new IP address along with the other details.
- Tap Save.
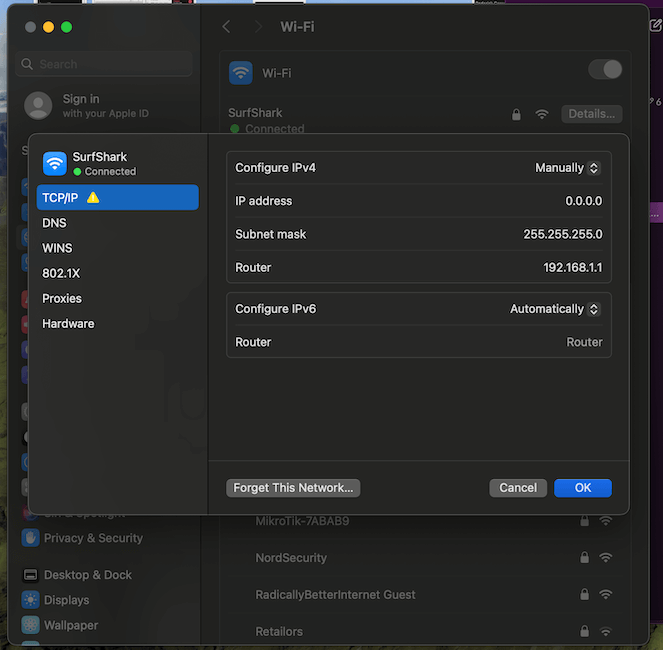
How to change your IP address on macOS manually
- Go to the Apple menu and choose System Settings.
- Click Network and select Details… by your current network connection.
- Move to the TCP/IP tab and select Manually from the Configure IPv4 dropdown menu.
- Enter your new IP address and other details.
- Click OK and then Apply.
Changing your IP address automatically with a proxy server
Follow these steps to change your IP address automatically using a proxy server:
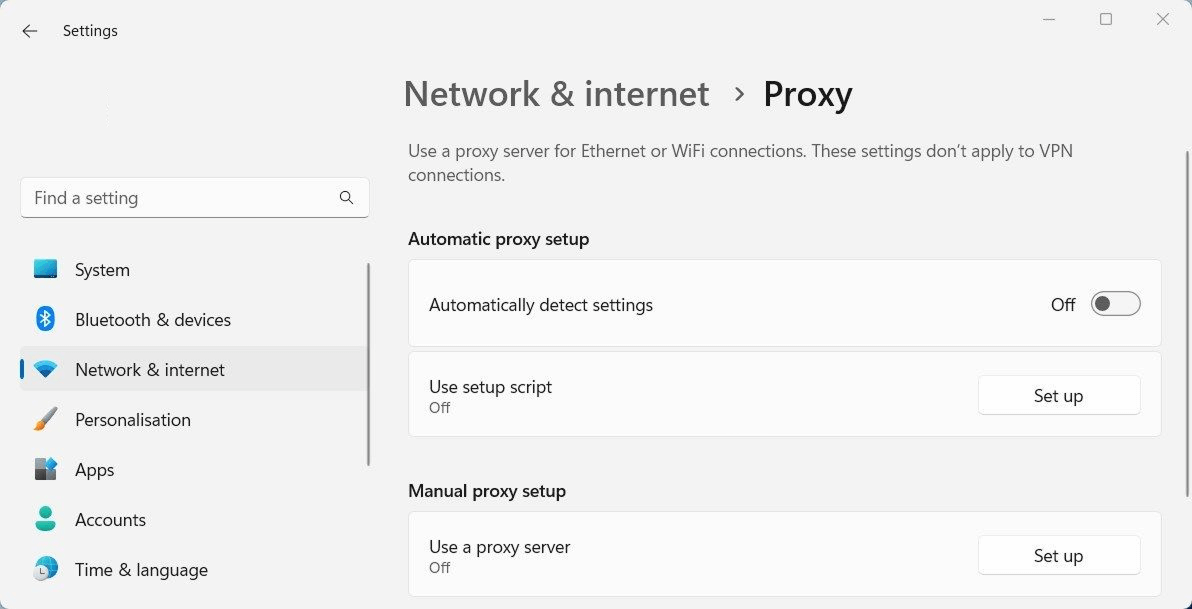
Using a proxy server on Windows
- Click the Start menu and select Settings.
- Go to Network & internet and click Proxy in the left-hand menu.
- Under the Automatic proxy setup section, toggle the switch to On to use a setup script if you have one.
- Enter the script address and click Save.
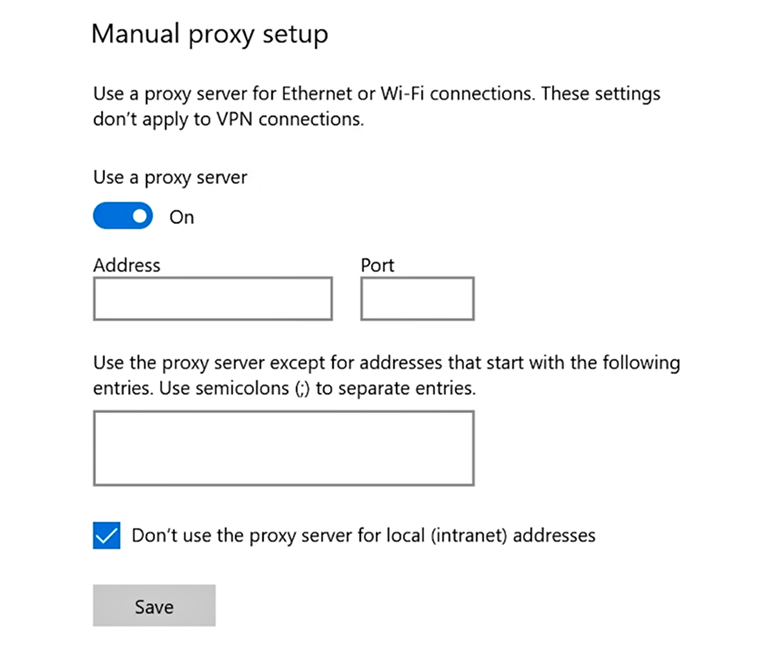
To manually set up a proxy, follow these steps:
- Scroll down to the Manual proxy setup section.
- Toggle the switch to On.
- Go to the Address field and enter the proxy server’s IP address.
- Enter the Port number in the Port field.
- Click Save to apply the new settings.
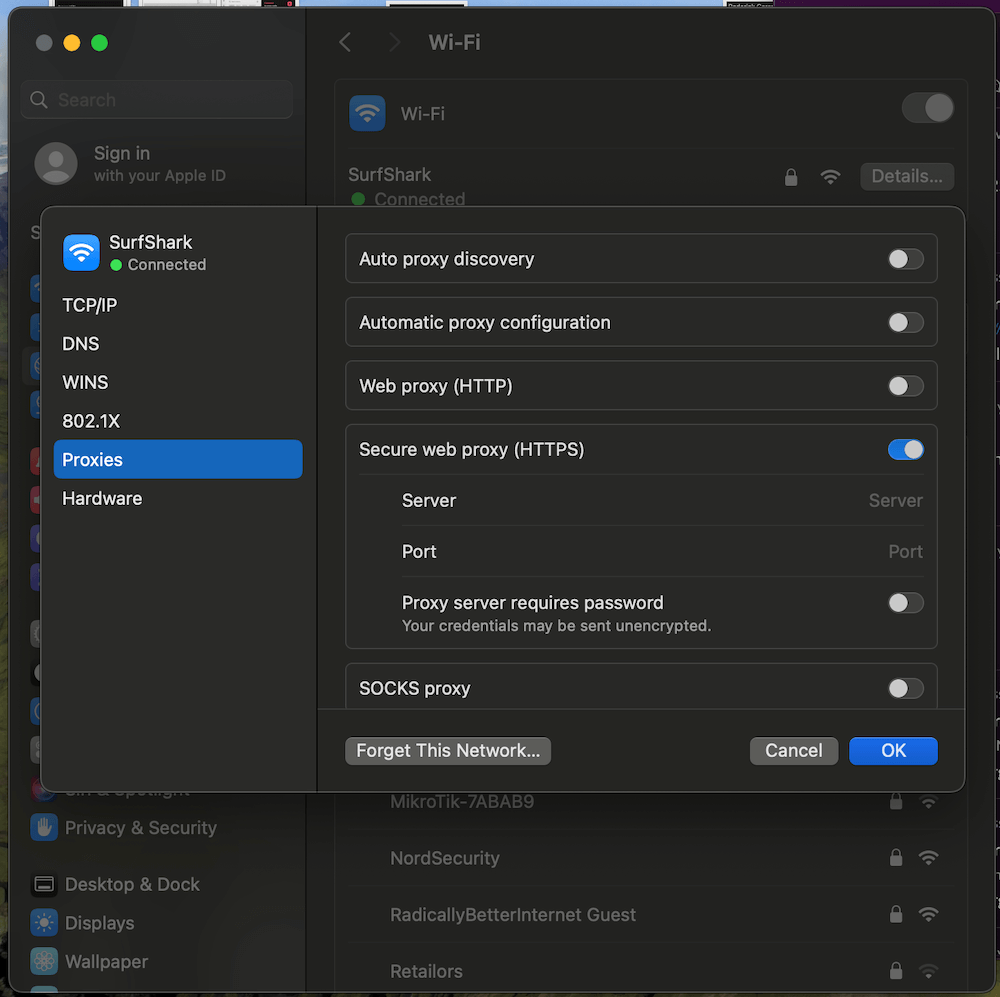
Using a proxy server on macOS
- Open System Settings from the Apple menu.
- Click on Network and click Details… by your active network connection.
- Click the Proxies tab and toggle the type of proxy you want on (e.g., Web proxy, Secure web proxy, SOCKS proxy).
- Enter the settings provided by your network administrator. Click OK and Apply.
Contacting your internet service provider
If you’re not confident about changing your IP address manually, you can contact your ISP for help. Here’s how:
- Find your ISP’s customer service contact information. It will most often be available on their official website or your billing statement.
- Call the customer service number or use the provided online chat/email support option.
- Explain that you want to change your IP address and provide a valid reason if asked (e.g., security concerns).
- Follow the instructions you receive.
- Confirm that your IP address has been changed.
Why should you use a VPN to change your IP address?
Changing your IP address via a VPN isn’t just about masking your location — it’s about keeping your online identity private.
Other methods may change your IP address, but there’s a good chance your internet activity will still be traced back to you. In contrast, VPN users enjoy a more secure browsing experience.
A VPN changes your IP address and routes your internet traffic through remote servers, ensuring your IP address is different and all your online data is encrypted.
Change your IP address with a VPN
Tired of being stuck with the same IP address? Change it with a VPN.
Reliable tools like Surfshark are simple, legal, and effective, making them a great choice for safeguarding your internet connection.
Swap out your actual IP address and make sure harmful actors don’t prey on your online activities with Surfshark.

FAQ
Is it possible to change your IP address?
Yes, you can change your IP address manually or automatically using a trusted VPN like Surfshark. A VPN masks your real IP address and assigns you a new one from a server in a different location, providing better online privacy and security.
Does your IP address change with Wi-Fi?
Yes, connecting to a different Wi-Fi network can change your IP address because each network has its own assigned IP. For instance, switching from your home Wi-Fi to a public Wi-Fi network will give you a different IP address.
How do you change your IP address without a VPN?
You can change your IP address without a VPN by contacting your ISP to request a new one, using a proxy server to mask your real IP, or rebooting your router. Note that this final option won’t work if your ISP only offers a static IP address.
However, none of these methods offer the same level of security and privacy as a VPN.
Can a VPN change your public IP address?
Yes, a VPN can change your public IP address, which is assigned by your ISP and is visible to websites and online services. In contrast, VPNs don’t change your private IP address, which is assigned by your router and is used only with your local network to help your devices communicate with each other.