
With their latest updates, Apple has added extra privacy settings users can customize. Now the iPhone’s operating system (iOS) limits app access to sensitive data like contacts and location without your consent. So, here are some tips for adjusting iPhone privacy settings for a safer experience.
Note: All of the tips and tricks are applicable to all Apple devices rocking the latest iOS.
Table of contents
Secure your iPhone login
Let’s begin with the first step — the login. Everyone should have a lock to stop strangers from accessing their personal info. Why not make that lock a strong one? Why not have more than one?
Consider stronger passcodes and passwords
Create a strong and randomized passcode for your iPhone login. Avoid using dates, especially those tied to you, like your birthday. When creating app passwords, your iPhone will identify weak or already used passwords, and if you wish to check how strong it is, go to Settings and scroll down to Passwords.
While on the topic of passwords, you may want to consider using a password manager.
Use biometric authentication
It’s safe (pun intended) to say your face and fingerprints are unique to you, which means they can be used as biometric keys to bolster your security. iPhones offer precisely that with their Touch ID and Face ID technology.
Set up Touch ID for fingerprint recognition
To set up Touch ID, open Settings and tap Touch ID & Passcode. Turn on any of the options, then follow the instructions.
Set up Face ID for facial recognition
To set up Face ID, go to Settings, tap Face ID & Passcode, choose Set up Face ID, then follow the instructions.
During this process, the iPhone uses its TrueDepth camera system — a combination of infrared sensors and a dot projector — to create a secure 3D map of your face for future recognition.
Enable Two-Factor Authentication (2FA)
Two-factor authentication means adding a one-time-use code to your password when logging into your Apple account. 2FA improves security and neutralizes risks associated with compromised passwords.
To enable the in-built Two-Factor Authentication option on your iPhone, go to Settings, tap on your user profile, Password & Security, and turn on Two-Factor Authentication. You will need to provide the number to which you want the code to be sent.
Sign in with Apple
Signing in to different accounts can be made easier with a helpful security feature called “Sign in with Apple.” In short, this feature allows you to use your secure Apple ID instead of creating a separate password. Of course, this feature is only available on websites and apps that let this type of sign-in.
- Tap Sign in with Apple.
- Enter the required info.
- Hit Continue and confirm with Touch ID, Face ID, or your iPhone passcode.
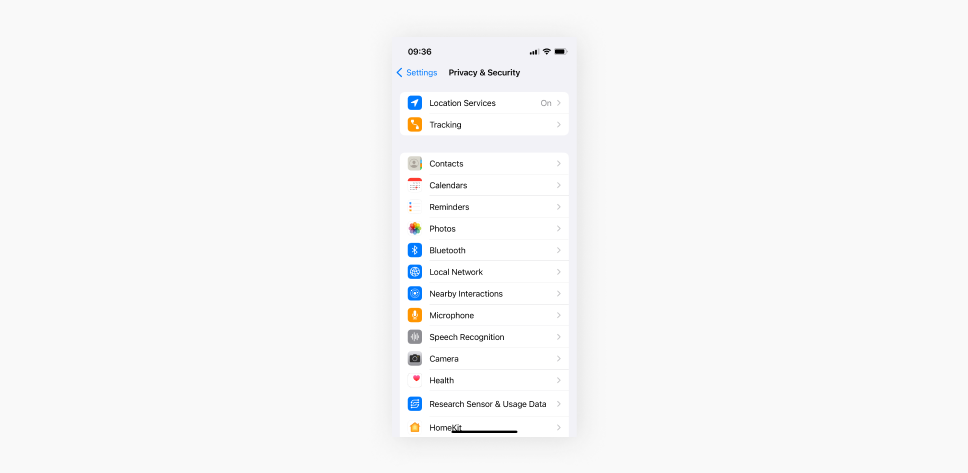
Change iPhone’s Privacy & Security settings
Limit location tracking
Go to Settings > Privacy & Security > Location Services. You’ll see an entire list of apps with permission to access your location data. Choose which ones really need your location.
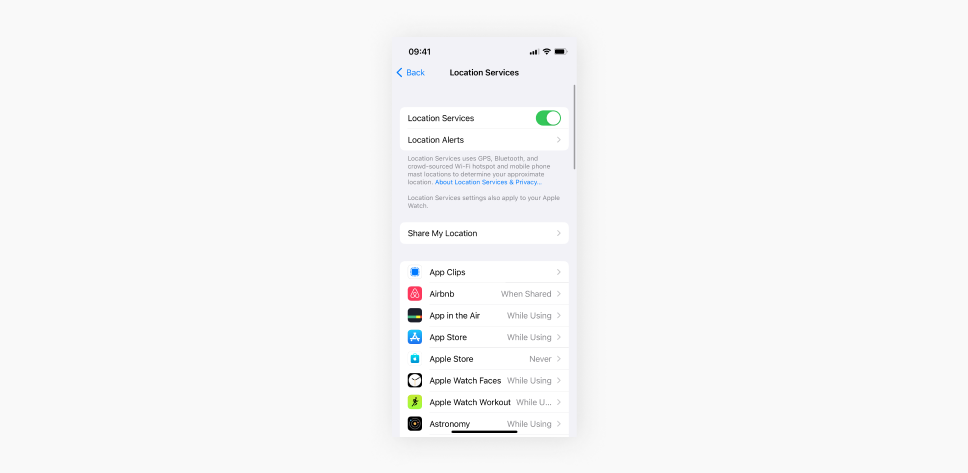
When an app uses Location Services, an arrow icon appears in the status bar or in the Control Center. If you’re on the road most of the time, you may want to grant access to Waze or Google Maps. For ease, I’ve allowed my Wallet and Weather apps to use my location only while using them.
Disable Apple’s cross-app tracking
Apple requires apps to get your consent before tracking you across third-party apps and websites. Open Settings, tap Privacy & Security, continue to Tracking, and toggle on the Allow Apps to Request to Track.

Limit ad tracking
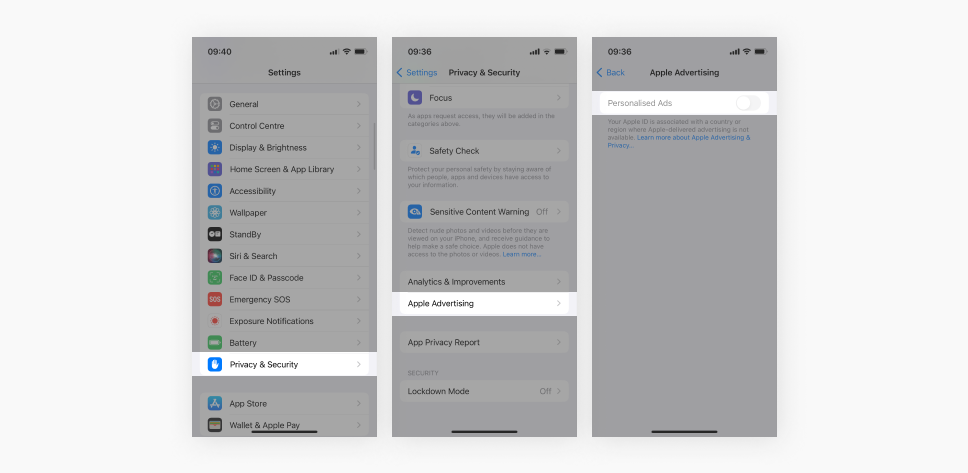
You can minimize personalized ads in your iPhone privacy settings by going to Settings, tapping Privacy & Security, scrolling to the bottom, choosing Apple Advertising, then Personalized Ads, and toggling it off. Remember, Apple will show you neutral ads instead of ones tailored around your search history.
Disable unnecessary Bluetooth tracking
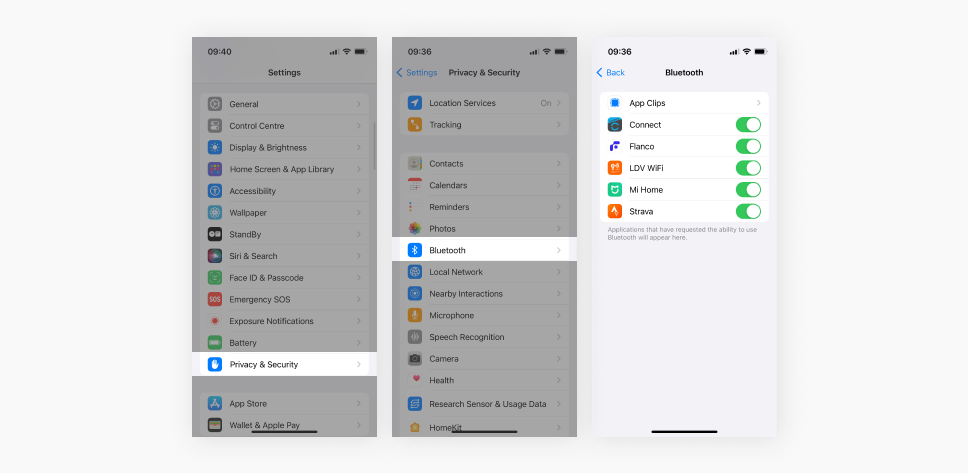
Go to Settings, then Privacy & Security, and turn Bluetooth off when not in use. Some third-party apps may not ask for your location, but they’ll tap into your Bluetooth to get more data.
Be picky when granting Bluetooth tracking, as it not only reduces the risk of bluejacking but also prevents apps from quietly determining your approximate location. Apps like Fitbit work with Bluetooth devices, so you can grant permission for your device to work. Be cautious when other apps like Facebook ask for it because all of Meta’s apps collect all of the data that is legal to collect.
Change your lock screen display
Go to Settings, tap on Face ID & Passcode, scroll down to the ALLOW ACCESS WHEN LOCKED menu, and toggle all choices off. This shouldn’t be an inconvenience if you have your Face ID set up.
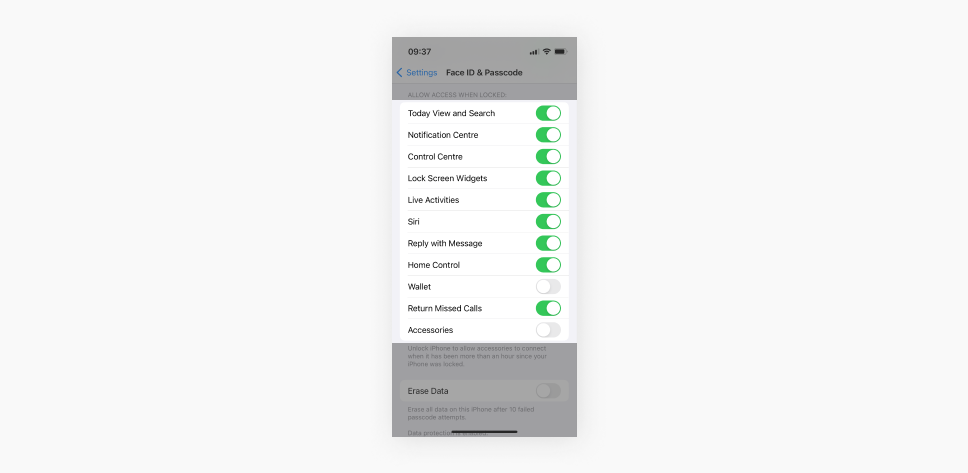
You may want to enable Erase Data, but be warned — this option deletes ALL data on your iPhone after ten failed passcode attempts. It’s not advisable for butterfingers.

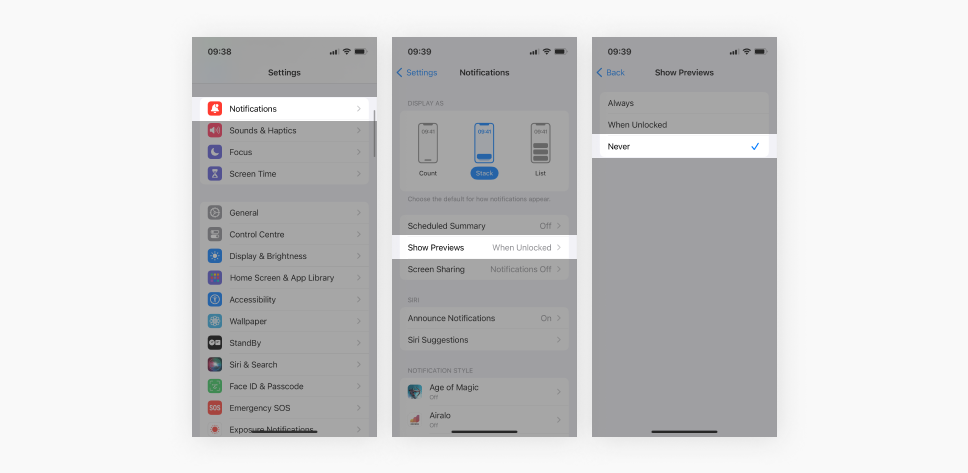
As a bonus, you can turn off message previews by going to Settings, then over to Notifications, then Show Previews, and tap Never. This will stop anyone who’s not you from peeking at your messages on your lock screen display.
Turn on Privacy Protection on your emails
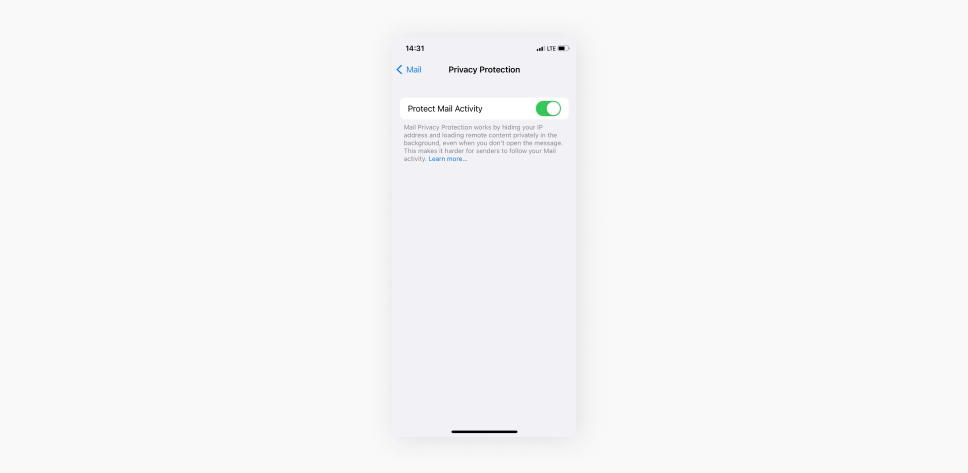
The iOS 15 update introduced the Privacy Protection feature — it blocks companies that send you mail from tracking your IP or tracking whether you opened the mail or not. Go to Settings, tap Mail, then go to Privacy Protection, and toggle on the Protect Mail Activity.
Turn off “Hey Siri”
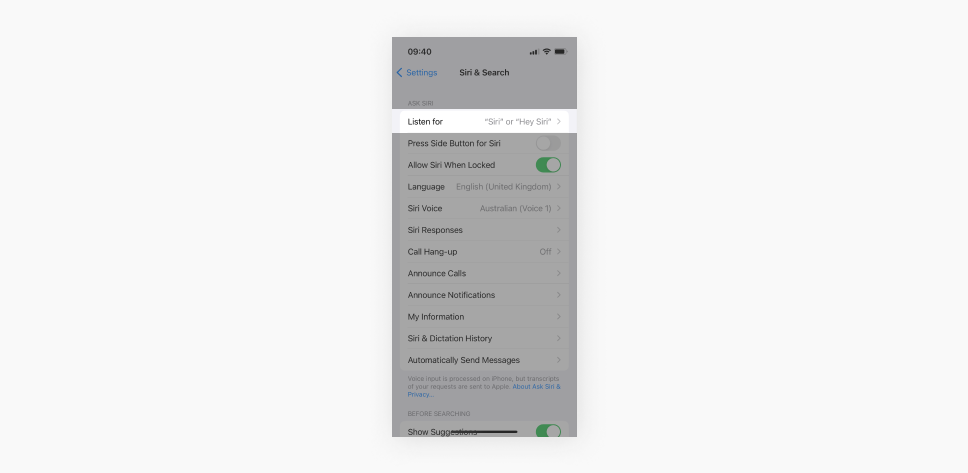
Disable the “Hey Siri” feature to prevent your device’s microphone from continuously listening for the activation phrase. Once turned off, you’ll have to activate it manually. Go to Settings, tap Siri & Search, and turn off Listen for “Hey Siri.”
Turn off Wi-Fi auto-connect
Your iPhone can automatically join networks it’s joined before. This could put your data at risk, especially if you don’t want your Wi-Fi owner to see which sites you visit.
To turn off auto-connect, go to Settings, tap Wi-Fi, and set Ask to Join Networks to Off.
Review your Settings app
Most mobile apps request access to your data when you install them. Despite that, you can decide which apps can access specific functions on your phone.
Change Apple’s app permissions
Go to Settings, and tap Privacy & Security. You’ll see a list of settings like location, camera, microphone, photos, and contacts. Click on any of these to pull up all the apps you have granted access. From there, you can easily toggle which ones can access your data.
Monitor third-party apps with the App Privacy Report
The App Privacy Report observers how third-party apps use your data and lets you adjust privacy settings or revoke permission if needed.
To turn it on, go to Settings, then tap Privacy & Security, choose App Privacy Report, and tap Turn On App Privacy Report.
Additional measures
Adjust your AirDrop settings
Although it’s great for quickly sharing files between Apple devices, AirDrop can reveal your device information to people nearby if left open to Everyone. To reduce your exposure, go to Settings → General → AirDrop (or use Control Center) and choose Contacts Only or Receiving Off.
This helps prevent unwanted file requests and keeps your device discoverable only to people you trust.
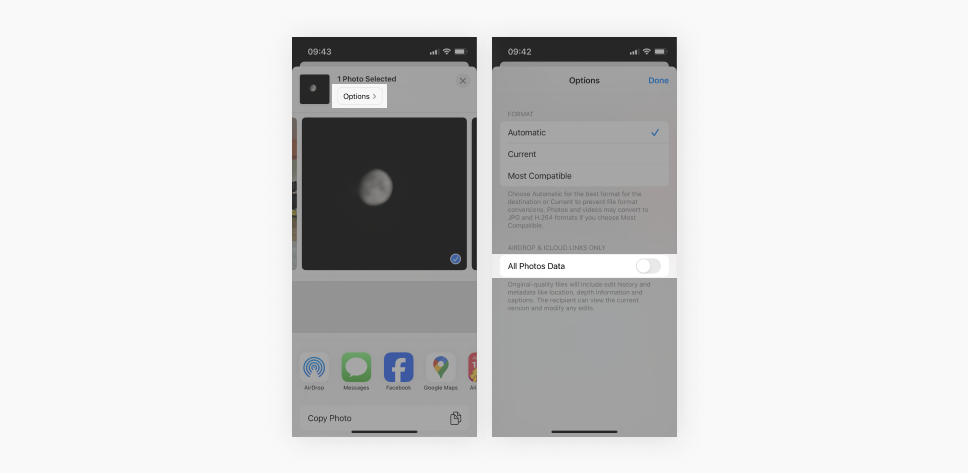
Stop photo location sharing
When you upload and share pictures straight out of the Gallery, you may add metadata — the time and location of where and when the pictures were taken. The good news is you can strip it off your photographs!
When uploading from your gallery to social media, select Options at the top of the screen. Turn off All Photos Data. Trust me, your photo quality will not drop.
Use the Hidden folder
Select which apps can access your photos, and use only the chosen ones for apps requiring access to your library. If you have concerns about apps accessing your sensitive photos, you can put them in the Hidden folder.
To access your Hidden folder follow these steps:
- Open Photos and tap the Albums tab.
- Go to Utilities, scroll down, and tap Hidden.
- Unlock your Hidden album with Face ID or Touch ID.
Tip: Consider turning off live photos, and you won’t share anything you don’t want to by accident.
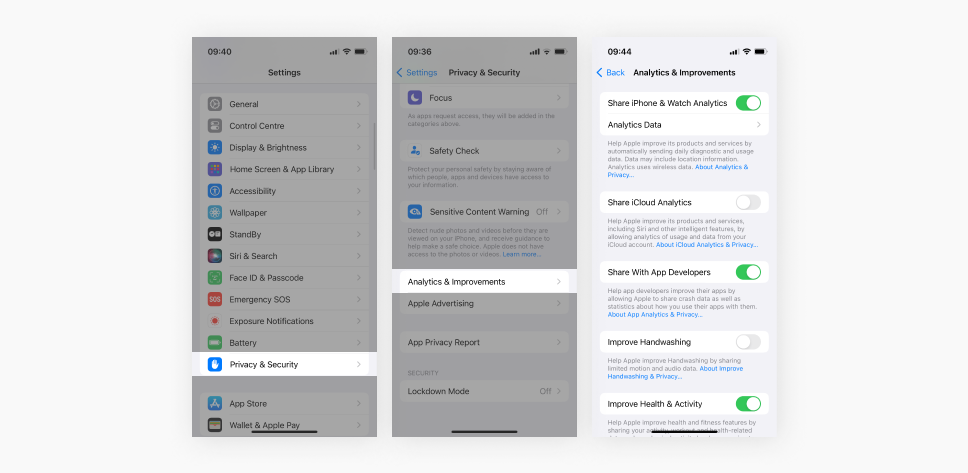
Decide what you want to share with Apple
If you’re extra cautious about your iPhone privacy settings, you can always stop sharing your data with Apple. Go to Settings, Privacy & Security, Analytics & Improvement, and toggle off the following: Share iPhone Analytics, Improve Siri & Dictation, Share iCloud Analytics, Improve Safety.
Get a virtual private network (VPN) for iPhone
What is a VPN on an iPhone if not a one-click solution to stopping online tracking and staying private?
More tracking happens online than you can prevent by fiddling with iPhone settings. For better privacy, you should at least mask your IP (Internet Protocol) address. An IP is like your home address online and can be used to track you.
How do you deal with this? Get a VPN that changes your IP and doesn’t keep a track record of your online activities. Get Surfshark.
Final takeaway – should I check my privacy settings one by one?
Privacy. Apps. iPhone. These are three different words that can co-exist in the digital world. Go ahead and review your iPhone privacy settings. While Apple’s emphasis on security and privacy sets the bar for other tech companies, you should remain cautious about what information you share.
When Apple can’t protect your data, Surfshark can. Complement your iPhone privacy with Surfshark to encrypt the information you transmit online. Haven’t decided yet? Try our free VPN trial for iPhone users!
FAQ
What privacy settings should I have on my iPhone?
Your iPhone privacy settings should be set to the highest standard. Follow these steps to maintain a high level of security and privacy:
- Update your iOS.
- Use a unique password.
- Secure your iPhone with Face ID.
- Delete unknown fingerprints from iPhone.
- Add fingerprints on your Mac.
- Keep your Apple ID secure.
How do I keep everything private on my iPhone?
To keep your browsing private on your iPhone, you should simultaneously use a VPN like Surfshark and Private Browsing. To improve your online privacy on the iPhone, turn off location tracking, ad tracking, and cross-app tracking.
Can someone access my iPhone remotely?
Yes, it is technically possible for someone to access an iPhone remotely, but it’s unlikely to happen due to how expensive the process is. One way to lessen the chances of a remote or online hack is to use an iOS VPN.
How do I change my Privacy settings?
Access Privacy settings from the Settings menu. Choose an app or category to manage and control what information they track and what parts of your iPhone are accessible.
What settings should I turn off on my iPhone for Privacy?
To enhance privacy and block ad tracking on your iPhone, follow these steps:
- Open Settings and tap Privacy.
- Tap Apple Advertising and turn Personalized Ads off.
- Get back to the Privacy tab and tap Location Services.
- Turn Location Services to stop location-based ads.

