

Apple devices like Macs have a glowing reputation for being safe, but they can still get malware.
Whether it sneaks in through a fake update or a suspicious email link, malware can slow down your Mac, steal data, and cause crashes.
But don’t be alarmed. This guide walks you through simple steps to check for malware on your Mac and clean infections to keep your machine safe.
Signs your Mac may be infected with a virus or malware
Before you dive into a malware scan, watch for these red flags that signal trouble on your Mac.
- Sluggish performance: hidden processes like malicious software can eat up your CPU (Central Processing Unit) resources. You may see your Mac start to heat up, your fans spin loudly, or your apps freeze;
- Unwanted pop-ups: seeing more pop-up ads or security alerts is another sign there’s malware on your Mac;
- Browser redirects: getting sent to random pages while surfing? Seeing an all-new browser homepage you didn’t set? Unexpected redirects like these often indicate adware or browser hijackers, which can send you to malicious sites without you ever knowing;
- Unfamiliar apps or files: malware frequently installs itself with generic names so it doesn’t stand out. Check your Applications or Login Items for any programs that sound strange or aren’t recognized;
- Spam coming from your accounts: if anyone from your social circle says they’ve received strange messages from your email address or social media accounts, your Mac may have been infected with malware that’s trying to spread to other users.
How to check for malware on Mac
You can use a mix of built-in tools and reputable antivirus software to uncover malware hiding in your system. Here are the best ways to spot malicious software on a Mac:
Inspect with Activity Monitor
Activity Monitor is a built-in macOS feature that shows every app and background process running on your Mac. It also displays real-time CPU, memory, and disk usage, so you can find any program that’s acting suspiciously or hogging system resources.
- Click on the Apple menu bar and open Applications > Utilities > Activity Monitor.
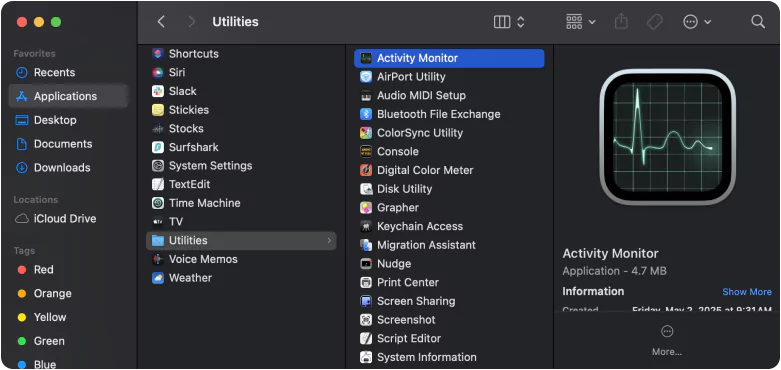
- Click the CPU tab and sort by % CPU.
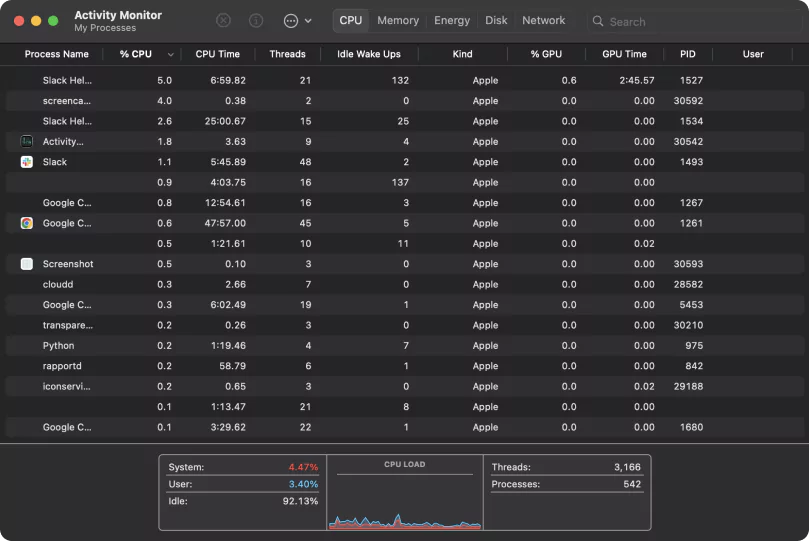
- Start at the top of the list and note any unknown processes. You can search for each one online to verify if they’re legitimate software or likely virus threats.
Review Login Items
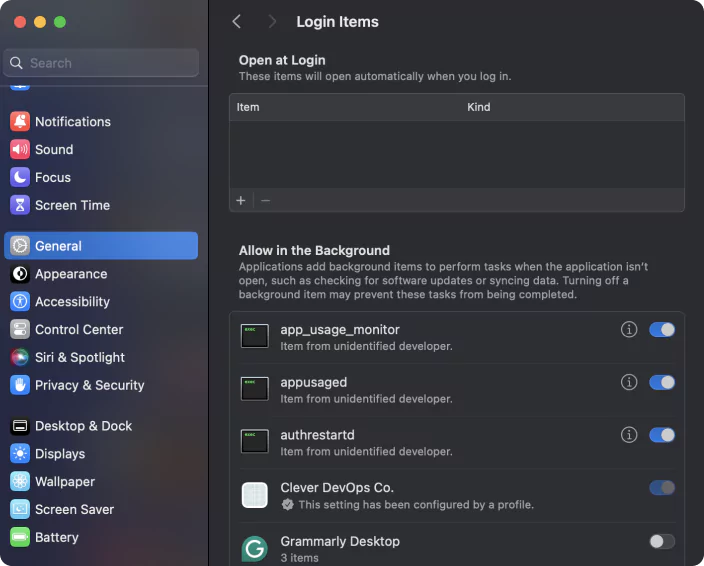
Your Login Items are the apps and tools Mac computers automatically launch when you log in. Removing malware or unknown items here stops them from starting up and reduces hidden background activity.
- Go to System Settings > General > Login Items.
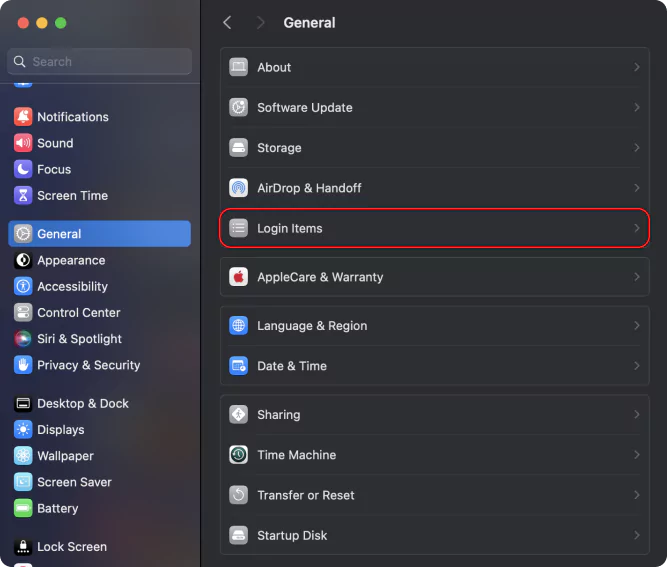
- Review the listed entries and remove any apps you didn’t install yourself. Malware often uses Login Items to relaunch itself, so this can help keep your Mac safe.
Audit your applications
Mac users can use their Applications folder to find every app installed on their device, including those that come with macOS and anything they downloaded themselves from the App Store or a developer’s website.
- Open the Finder and click Applications to see all your apps.
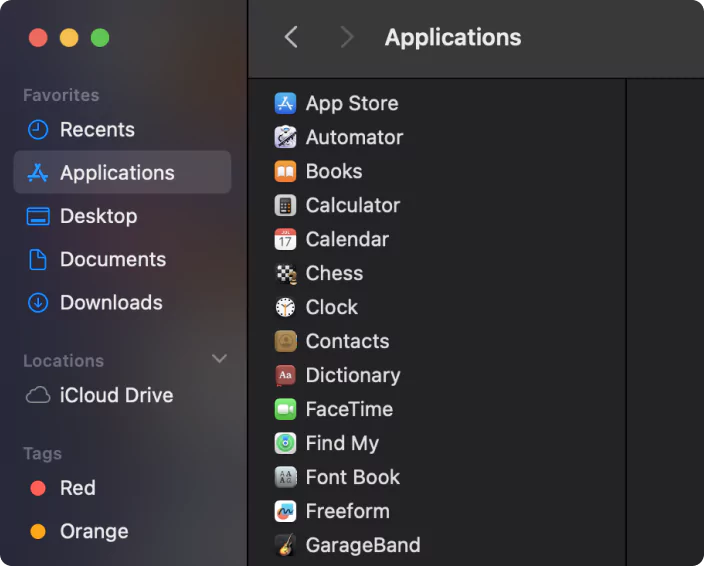
- Browse the list for any app or installer that has an odd name or doesn’t look familiar. Look them up online to see what’s legitimate and what’s tied to known viruses.
Run a dedicated virus scan
Install a trusted antivirus on your Mac to scan for viruses, adware, and other malware. With software like Surfshark Antivirus running behind the scenes, your Mac is better protected from malware attacks thanks to the real-time protection feature.
How to check for malware with real-time protection
- Open the Surfshark app, and click the Antivirus tab.
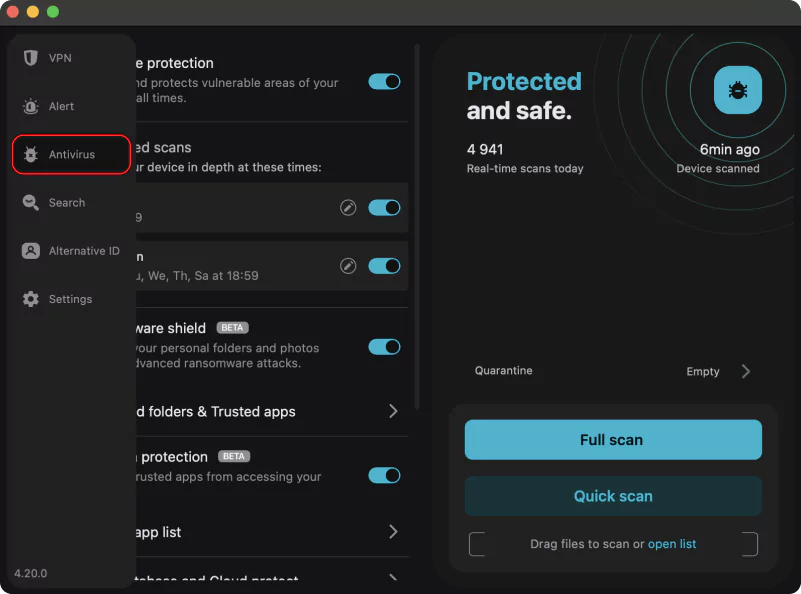
- Toggle Real-time protection on.
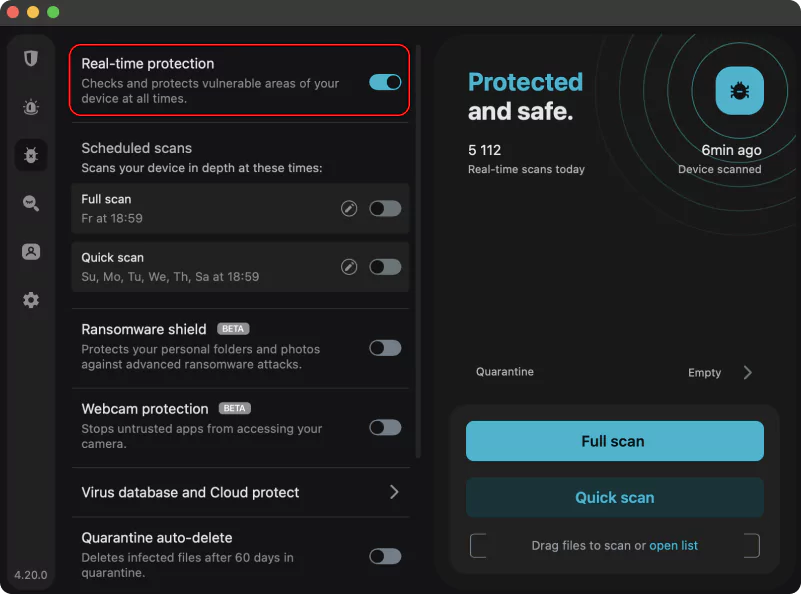
With real-time protection enabled, Surfshark Antivirus will automatically scan for threats whenever you open an app or download a file. These anti-malware capabilities keep you safer at all times.
How to check for malware with manual scans
Alternatively, you can run manual antivirus scans to check for malicious software on your Mac.
- Open the Surfshark app, and click the Antivirus tab.
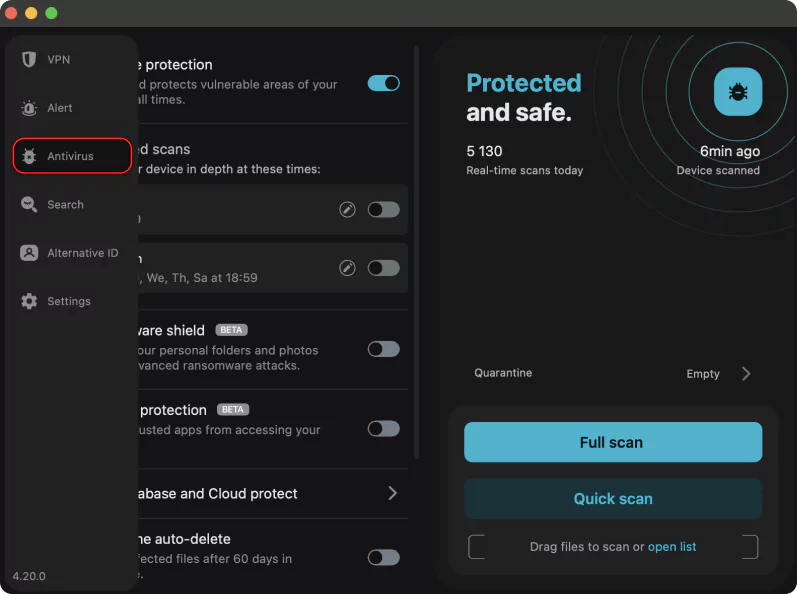
- Click Full scan or Quick scan. A quick scan focuses on commonly targeted areas like your Desktop and Download folder, while a full scan will check every file and folder on your Mac.
Full and quick scans can also be scheduled. Surfshark Antivirus even has a drag-and-drop virus scanner that checks individual files and folders when needed.

How to remove malware from Mac
Mac virus removal isn’t that complicated. In fact, you can take several simple steps to remove malware from your Apple device.
Manually remove apps
If anything looks suspicious or infected, and you can find it yourself, you can manually remove it with just a few clicks.
- If an app has been infected with known malware, drag it from your Applications folder to the Trash.
- To delete the malware from your device, click Empty inside your Trash and then Empty Trash.
Clean up browser extensions
Removing unwanted browser extensions is useful when you’re looking to remove malware from Safari on your Mac.
- Open Safari and go to Settings and then Extensions.
- Select any suspicious add-on and click Uninstall.
The process is similar for other browsers, like Chrome or Firefox. Open the browser, go to your settings, find your extensions, and follow the on-screen instructions to remove them.
Restart your Mac in Safe Mode
Safe Mode only loads essential services, so most login items, extensions, and background apps are disabled. This makes it easier to remove stubborn malware from your Mac. The exact steps to do this depend on your Mac’s processor.
Start your Mac in Safe Mode with Apple silicon
- Shut down your Mac. Then, press and hold the power button until you see Loading startup options.
- Select your startup disk, hold Shift, and click Continue in Safe Mode.
- Log in with your normal credentials.
Start your Mac in Safe Mode with Intel
- Restart or turn on your Mac and immediately press and hold Shift.
- When the login screen comes up, release the Shift key.
- When you see Safe Boot, you can log in with your normal credentials.
Safe Mode can prevent malware from launching and make detecting and deleting suspicious items easier. In Safe Mode, you can check the Activity Monitor, clear Login Items, manually review and remove system files, and run antivirus software.
After cleaning up, restart normally to see if the issues are gone.
Use macOS recovery tools
MacOS users can turn to Apple’s own recovery tools if they encounter malware on their device. MacOS Recovery is a built-in toolset that helps you fix more serious problems and remove malware that won’t go away through other methods.
Here’s how to access macOS Recovery:
- Apple silicon Macs: restart your Mac and hold down the power button until Load startup options appears. Then choose Options and click Continue;
- Intel-based Macs: restart your computer and immediately hold Command (⌘) + R until you see the Apple logo or spinning globe.
Once in macOS Recovery, you can take the following actions to remove any malware on your device:
- Reinstall macOS: choose Reinstall macOS from the Recovery menu to install a clean operating system version without deleting your personal files. You’ll wipe out malware that’s embedded in your system files;
- Use Disk Utility: in Disk Utility, run First Aid on your startup disk to check for and repair errors. While it’s not explicitly designed for malware, fixing disk permissions and integrity can help restore normal Mac performance after an infection.
- Open Terminal access: tech-savvy users can open Terminal in Recovery Mode to manually delete malware, suspicious launch agents, or hidden scripts;
- Erase and restore: if malware keeps returning or you can’t regain control of your Mac, you can completely erase your disk and reinstall macOS with its factory settings. But treat this as your nuclear option, and only do this after backing up your personal files.
Quarantine and delete files with an antivirus
Antivirus and anti-malware tools don’t just detect malicious software — they remove it, too. Solutions like Surfshark Antivirus can isolate threats, rendering them harmless until you delete them permanently.
Here’s how it works:
- Run a Full scan or Quick scan in Surfshark Antivirus, schedule a scan, or toggle on Real-time protection.
- Surfshark Antivirus will notify you when a dangerous file is found and moved to Quarantine. Click Quarantine to see all isolated files.
- Review the items in your Quarantine folder. Select the ones you don’t want to keep and delete them permanently with one click. You can even toggle on Quarantine auto-delete to have Antivirus automatically remove infected files after they’ve been in Quarantine for 60 days.
How to protect your Mac against malware
Recent research found that 6% of all malware was distributed on Macs. While relatively low compared to Linux and Windows, you should still adopt these best practices to stay malware-free on macOS.
Keep your software up to date
Outdated apps and operating systems are more likely to have vulnerabilities that malware can exploit. Updating everything on your Mac, from apps to macOS itself, will boost your chances of staying malware-free.
Routinely check your System Settings or the App Store for updates. Remember to have your Wi-Fi connection on to download any new software.
Only install from trusted sources
Only download software from the App Store or trustworthy developers. Avoid free apps on sketchy or unknown sites, and ignore requests for software updates that don’t come directly from Apple or the apps you’re actually using.
Don’t click on suspicious links
Cyber hygiene can go a long way in stopping malware-designed attacks. Watch where you’re surfing, and don’t click on anything that looks risky. Stay away from unexpected email attachments, as these are often used to distribute malware.
To further protect your Mac, use strong passwords and enable two-factor authentication (2FA) on all your online accounts. Unique passwords can prevent malware from accessing apps, files, or sensitive data, ultimately limiting the damage malicious software can do.
Use an antivirus and cybersecurity suite
With a lightweight antivirus like Surfshark Antivirus, you can run scans that prevent new viruses from harming or entering your device as you access a site or download something. Real-time scans work 24/7 and can flag programs that are behaving unexpectedly, quarantining threats before any damage is done.
Better still, Antivirus comes bundled with Surfshark’s all-in-one cybersecurity suite for greater protection. Surfshark VPN (Virtual Private Network) offers greater online privacy — a VPN for macOS encrypts your internet traffic on any Mac application and helps protect it from hackers — and features like Clean Web block malicious ads on your device.
Mac malware removal made easy
Malware attacks are on the rise. Thankfully, detecting, removing, and preventing malware on your Mac can be achieved with a few common-sense steps and powerful anti-malware tools like Surfshark Antivirus.
Antivirus gives you reliable protection against malware and other online threats. With features like webcam protection, a spyware shield, and fully customizable scans, Antivirus is a smart choice when looking to keep malware off your Mac.

FAQ
How do I run diagnostics on my Mac?
To run diagnostics on an Intel-based Mac, shut down your Mac, turn it back on, and immediately press and hold the D key until you see the diagnostics screen. Follow the on-screen instructions to check for any hardware issues.
If you’re using Apple silicon, hold the power button until you see Options, and then press Command (⌘) + D.
Keep in mind that running diagnostics checks your Mac’s hardware — it doesn’t scan for viruses. To check for malware, use antivirus software like Surfshark Antivirus.
How do I get rid of a Mac virus alert pop-up?
To stop seeing a virus alert pop-up on your Mac, close your browser windows or apps showing the alert. Clear your browser history and remove any suspicious extensions. If the pop-up keeps returning, scan your Mac with a trusted antivirus — like Surfshark Antivirus — to check for adware or malware that may be causing it.
Does Mac have built-in virus detection?
Yes, macOS includes built-in virus detection tools like XProtect and Gatekeeper. XProtect checks for known malware, and Gatekeeper blocks unauthorized apps.
While these generally help keep your Mac safe, they don’t catch everything, so adding a reputable antivirus program will still give you extra protection, especially against newer or more complex threats.
How long does a virus scan take?
The duration of a virus scan depends on your Mac and the type of scan.
A quick scan usually takes a few minutes and checks only the most common trouble spots. A full system scan can take anywhere from 10 minutes to over an hour, especially if you have a lot of files or apps to inspect.
Leading antivirus tools let you keep using your Mac during any scan without negatively affecting performance.