
If you know anything about network management, you know it can be challenging, especially for a beginner. The freedom to control your network settings is paramount for some activities. One way to manage your network settings and security is through NAT.
Table of contents
What is NAT?
NAT, or Network Address Translation, is a set of procedures that translate your network’s private IP (Internet Protocol) addresses to one public IP. Given the limited number of IPv4 addresses available, NAT is the stopgap measure to prevent IP address overuse until everyone adopts IPv6 (ETA: not soon).
To understand how NAT works, one must have a good idea of network packets. A packet is a set of data that a computer or server sends to another network entity.
This packet is released from your private address (your computer) and is sent through the modem. The router modifies the packet by stripping away your private address and replacing it with a public one.
Without a router, you’d have a static NAT. A static NAT happens when your IP address doesn’t change from private to public, leaving you exposed.
What are the different NAT types?
There is no single definition of NAT types as they’re just approaches, not actual apps, and might be different based on the device. Here’s an example of the most common NAT types:

Open NAT type
Open NAT type, or NAT Type 1, disables router or firewall restrictions and allows your devices to connect to the internet directly. This NAT type allows fast server connections, minimal lag, and a seamless online gaming experience.
However, it’s a lot like leaving your front door unlocked — convenient but less secure. With disabled firewall protections, Open NATs leave your network more exposed to potential threats.
Moderate NAT type
Moderate NAT types are the happy middle between open and strict. There is a small number of open ports, enabling restrictions for most network connections.
For any network connection, moderate NAT type provides the best of both worlds. Still, it is kind of like leaving your door unlocked.
Strict NAT type
Strict NAT types disallow all data from traveling through your local network. They are the safest type of NAT setting, as they prevent most attacks against your computer.
Strict NAT type is less popular because they prevent connected devices from communicating and your ability to join with other servers. So, if you are a gamer, you constantly run into lag and often find yourself unable to access most servers.
How to check NAT type on PC:
The most efficient way to check your NAT type is the following:
- Press the Windows key and R.
- Enter cmd and press Enter.
- Type ipconfig in the new window and press Enter.
- Write down the address next to the Default Gateway line.
- Enter that address into your browser.
- Access the settings of your modem (most modems have passwords set to blank, admin, or password).
- Find the NAT type under internet settings (varies from modem to modem).
Now that you know what you’re dealing with — and have the default gateway address — you can go forth and change the NAT.

How to change the NAT type on a PC: 5 methods
There are five methods you can use to change your NAT type on a PC:
- Turning on UPnP
- Port forwarding
- Activating Network Discovery
- Editing your router’s configuration file
- Enabling DMZ mode
Read below to see how you can go through each method:
Method #1: Turn on UPnP on the router
UPnP, or Universal Plug and Play, is a protocol set that allows devices to connect and applications (primarily gaming) to automatically forward ports.
As you might expect, having automatically open ports poses a significant security risk. Hackers might use these port exposures to steal your data, gaining access to your local network.
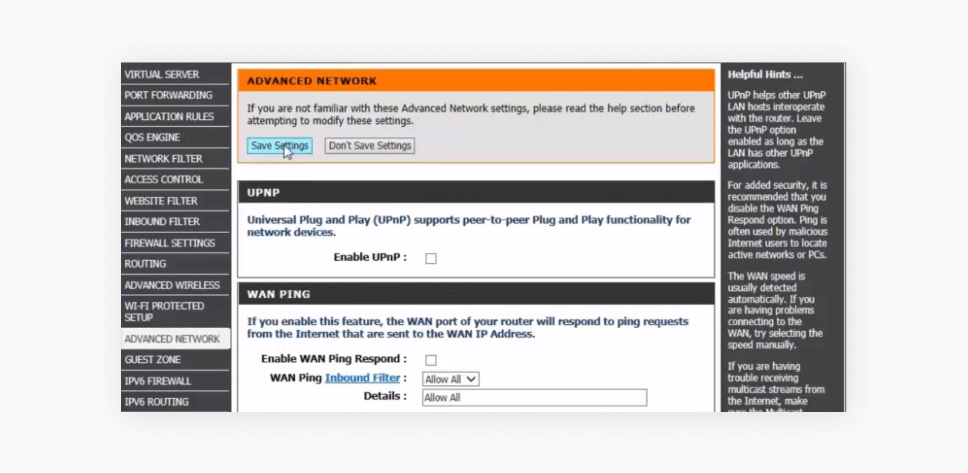
To activate UPnP, you will typically find it under a router’s advanced network settings. Here are the detailed steps:
Step 1. Find your router’s IP address.
Step 2. Enter the IP address in your preferred browser and log in.
Step 3. Go to your router’s advanced settings.
Step 4. Find the Enable UPnP box/button.
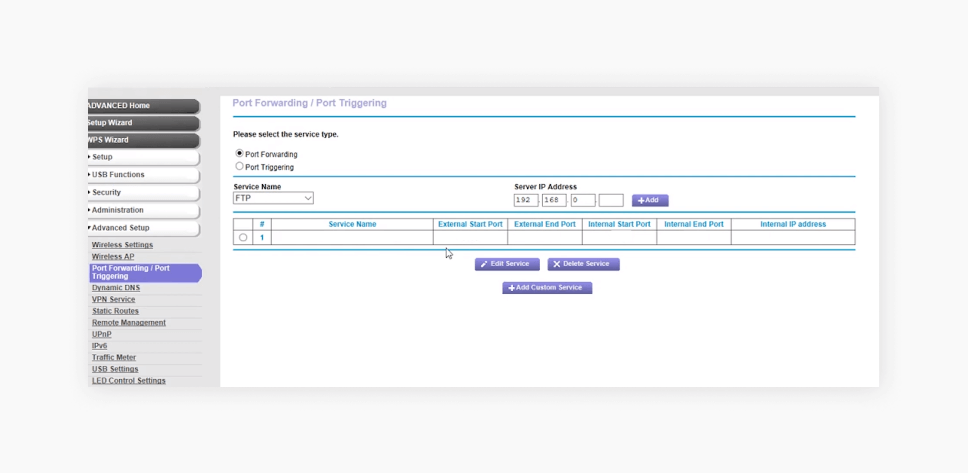
Port forwarding is a more controlled version of UPnP. Unlike having ports automatically opened via router settings, you have manual control of the ports you want to open up.
Much like UPnP, having a port open exposes you to some security risks. However, you have control over the open ports, so you can choose to close them at any time.
Before you begin, you need to know your preferred port for your game (or app). You might find this on the creator’s website, but you can also find it through third-party online sources.
After that, you can follow our guide for VPN port forwarding across multiple operating systems. Otherwise, here are some quick instructions that apply to almost any router model:
Step 1. Find out which ports you need (you can do so at portforward.com).
Step 2. Go to your router’s configuration page.
Step 3. Go to your router’s advanced settings.
Step 4. Find the setting that says enable port forwarding.
Step 5. Input the port number details from Step 1.
Depending on your router model or internet service provider, your router might have a series of preset ports available for current games. You should find them under the same advanced settings.
Method #3: Turn on Network Discovery on Windows
Network Discovery offers numerous local network benefits, including increased internet speed and the ability for devices to easily find each other on Windows. With all the devices able to communicate, it is the computer-side version of UPnP.
To enable it, you can follow these quick instructions for Windows 10:
Step 1. Open the Windows control panel.
Step 2. Click on Network and Internet and go to the Network and Sharing Center.
Step 3. Click on Change Advanced Sharing Settings.
Step 4. Find the Network Discovery subheading.
Step 5. Click on the bullet next to Turn on Network Discovery.
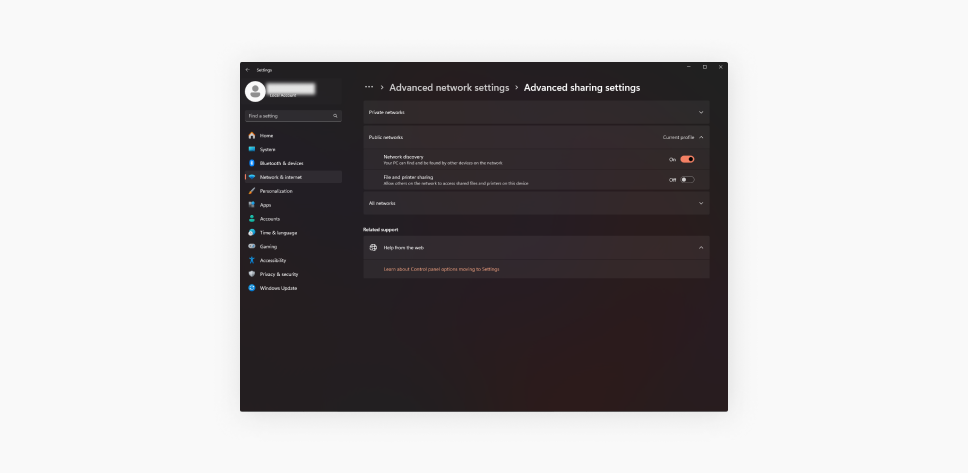
Quick instructions for Windows 11:
Step 1. Open the Settings app.
Step 2. Click on Network & internet.
Step 3. Click on Advanced network settings.
Step 4. Click on Advanced sharing settings.
Step 5. Toggle Network discovery on.
Be sure to do this only with your local area network. Activating UPnP, forwarding ports, and activating network discovery mode can all potentially expose your computer.
Method #4: Edit the configuration file
A router’s configuration file controls everything your routing device does, including security, network traffic, and any port forwarding you want.
Any changes to your configuration file should only come after you’ve made a backup.
Here are some instructions you can follow to change your config file easily:
Step 1. Open your config file using Notepad (should happen by default).
Step 2. Click ctrl+F and search for the last bind.
Step 3. Type bind application=CONE(UPD) port=XXXX-XXXX with X’s replaced by the desired port number.
Step 4. Save your changes.
Step 5. Go into your router and search for the option to load/restore configuration file.
Step 6. Select your edited file.
Step 7. Restart your PC.
Older routers might rely entirely on changing config files. However, accessing your port forwarding via router settings will do much of the same thing.
Method #5: Enable DMZ mode
A router’s DMZ (demilitarized zone) refers to a single user being completely exposed to the internet. Typically, you see this done in moments of desperation when users struggle to set up port forwarding or change other router settings.
Network specialists will prefer that you use port numbers or a router’s control panel over this method. DMZ modes are not security-friendly, but they are one way to change your NAT type.
Here are the steps:
Step 1. Open your router’s configuration page.
Step 2. Go to your router’s advanced settings.
Step 3. Find DMZ mode and insert a manual IP address (the same static IP address from your IP config readout).
DMZ mode should only be used in emergencies, like a video conference meeting that needs to happen. If you want to play video games with your buddies, DMZ mode isn’t worth it.

NAT type connectivity issues
Sometimes, connectivity issues are caused by mismatching NAT types between your router and the service you’re trying to reach. What does a mismatch look like? You may be able to play the game online, but the voice chat doesn’t work.
A mismatch of NAT types means that not all of the information is being exchanged between two IPs. That happens because your router’s firewalls block some of the data.
To help you troubleshoot your way through common NAT connectivity issues when gaming, here’s what they look like:
- No voice chat;
- Not being able to play with some people;
- Sometimes matches won’t load or start (matchmaking is barely and rarely possible);
- Can’t host games;
- Lagging when you’ve got great internet speeds and great connection;
- You’re getting thrown out of lobbies for no apparent reason.
The table shows what NAT types can exchange information (different NAT types that can play multiplayer games together and hear each other over voice chat).

What to expect from different NAT types when gaming
- Open — this NAT type can play with every other type, as well as chat and host matches. When playing, you’ll experience zero lag issues, but your security will be at risk because anyone can connect to your network.
- Moderate — you’ll be able to play with people who have open and moderate NAT types, and, in most cases, you won’t be the host of a multiplayer match.
- Strict — you can only play with people who have the open NAT type. This is the safest option, but it has a cost — sometimes, you might experience lag and some in-game functions not working.
Why would you want to change NAT types?
Changing NAT types enables you to have control over your network experience. An open NAT results in a faster internet connection with fewer speed bumps. However, the lack of security is concerning.
If you are a gamer, you probably know more about the benefits of moderate or open NATs than anyone. Lower lag and easier connectivity are necessary for any multiplayer endeavor (any that isn’t PBEM, obviously).
A faster internet connection through less stringent NATs also helps server hosts. Port forwarding is a must for gaming, so you need a less strict NAT.
However, security-conscious gamers need to consider an alternative: getting a VPN.
Is it safe to change your NAT type?
Changing the type of your network address translation can pose various risks. The open NAT type is less secure than the moderate or strict NAT type, and changing it might jeopardize your security.
So, fiddle with your NAT settings only if you properly understand what you’re doing, what the change in the NAT type will achieve, and what risks you’re exposing yourself to.
Getting a VPN is a better alternative than changing NAT
Changing the NAT type can compromise your network security. Instead, a VPN for PC enables you to secure your data while maintaining solid gaming speed. Seems like it would be a good idea to look into Surfshark.

FAQ
How do I change my NAT type to open?
Enable UPnP. You can do that by following these steps:
- Open your web browser and type your IP address into the address bar.
- Fill in your login info.
- Look for UPnP settings (usually goes under Settings / Advanced Settings / Network Settings).
- Enable UPnP, reset the router, and restart your device.
Word of advice — changing your NAT type to open leaves you unprotected from hacking attacks. To ensure the least amount of lag and the most security, use a VPN.
Can you manually change your NAT type?
Yes, there are five different ways to change your NAT type: the UPnP method, port forwarding, the Network Discovery method, using a configuration file, or enabling the DMZ mode. However, the safest and easiest option is to use a VPN. It will bypass NAT restrictions while simultaneously keeping you safe and letting you enjoy lag-free gameplay.
What is NAT type 2?
NAT type 2, also known as moderate NAT, means that your device is behind a firewall with some restrictions. It is more secure than open NAT (type 1) but less safe than strict NAT (type 3). NAT type 2 may slow down your internet, and you may experience a little lag when gaming.
How do I change my NAT type without access to my router?
Since the NAT type is configured on the router, you need access to the router to change it. However, if you don’t have direct access to the router, you can try contacting your ISP and asking them to change your NAT type. In some cases, connecting your device to a VPN hotspot might connect you to a moderate NAT type instead of the strict type.
How do I change the NAT type on Xbox?
First, identify your Xbox NAT type by going to Settings > Network > Network settings and see the current NAT type. If you need to change it, you can do so via Port Forwarding or enabling UPnP on your router.