
A DNS (Domain Name System) is how the internet translates human-friendly domain names into numeric IP (Internet Protocol) addresses for computers to find websites and services. Sometimes, it’s worth changing your DNS to get higher internet speed or restrict age-inappropriate content. In this article, I will walk you through how to do this manually on Windows and Mac.
What is DNS, and why should you change it?
First, you should have a clear idea of what DNS is used for to understand why or how to change it. So, let’s explore what it is:
What is DNS?
A DNS functions as the internet’s phone book, which converts simple domain names (like www.example.com) into numerical IP addresses that computers can read. This allows users to access websites without remembering complex IP addresses, similar to how a phone book links names to phone numbers.
Why change your DNS?
The default DNS is usually set by Internet Service Providers (ISPs). When you connect to the internet, ISPs assign their own DNS servers to handle domain name requests. But you may want to change them for a couple of reasons, such as:
- Improving performance: default DNS servers may sometimes be slow or overloaded. To avoid this, you can switch to a public DNS service like Google DNS or OpenDNS and get better browsing speed when accessing multiple websites at a time;
- Enhancing security: some third-party DNS providers offer extra security features, like blocking malicious websites, phishing attempts, and malware. That’s why, for better protection against cyberthreats, you can choose a custom DNS instead of a default ISP server;
- Avoiding ISP tracking: ISPs can track your browsing history through DNS servers. If you are privacy conscious, choose an alternate DNS service to prevent your ISP from monitoring or logging your internet activity. However, if you’re unsure whether to use a DNS or Smart DNS for better privacy and performance, read our comparison on Smart DNS vs. DNS;
- Preventing DNS hijacking: DNS hijacking occurs when hackers or malicious actors alter DNS requests to redirect users to harmful or fraudulent websites. To avoid this, you can use a secure DNS service and reduce the risk of being a threat victim;
- Fixing connectivity issues: when your ISP’s DNS is unreliable or prone to outages, it may create connectivity problems or slowdowns with specific websites. To overcome this problem, you can switch to a public DNS server and restore stable access to those sites;
- Getting ad blocking and content filtering capabilities: changing your DNS can also help you avoid being bombarded by unwanted ads and restrict access to inappropriate content using third-party features. This is specifically ideal for family use or workplace networks.
How to change DNS on Windows
Now that you know why you may want to change your DNS settings, let’s see how you can do it on different Windows versions:
How to change DNS on Windows 10
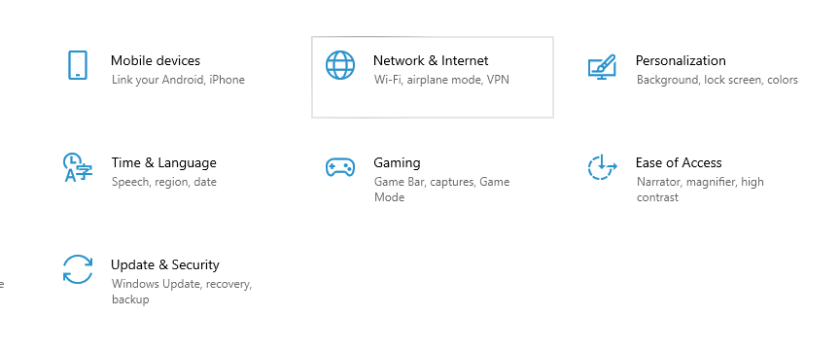
- Click the Start menu and select Settings (the gear icon).
- In the Settings window, go to the Network & Internet option.
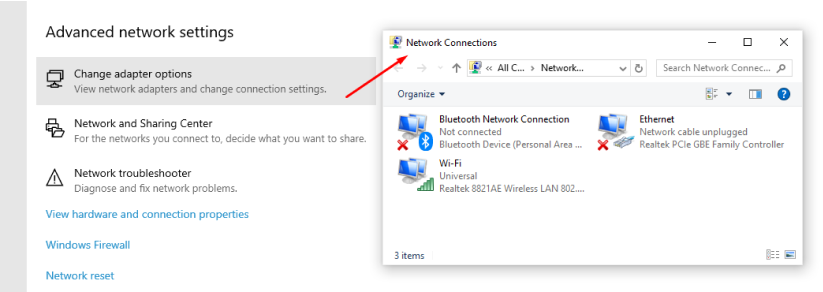
- Now, select Change adapter options under the Advanced network settings section. This will open the Network Connections window.
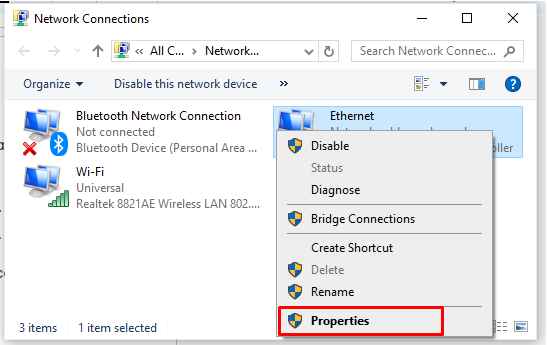
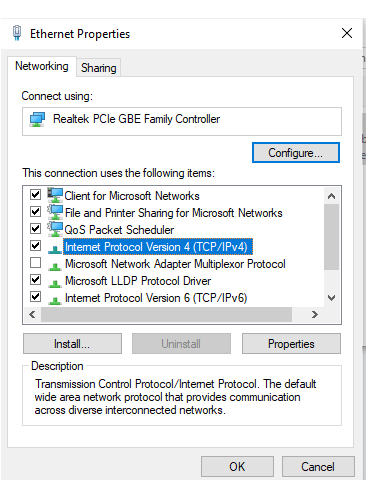
- Right-click on the network connection you want to configure (such as Wi-Fi or Ethernet) and select Properties from the context menu.
- In the Properties window, find and select Internet Protocol Version 4 (TCP/IPv4) from the list, then click on the Properties button below it.
- Select Use the following DNS server addresses in the Internet Protocol Version 4 (TCP/IPv4) Properties window.
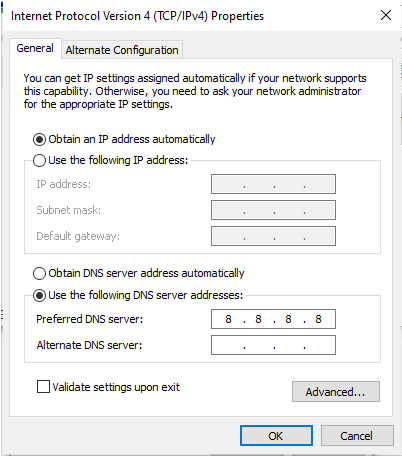
- Enter your preferred DNS server addresses. For example:
- In Google DNS: the preferred DNS server is 8.8.8.8
- In Cloudflare DNS: the preferred DNS server is 1.1.1.1
- In OpenDNS: the preferred DNS server is 208.67.222.222
- Click OK to save your DNS settings.
To ensure the changes take effect, restart your computer.
How to change DNS on Windows 11
- Go to Settings from the Start menu.
- In the Settings window, click the Network & Internet option from the sidebar.
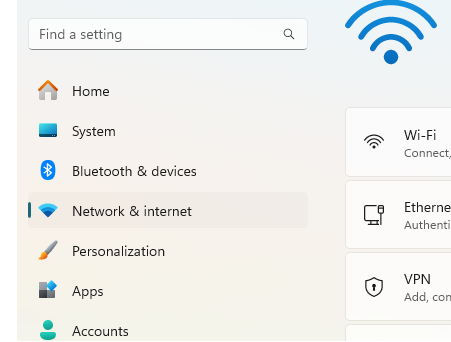
- Scroll down and click Advanced network settings.

- Under Network adapters, find your active connection (Wi-Fi or Ethernet) and click View additional properties.
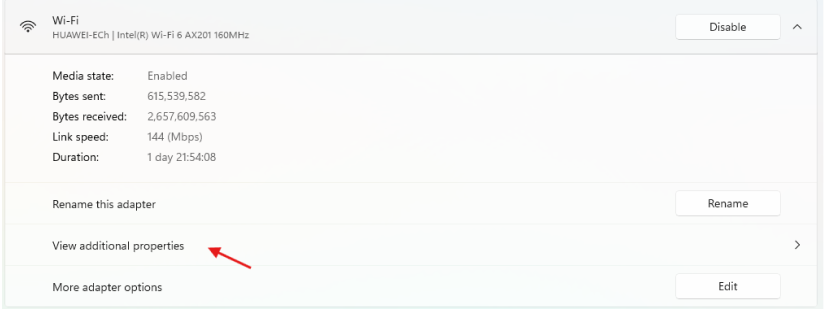
- In the DNS server assignment section, click the Edit button, choose Manual, turn IPv4 on, and enter your preferred DNS server addresses.
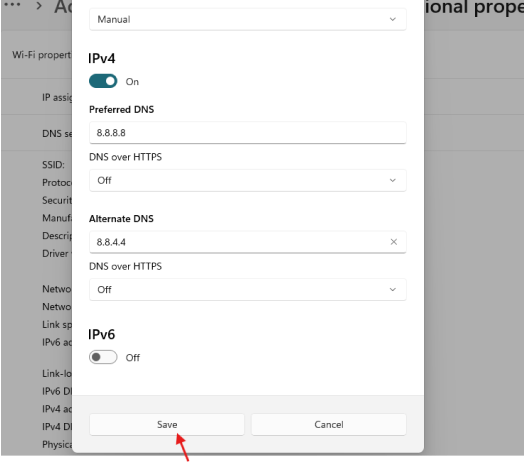
- Click Save to apply the changes.
Restart your computer to check if new DNS settings were applied.
How to change DNS on Mac
Changing your DNS on Mac is somewhat similar to how you do it on Windows. However, there are just a few different steps:
Steps to change DNS on macOS
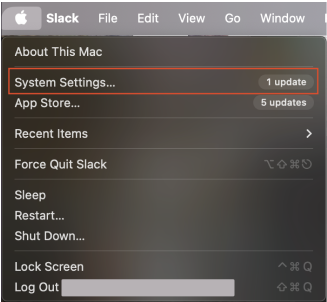
- Click the Apple logo and go to System Settings.
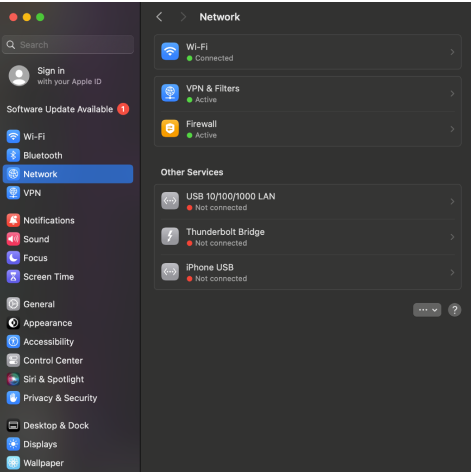
- From there, click on the Network option in the sidebar.
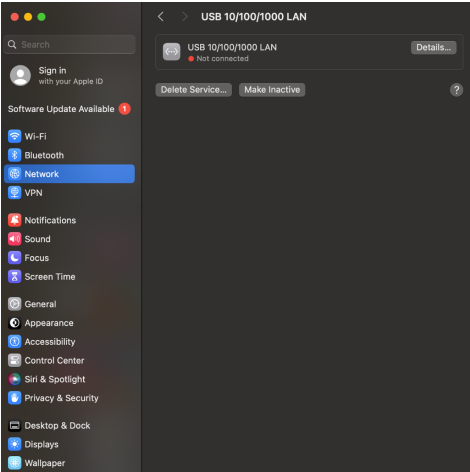
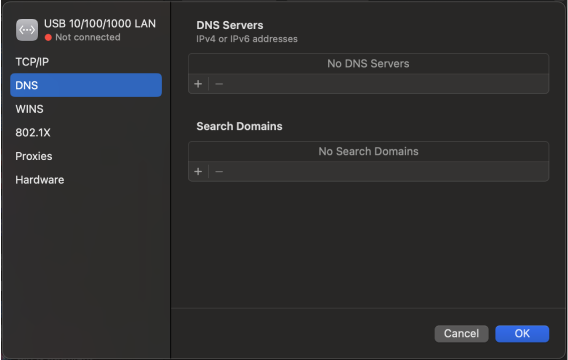
- From the available list, select the Network service > Details > DNS.
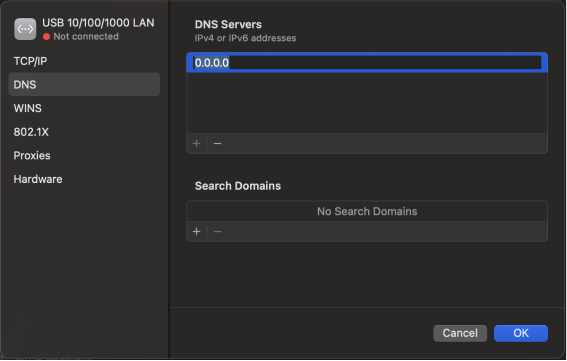
- Click the + button under the DNS Servers. Then, add your DNS address.
- Click OK to save your new DNS settings, then click Apply on the Network window.
Ensure the changes have taken effect by turning your Wi-Fi connection off and on again.
How to change DNS on your router?
You can also change the DNS settings on your router, which will automatically connect all your devices to the new DNS. This way, you can enjoy the benefits of the new DNS across your whole network.
Here’s why you should consider changing your DNS to a new one:
- Improved performance: using faster DNS providers like Google DNS or Cloudflare on your router can reduce latency and enhance browsing speed on all connected devices;
- Better security: third-party DNS services may block malicious websites, phishing attempts, and malware to intercept your browsing activity through your router IP;
- Increased privacy: with a privacy-focused DNS, you can avoid ISP tracking and protect your browsing activity.
Steps to change DNS on popular routers
- Open a browser and type your router’s IP address into the address bar to open the admin panel.
- Enter your login credentials.
- Once logged in, find the DNS settings. This is typically under sections like WAN, Network Settings, or Internet Settings.
- Look for fields labeled Primary DNS and Secondary DNS and enter your preferred DNS provider addresses:
- Google DNS: 8.8.8.8 (Primary), 8.8.4.4 (Secondary)
- Cloudflare DNS: 1.1.1.1 (Primary), 1.0.0.1 (Secondary)
- OpenDNS: 208.67.222.222 (Primary), 208.67.220.220 (Secondary)
- Comodo SecureDNS: 8.26.56.26 (Primary), 8.20.247.20 (Secondary)
- After entering the DNS addresses, Save the changes.
Once done, restart your router to make sure the changes take effect.
Changing IPv6 settings: is it worth it?
IPv4 (Internet Protocol version 4) is the traditional protocol that most devices use to connect, whereas IPv6 (Internet Protocol version 6) is the next generation of Internet Protocols. It provides a larger address space — which solves IPv4’s limitation and supports the growing number of devices on the internet.
If your ISP provides IPv6 connectivity and your network uses it, changing the IPv6 DNS settings can give higher speed and security. However, if your network primarily uses IPv4, changing IPv6 settings may not have a huge impact.
You can also configure both IPv4 and IPv6 DNS settings for dual-stack support so that your system handles both addresses efficiently. However, unlike IPv4, which uses 32-bit addresses and runs out of unique IP addresses, IPv6 uses 128-bit addresses, boasting trillions of unique addresses.
IPv6 is the future of the internet — it provides a huge address space to accommodate the growing number of devices and internet users. That’s why modern networks are increasingly adopting IPv6 to support more devices, improve routing efficiency, increase security, and reduce the need for NAT (Network Address Translation).
Find out if your ISP supports IPv6
Follow these steps to confirm whether your ISP supports IPv6:
- Check your system settings.
- On Windows: open the Command Prompt and type ipconfig — look for something that starts with IPv6 under Ethernet adapter or Wireless LAN adapter;
- On macOS: Open System Preferences, go to Network, select your connection, click Advanced, and go to the TCP/IP tab and find the IPv6 address.
- Visit websites like test-ipv6.com or ipv6-test.com to check if your network supports IPv6 and is appropriately configured.
- If you need clarification or help, contact your ISP directly and inquire about IPv6 support.
Recommended DNS providers
Most of us use default DNS servers provided by our ISP without knowing many third-party DNS providers offer better performance and privacy features. Let’s look at the top four options:
Google Public DNS
Google Public DNS is a free and globally available DNS service provided by Google to improve internet performance and security. Since 2009, it has been providing faster domain name services using optimized infrastructure to reduce the time it takes to connect to websites and services.
It increases your online security by preventing certain DNS-based attacks, such as DNS spoofing (redirecting users to malicious websites). Unlike many ISP DNS servers, Google Public DNS does not filter or block content, allowing you to have an uncensored internet experience.
In addition, Google prioritizes privacy by not associating DNS queries with user-identifiable information to prevent tracking your online activity.
The service supports both IPv4 and IPv6 addresses:
- For IPv4: the main addresses are 8.8.8.8 (primary) and 8.8.4.4 (secondary);
- For IPv6: the main addresses are 2001:4860:4860::8888 (primary) and 2001:4860:4860::8844 (secondary).
Cloudflare DNS
Cloudflare DNS is another free and privacy-focused DNS service that was launched in 2018. It claims to be the fastest DNS resolver that can reduce latency, which is why it’s also considered one of the best DNS servers for gaming.
Cloudflare also partners with independent auditors to maintain transparency and compliance with privacy. That’s why, unlike many DNS services that log user data, Cloudflare’s 1.1.1.1 DNS does not store personal browsing data or sell user information to advertisers.
Like Google, it also supports both IPv4 and IPv6 protocols:
- For IPv4: the main addresses are 1.1.1.1 (primary) and 1.0.0.1 (secondary);
- For IPv6: the main addresses are 2606:4700:4700::1111 (primary) and 2606:4700:4700::1001 (secondary).
OpenDNS
OpenDNS is a DNS service that provides more secure internet browsing while focusing on advanced features like content filtering and phishing protection. But here’s the best part — you know how sometimes you accidentally click on a phishy link? OpenDNS helps protect you from that.
And if you have kids, you’re going to love this — they have services called FamilyShield and OpenDNS Home. These let you block adult content and other websites you don’t want your kids to see. So they’re perfect if you’re trying to keep your family’s online experience safe and worry-free.
Here’s an overview of its additional security services:
- Content filtering: you can customize the filtering level by blocking specific categories of websites, such as social media, gaming, or explicit content;
- Phishing protection: it automatically blocks known phishing websites to provide an extra layer of security;
- Usage statistics: shares insights into internet activity so parents or administrators can see which websites have been accessed or blocked.
Comodo SecureDNS
Comodo SecureDNS is a free public DNS service developed by Comodo, a cybersecurity company. It provides a strong security-focused service, with advanced protection against online threats like phishing attacks and botnets. In addition, it blocks access to malicious websites by using a threat intelligence database.
Use Surfshark for extra security
Unlike traditional DNS resolution services provided by internet service providers (ISPs), which may track and record your online activity, our new public free DNS server ensures privacy by not logging or banning any data.
If you’re interested in an even stronger layer of security, consider using a reliable VPN like Surfshark. While a simple DNS change improves privacy, our VPN goes further by encrypting your data and masking your real IP address to enhance both security and performance. To confirm our VPN’s performance, you can even run a quick VPN test to ensure your connection is secure.
It’s like getting freedom and protection in one package — perfect for those who want quality performance with privacy while browsing.

FAQ
What does changing your DNS to 8.8 8.8 do?
Using an 8.8.8.8 DNS changes it to Google’s public DNS servers. It is a widely used DNS and is considered very safe.
Is 1.1 1.1 still the fastest DNS?
Yes, Cloudflare’s 1.1.1.1 is one of the fastest DNS services with low latency and increased privacy protection.
Is it OK to change DNS?
Yes, it is safe to change your DNS, and depending on your DNS provider, it can improve latency and provide better privacy.
Can I change my DNS on Wi-Fi?
Yes, you can change the DNS settings for your Wi-Fi connection by modifying your network adapter settings or configuring your router.
Can I use 1.1 1.1 and 8.8 8.8 at the same time?
Yes, you can use 1.1.1.1 as your primary DNS and 8.8.8.8 as your secondary DNS for backup.


